Alumilite Castings Jerry's way

Nubsnstubs

Where is it???
Full Member
Messages
3,466
Reaction score
7,733
Location
Tucson, Arizona
First name
Jerry
Several years ago, I saw a form posted by Alan Trout on another will not be named turning site that was Agarita and Alumilite. It was an absolutely beautiful turning, and I was determined to find out more.

My absolute passion is Flintknapping, and I have a friend in San Antonio, also where Alan Trout lives. So, when there to go to a knapin nearby, I visited Alan and actually handled the piece that I had only seen pictures of. It was better in real life, so I asked questions and got some good education from him.

After getting back home, I managed to scrape up several hundred dollars to get an order from Alumilite Corp. Ordered the Water Clear, some different colors and several powders.

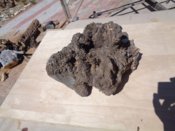
The first task at hand is to determine what type of trash wood I want to turn. Here are 3 examples of some of the wood I like turning. Here is one example.
DSC00109.JPG

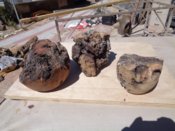
Here are 3 more pieces of rough turned Mesquite, and oak. The large gaps voids you can see get stuffed with pieces of the same wood, mostly pieces that I either cut or broke off the piece before it went onto my lathe
DSC00108.JPG

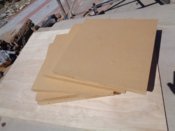
This next picture are the mdf pieces I cut to make the mold. My paint tank is about 9" ID, so these are cut about 8 3/4" square.
DSC00110.JPG

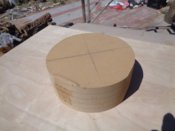
After glue up and cure time, they are cut on the bandsaw.
DSC00112.JPG

The round is then mounted to a face plate, and then trued round on the od, and the center is actually parted off to match the OD of the blank that will be cast. (I sure hope these in order.) DSC00113.JPG
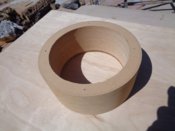
Piece inserted into the main mold. As you can see, there is more to do. DSC00114.JPG
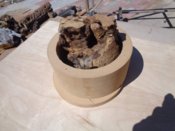
I need more height. Normally, I would do the same as in the previous picture, but sometimes I don't need the total depth, so I just glue up individual rings as needed. I sometimes make the height about 1 1/2" higher than the piece being cast as I don't really know whether the resin will settle fast enough or I'll have too much DSC00115.JPG
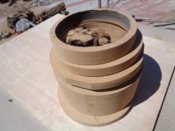
Ignore the resin here, but here are the tooth picks I use to get clearance for the resin to migrate to the bottom. I used to insert a screw through the bottom, but with some of the woods I use, a screw wouldn't work. The screws and or toothpicks are there to keep the piece from floating DSC00116.JPG
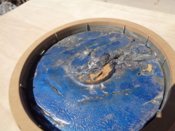
Should be the bottom here. I use a glue block so when the turning is cast, I'll at least have a tenon to mount into. Notice the screw hole. It applies to the failure picture. DSC00117.JPG
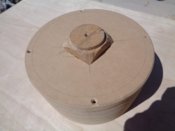
Success, but barely. My resin was just short of covering the bottom of this piece. When I get this turned, no one will ever notice that it was a short pour. DSC00118.JPG More pictures to come. This is all I'm allowed at this time.
 
Last edited:

Nubsnstubs

Where is it???
Full Member
Messages
3,466
Reaction score
7,733
Location
Tucson, Arizona
First name
Jerry
  • Thread Starter Thread Starter
  • #2
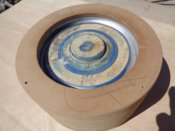
This next picture shows a lose of resin. Notice near the bottom where I stopped turning as I noticed how incomplete my casting was. The resin leaked out of the screw hole.
DSC00119.JPG

A picture of the bottom showing the wood after casting. the wood is from near Quartzsite, Arizona. I'm undecided whether it's young Desert Ironwood, or Palo Verde. DSC00120.JPG

This last picture also shows what a failure looks like. At $1 an ounce, it's disappointing to lose material. DSC00121.JPG

I'll start another thread of not these pieces, but some that have been turned. Any of you that may have any questions, do not hesitate to make it known....... Jerry (in Tucson)
 
Last edited:

woodtickgreg

scroll, flat, spin
Staff member
Administrator
Global Moderator
Founding Member
Full Member
Forum Moderator
Messages
19,724
Reaction score
29,620
Location
Eastpointe, Mi. usa
First name
Greg
Jerry, this is awesome, I would like to move it to the classroom if that's ok with you? It's very educational and I would like to see you share more details about the process if you could, like mixing and pouring, etc.
 

Nubsnstubs

Where is it???
Full Member
Messages
3,466
Reaction score
7,733
Location
Tucson, Arizona
First name
Jerry
  • Thread Starter Thread Starter
  • #6
Greg, if it will get exposure in the classroom, that's ok with me........... Jerry (in Tucson)
 

ripjack13

ɹǝʇɹɐqpooʍ
Staff member
Administrator
Global Moderator
Full Member
Messages
30,850
Reaction score
37,757
Location
Connecticut
First name
Marc
This sooooo interesting. I have thought about doing this, but lack of room in shop and I have too many irons in the fire now. But soon I will.
Nice write up. I cant wait to see the finished piece....
 

Tony

Hardwood Enthusiast
Staff member
Global Moderator
Full Member
Messages
20,489
Reaction score
27,473
Location
San Antonio, TX
First name
Tony
Very, very cool stuff Jerry, thank you!!! There's a lot I don't understand, but I will wait until all is posted and maybe my slow brain will catch on. Tony
 

larry C

Member
Full Member
Messages
981
Reaction score
1,478
Location
Elberta, Alabama
First name
Larry
Jerry, what are you using as a mould release? Also, how many times can you use these moulds?
Just wondering....
Larry
 

barry richardson

Moderator
Staff member
Global Moderator
Full Member
Messages
10,282
Reaction score
16,766
Location
Buckeye AZ
First name
Barry
Outstanding Jerry. I was curious about how this was done. Even thought about reaching out to Allan Trout, but never did...
 

Nubsnstubs

Where is it???
Full Member
Messages
3,466
Reaction score
7,733
Location
Tucson, Arizona
First name
Jerry
  • Thread Starter Thread Starter
  • #12
Larry, I'm not trying to be a smart a-- but, I use a Thompson Bowl gouge as my mold release. I spend a little time making up these molds to fit each piece using MDF because they will get cut away after the Alumilite cures. The molds are sacrificial pieces and not too time consuming, but well worth it after the form is completed. One thing I haven't mentioned yet is the insides of the molds should be painted to prevent the resin from being forced into the MDF. Painting might not be required, but I'd rather do it than find out after the pressure was released to find my resin had passed through the MDF and contaminated my pressure pot. Spray can paint is sufficient.

If you noticed in the second picture of the 3 pieces together, they are solid. In the voids and open spaces, I'll stuff small pieces to build them up to displace some of the Alumilite. Natural edges are out of the picture as the resin is a liquid and liquids always cure or freeze with a level surface. What you end up with is a piece that has an even rim. So, I put in limb, root, or broken pieces I broke off, not cut, but broke or torn off because I don't want any saw cut edges to be seen. I also use a lot of resin in hopes that I will have a good casting and won't have the need to pour in more resin as the colors probably wouldn't match and show a straight horizontal line across the piece.

Posting this yesterday really caught me off guard more than I thought, and I was really ill prepared to explain this that would make sense to someone who hasn't done it yet. I don't articulate my thoughts or procedures very well, and spend way to much time trying to set this to paper or keyboard. Give me some time to get this together, and I'll have certainly a lot more pictures with a clearer explanation of what the pictures are depicting. I want you all to know that your comments mean a lot, and I'll be posting more of my turnings as time goes on. Jerry (in Tucson)
 

Nubsnstubs

Where is it???
Full Member
Messages
3,466
Reaction score
7,733
Location
Tucson, Arizona
First name
Jerry
  • Thread Starter Thread Starter
  • #13
Barry, you should get in touch with him. He's an outstanding individual, and will answer any questions you might have regarding Alumilite. His website is www.tobinhillturning.com BTW, his front page picture on this website is the one that got my interest piqued for casting stuff. Thanks for your thoughts on my procedure. ............. Jerry (in Tucson)
 
Last edited:

larry C

Member
Full Member
Messages
981
Reaction score
1,478
Location
Elberta, Alabama
First name
Larry
Larry, I'm not trying to be a smart a-- but, I use a Thompson Bowl gouge as my mold release. I spend a little time making up these molds to fit each piece using MDF because they will get cut away after the Alumilite cures. The molds are sacrificial pieces and not too time consuming, but well worth it after the form is completed. One thing I haven't mentioned yet is the insides of the molds should be painted to prevent the resin from being forced into the MDF. Painting might not be required, but I'd rather do it than find out after the pressure was released to find my resin had passed through the MDF and contaminated my pressure pot. Spray can paint is sufficient.

If you noticed in the second picture of the 3 pieces together, they are solid. In the voids and open spaces, I'll stuff small pieces to build them up to displace some of the Alumilite. Natural edges are out of the picture as the resin is a liquid and liquids always cure or freeze with a level surface. What you end up with is a piece that has an even rim. So, I put in limb, root, or broken pieces I broke off, not cut, but broke or torn off because I don't want any saw cut edges to be seen. I also use a lot of resin in hopes that I will have a good casting and won't have the need to pour in more resin as the colors probably wouldn't match and show a straight horizontal line across the piece.

Posting this yesterday really caught me off guard more than I thought, and I was really ill prepared to explain this that would make sense to someone who hasn't done it yet. I don't articulate my thoughts or procedures very well, and spend way to much time trying to set this to paper or keyboard. Give me some time to get this together, and I'll have certainly a lot more pictures with a clearer explanation of what the pictures are depicting. I want you all to know that your comments mean a lot, and I'll be posting more of my turnings as time goes on. Jerry (in Tucson)

Jerry, apparently you and I think much the same. I've never tried MDF as a mold, however I do use empty soda bottles, (1 liter and 2 liters), and they are are also sacrificial, in my case, I use a carbide tool, it's amazing how well it works....
Thanks for your ideas, I'll be trying them..
 

woodtickgreg

scroll, flat, spin
Staff member
Administrator
Global Moderator
Founding Member
Full Member
Forum Moderator
Messages
19,724
Reaction score
29,620
Location
Eastpointe, Mi. usa
First name
Greg
Jerry, you are doing a terrific job on this and for the turners here it is very informative. There obviously is a lot of interest in this. Don't worry about being perfect with your presentation and as you put it "being ill prepared" if you miss some detail questions will be asked and all will learn from the questions. It's all about sharing your knowledge with like minded folks. I think back on when I first started turning and heck when I started using the computer to go online to learn things and talk about our craft. I didn't even know how to post a pic to the site. I remember @phinds helping me with that, lol. I was such a newb. And now I try to share all kinds of things with others, hopefully so it will make them think and try things, and be inspired, and learn, and maybe even just look at things a different way. That's what it's all about here on the wood barter. I am watching what you are doing and learning from you! Thank you for that.
 
Top