Band saw experts. Please help.

4jo3

Member
Full Member
Messages
162
Reaction score
163
Location
Pittsburgh
First name
Justin
  • Thread Starter Thread Starter
  • #61
New table and upper trunnion on the way. Hopefully it fixes the issue.

Unfortunately, I’m skeptical. I was first asked to ream the holes which I could probably see that working if there was enough steel there. Which Im doubtful there is.

I can’t see it being the root cause. I have had the trunnion apart and there is minimal play in it everything looked normal. Nothing out alignment/bent. No wear. It’s also a PITA to re-install.

As I write this. I might have an ah ha moment. My bet is if I modify the lower trunnion and cut slots in it and use blue lock tite I should get it to align in the center. That solves one problem. The next would have to be the rotation of the table which is the main issue. Kinda need to think on that one. Maybe just opening/reaming those holes would do it.
 

Nubsnstubs

Where is it???
Full Member
Messages
3,468
Reaction score
7,735
Location
Tucson, Arizona
First name
Jerry
Justin, finally was able to locate my saw. It's been buried in my turning room since November. The distance from the blade to the cover is just at 1/4". I also measured from miter slot to the frame. It's 6 1/2". If yours is the same, then your problem could be above the table. ............... Jerry (in Tucson)
 

V. Kelly Bellis

Member
Full Member
Messages
58
Reaction score
54
Location
Ellsworth, ME
First name
Vance
I forgot to mention. Trunion bolts are tight. I removed the table and the trunion. I had to push max them out to the right. Both the table and the trunion.

Hi Justin,

In three of your photos (great photos, all of them, BTW) shot as viewed from beneath the table, there is a stop bolt/ stud that looks like (Part Number M8X45GB5783Z?) it is resting on the table angle stop block (Part Number JL21010014) bolted to the outer topside of the lower wheel cabinet assembly. I'm guessing that it's threaded into the cast iron table.

If the table and trunion are both positioned as far as they can slide to the right, shouldn't the stop block be to the left of the stop bolt centerline?

I've cropped your three photos that shows what I'm referring below.

Under-Table-Bolt.jpg
 

V. Kelly Bellis

Member
Full Member
Messages
58
Reaction score
54
Location
Ellsworth, ME
First name
Vance
Another question that occurs to me in regards to the flexed/ bent frame theory, and in particular, the photos of the yellow carpenters level against the outer edge, the drawing found in the manual (Frame Assembly, Page 28) shows the outer edge of the frame not being perpendicular to the base and as being tapered with the widest point at the base. The inward facing edge is shown perpendicular with the base. My question, how difficult is it to stretch a taught line along that inward face? I've shown the line in red below. I realize the hinges on both upper and lower cabinet doors will interfere, but maybe the line could be stretched with both doors open?
column-flex.png
 

4jo3

Member
Full Member
Messages
162
Reaction score
163
Location
Pittsburgh
First name
Justin
  • Thread Starter Thread Starter
  • #66
I believe that has always been misaligned. But can’t recall. The bolt does thread into the table. And there is a stop screw that prevents the stop from aligning.


Hi Justin,

In three of your photos (great photos, all of them, BTW) shot as viewed from beneath the table, there is a stop bolt/ stud that looks like (Part Number M8X45GB5783Z?) it is resting on the table angle stop block (Part Number JL21010014) bolted to the outer topside of the lower wheel cabinet assembly. I'm guessing that it's threaded into the cast iron table.

If the table and trunion are both positioned as far as they can slide to the right, shouldn't the stop block be to the left of the stop bolt centerline?

I've cropped your three photos that shows what I'm referring below.

View attachment 184541
 

4jo3

Member
Full Member
Messages
162
Reaction score
163
Location
Pittsburgh
First name
Justin
  • Thread Starter Thread Starter
  • #67
Unfortunately, that piece has sheet metal over it because it is a hollow space where the blade goes. I did put a straight edge on the back thou. There appears to be a slight bow in the middle but nothing crazy that would affect that kind of movement. At least I think. It may have been engineered that way.

Another question that occurs to me in regards to the flexed/ bent frame theory, and in particular, the photos of the yellow carpenters level against the outer edge, the drawing found in the manual (Frame Assembly, Page 28) shows the outer edge of the frame not being perpendicular to the base and as being tapered with the widest point at the base. The inward facing edge is shown perpendicular with the base. My question, how difficult is it to stretch a taught line along that inward face? I've shown the line in red below. I realize the hinges on both upper and lower cabinet doors will interfere, but maybe the line could be stretched with both doors open?
View attachment 184560
 

4jo3

Member
Full Member
Messages
162
Reaction score
163
Location
Pittsburgh
First name
Justin
  • Thread Starter Thread Starter
  • #68
It may not have been in position. As I have had the table on and off a lot. Below is a picture of how it sits.

58F44D3B-75E7-4E80-8AD8-00D55A2A554D.jpeg
 

Otterhound

WB Enthusiast
Banned
Messages
183
Reaction score
353
Location
Manheim , Pa
First name
Richard
Unfortunately, that piece has sheet metal over it because it is a hollow space where the blade goes. I did put a straight edge on the back thou. There appears to be a slight bow in the middle but nothing crazy that would affect that kind of movement. At least I think. It may have been engineered that way.
Have you tried measuring the distance between the blade and the piece of sheet metal you mention at the top and bottom of that sheet metal piece . Being attached to the frame and the blade mounting independently of it , I am guessing that the blade and that sheet metal piece are supposed to be parallel .
 

4jo3

Member
Full Member
Messages
162
Reaction score
163
Location
Pittsburgh
First name
Justin
  • Thread Starter Thread Starter
  • #71
Bearings were checked. I also asked that question to Rikon as well. I put my order in for a Powermatic PM1500.

Now I’m hoping I can get this fixed to sell and recoop my loss. Saw is still under warranty but I had too many issues with it.
 

4jo3

Member
Full Member
Messages
162
Reaction score
163
Location
Pittsburgh
First name
Justin
  • Thread Starter Thread Starter
  • #73
Anyone know the advantage of using a wider blade when resawing. I have a chose between 3/4” and 1” on the new saw. Looking at a resaw king.
 

V. Kelly Bellis

Member
Full Member
Messages
58
Reaction score
54
Location
Ellsworth, ME
First name
Vance
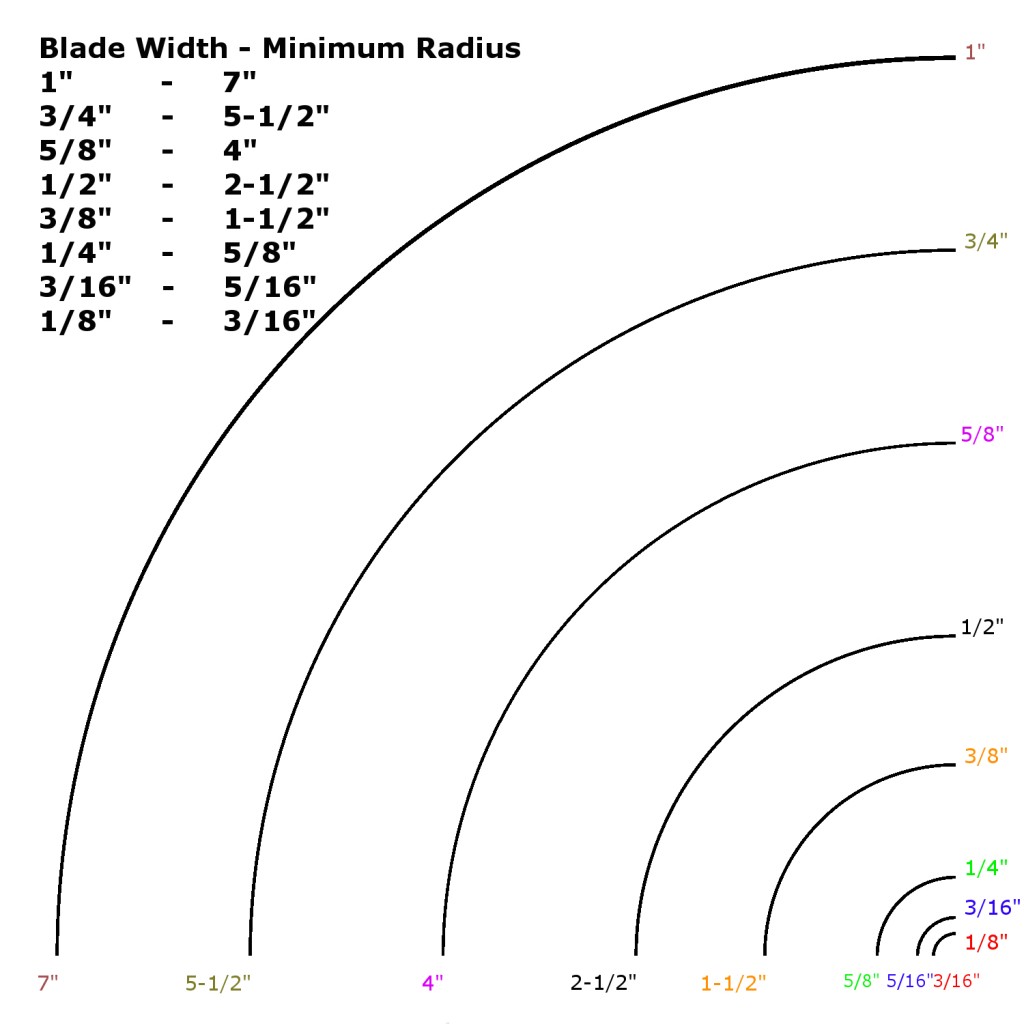
blade-radius.jpg
 

V. Kelly Bellis

Member
Full Member
Messages
58
Reaction score
54
Location
Ellsworth, ME
First name
Vance
This is an informative article for you to check out Justin:
https://www.popularwoodworking.com/projects/premium-resaw-bandsaw-blades/
including the section discussing blade width;

For resawing you want to use the widest blade your saw can handle. A wide blade resists bending as stock is pushed into it. This is commonly referred to as “beam strength.” Another advantage to wide blades is their ability to dissipate heat. The extra metal acts as a heat sink, drawing excess heat away from the teeth. Note: Most 14-in. bandsaws can take a 3/4-in. blade, but be careful! Most 3/4-in. blades are also too thick (.032-in. or greater) for your saw. So, it’s the thickness of the blade that limits how wide a blade you can put on a 14-in. saw. For the most part, you are limited to 1/2-in.-wide blades in order to stay within the .025-in. thickness limitation. Some notable exceptions are Olson’s All-Pro (AP77105) and Grizzly’s Carbide Embedded blade, which are 5/8-in. wide. The Timber Wolf AS-S series is 3/4-in. wide but only .025-in. thick.
 

Otterhound

WB Enthusiast
Banned
Messages
183
Reaction score
353
Location
Manheim , Pa
First name
Richard
Anyone know the advantage of using a wider blade when resawing. I have a chose between 3/4” and 1” on the new saw. Looking at a resaw king.
Stability and heat dissipation . I use a 1" Lennox Woodmaster CT . You may want to give one of these a try at some point . For myself , bigger is better when choosing a resaw blade . That Powermatic should be a bear .
 

4jo3

Member
Full Member
Messages
162
Reaction score
163
Location
Pittsburgh
First name
Justin
  • Thread Starter Thread Starter
  • #77
Do you have the 1.3 or 2 tpi?

Stability and heat dissipation . I use a 1" Lennox Woodmaster CT . You may want to give one of these a try at some point . For myself , bigger is better when choosing a resaw blade . That Powermatic should be a bear .
 

Otterhound

WB Enthusiast
Banned
Messages
183
Reaction score
353
Location
Manheim , Pa
First name
Richard
I use the 1.3 . I've never tried the 2 so I can't comment on it . I find the 1.3 works fine . Once the blade begins to dull , it will start to wander . At that point , there is no way to dial it out . They are still sharp for other uses , but not for resawing . Try to keep in mind that I am resawing 6" and 9" stock at 3/16" in thickness . Very little margin for error . In time , a feel for the feed rate shows itself . I am using a Grizzly G0513X2 and have good results , although more power would be nice . I haven't tried , but I think I could resaw without blade guides as long as the blade is up to par . I do use the Euro style ceramic guides when I resaw . Square everything up and make some sawdust . One last thing . I have returned 1 blade because of a poorly aligned weld and 1 for improperly set teeth/carbides . Both times , I received a replacement at no cost . The first was through an internet supplier and the second was sourced locally . My local source sells them for less even when you include sales tax . You may find a local source like that if you look . I get mine through a local Mennonite sharpening service .
 

4jo3

Member
Full Member
Messages
162
Reaction score
163
Location
Pittsburgh
First name
Justin
  • Thread Starter Thread Starter
  • #79
Resaw kings are on sale. I had really good luck. I did 6” lignum vitae on my rikon came out super smooth. One pass on the jointer and it was flat. The saw struggled a bit but came out smooth. I might have been testing the saw too :). I only needed 3”. I think I will give the Lenox a try out as well. Can never have enough blades. I always like to keep one extremely sharp. Resawing rosewoods has a bit of a pucker factor with dull blades.
 

Otterhound

WB Enthusiast
Banned
Messages
183
Reaction score
353
Location
Manheim , Pa
First name
Richard
I would never try Rosewood with a possibly dull blade , let alone Lignum Vitae . I take about .010 with my jointer . When I resaw for sides and backs , they are already on the thin side . Thickness sander finishes the job . I always try to keep 1 new blade around just as a starter blade since I can get new ones fairly quickly and I try to plan ahead when I am doing more than just a few .
 
Top