- Thread Starter Thread Starter
- #41
You are using an out of date browser. It may not display this or other websites correctly.
You should upgrade or use an alternative browser.
You should upgrade or use an alternative browser.
First guitar - dreadnaught
- Thread starter DLJeffs
- Start date
- Thread Starter Thread Starter
- #42
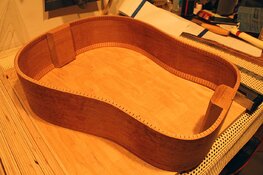
Sanded the top side on the 50 ft radius disc. Won't be the last time so mostly just got it all flush. That made it ready to glue on kerfing. Kerfing is a narrow strip of wood with narrow saw kerfs cut in it so it's flexible as a rope. Kerfing gets glued to the side, flush with the top edge, and another section flush with the bottom edge. Ultimately, the top and bottom will be glued to the kerfing. So essentially, kerfing expands the top and bottom edge so you have a large enough gluing surface to get a good bond, without influencing the flex in the top (sound quality).
Most luthiers have a set of 50 or so good clamps to do this. Being cheap, and not in guitar production mode, went with the clothes pin option. Did you know that finding clothes pins these days is like a scavenger hunt? Finally found some in Walmart. I haven't been in Walmart in quite some time. There's a whole segment of humanity in that store that defies explanation. Anyway, got some clothes pins. Then I had to wind rubber bands on them to increase the clamping pressure. Finally, ready. Here's some pics of kerfing and of the kerfing glued onto one half of the top side. I'll glue on the other side tomorrow. Then it's back to the radius disc to get all those edges flush again.
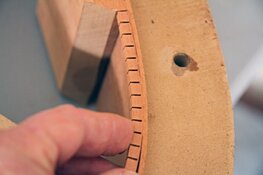
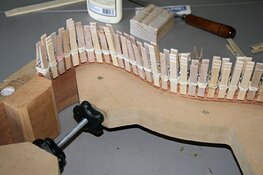
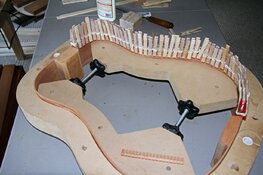
Most luthiers have a set of 50 or so good clamps to do this. Being cheap, and not in guitar production mode, went with the clothes pin option. Did you know that finding clothes pins these days is like a scavenger hunt? Finally found some in Walmart. I haven't been in Walmart in quite some time. There's a whole segment of humanity in that store that defies explanation. Anyway, got some clothes pins. Then I had to wind rubber bands on them to increase the clamping pressure. Finally, ready. Here's some pics of kerfing and of the kerfing glued onto one half of the top side. I'll glue on the other side tomorrow. Then it's back to the radius disc to get all those edges flush again.


- Thread Starter Thread Starter
- #43
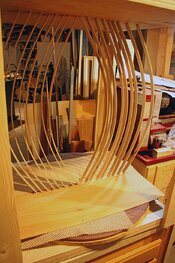
Glued kerfing and finished sanding both top and back in the radius discs (that puts the correct curvatures to top and back). Finished cutting braces for both top and back (had to make a couple adjustments from the other day). Then we tested the go bar deck and decided on the final length of the go bars and cut them to length. Then we glued in the center braces on the back - these reinforce the glue joint connecting the book matched back sections - first thing in the go bar deck. It worked perfect. Tomorrow I'll rough cut the back to shape and we'll glue on the rest of the back braces. I'll do the side braces during the week and next time we get together we'll glue the back to the sides and start on the braces for the top. It'll start to look like a guitar.


woodtickgreg
scroll, flat, spin
Staff member
Administrator
Global Moderator
Founding Member
Full Member
Forum Moderator
Very cool build thread. Enjoying it. I dont know how I missed this one but I'm glad to have found it.
Looking good so far. Probably jumping ahead and I am not sure if it will be implemented as it is usually optional. Any thoughts of using bracing on the side walls?
- Thread Starter Thread Starter
- #46
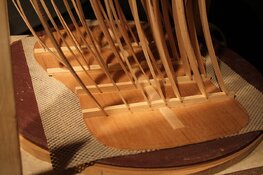
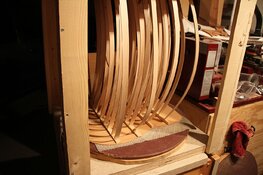
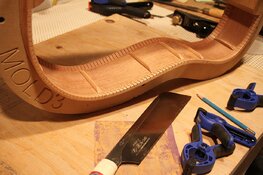
Thanks all. Good progress this weekend. Made side braces and got about half glued in place. Finished the center bracing on the back, radiused the back braces, and got them glued in place in the go bar deck. Over the next couple days I'll finish gluing all the side braces in place, round the 'X" braces.. Then next week end we'll hopefully start gluing up the top bracing.


- Thread Starter Thread Starter
- #47
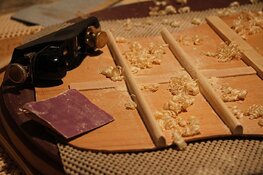
Got the side braces glued in place now. Cleaned up and sanded the interior of the sides (just in case someone looks inside). Shaping the back bracing now. Making wood curls and sawdust. Next I'll radius the X bracing for the top so I'm ready next time my coach comes over. One thing I've learned is the sequence of steps is worth thinking through. For example, we glued the center braces in place first, then cut out the gap for the transverse braces and glued them on. That allowed us to sand and finish the center brace. But now it's in the way of finishing the transverse braces. It's 6 of one, half dozen of another and comes down to a personal preference which one you glue in place first. The top is much straighter forward. The only thing is deciding how far to position the X from the sound hole.

- Thread Starter Thread Starter
- #49
Thanks Nick. I started on the X bracing for the top yesterday. But I screwed up the first one I did. I'll start over tomorrow and if it goes as it's supposed to I'll post a picture.
- Thread Starter Thread Starter
- #50
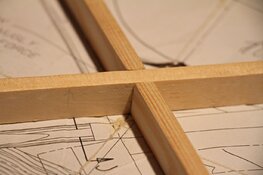
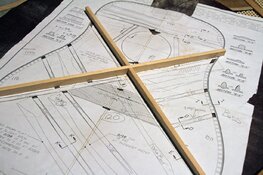
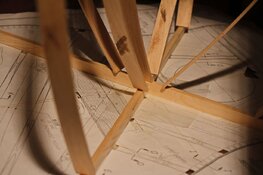
After a brief learning curve, I got my X brace done. The joint fits nice and snug and the angle is spot on (to the plan drawing of 100 degrees). Glued it up and stuck it in the go deck. I was preparing to cut out the sound hole and while trying to set the depth on my Dremel with 1/32" bit, I snapped the bit. Man, they're fragile. So ordered a couple more and will pick up the build when they get here. In the meantime I can sand the top. The area around the sound hole / rosette will be around 0.125" and on the lower bout it'll taper to 0.11" at the edges. The upper bout isn't as important.


- Thread Starter Thread Starter
- #51
More progress this week....
Cut out the sound hole and sanded the top close to final thickness. Edges get down to around 0.1" and the middle of the lower bout is around 0.12 - 0.125". The upper bout is around 0.135". We'll do the final sanding when we do the sounding.
Glued the X brace to the top, cut the transverse brace to length and drilled the hole needed to insert the wrench into the truss rod, and glued it to the top.
I'll keep cutting and gluing top bracing this week. I have to plan them around go bars and access in the go deck so that'll probably take me 2 - 4 days, including drying time.
Here's a shot of the back bracing, finished except for the edge tapers to be ready for gluing to the sides.
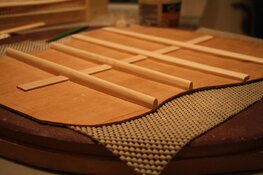
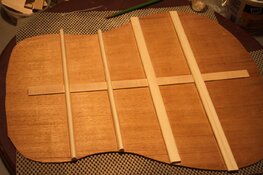
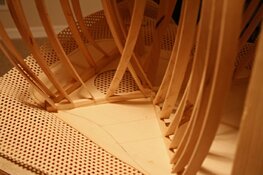


- Thread Starter Thread Starter
- #53
Nick - From all my questions to my coach (thankfully he's a patient guy), here's what I know (or think I know). Bracing is installed mainly for two reasons - (1) structural reinforcement (protect glue joints, provide durability and crack resistance, etc); (2) to transfer/control vibration and flexibility. The bracing in many mass produced guitars was altered from the original designs to increase durability so manufacturers weren't dealing with complaints about guitars cracking, warping, etc. and to improve the efficiency of the manufacturing process. But it cost the guitar sound qualities. I won't be worrying about durability - this guitar won't be the one I take fishing or camping with me. Therefore, we're focusing on sound quality and a little on tradition and craftsmanship (and my education about guitars and making them).
All the braces will get tapered. Not all the braces will penetrate through the kerfing and sides. All the bottom braces will be notched into the sides, the X brace and transverse brace will be notched into the sides. I think that's all (I get confused). If I understand correctly, the scallops and taper of the braces are part of the sounding process, changing and altering the flexibility of the top in selected areas. Some of the end tapers on braces that are notched into the sides are done simply so they will be hidden behind the binding later. While the Martin plans we're using do provide dimensions for bracing, it appears those aren't set in stone and can vary based on the builder's preference. I will roughly taper the braces where they abut the X bracing, just to make it easier later. Other than that, all the final scallops and tapers are done after gluing and as part of the sounding step. The top itself can also get some more sanding as part of sounding the top. It's a fascinating process for sure.
One thing I've learned, you can mechanically follow a set of plans or videos and build a perfectly functional, attractive guitar. But there are steps where the art or magic come into play that differentiate a really good sounding guitar from a mass produced guitar. That's where my coach is proving so valuable and I'm sure glad he agreed to help me.
Last edited:
Interesting, and it makes sense to do that later to fine tune the sound. I know that Martin got away from the scalloped bracing for a while, and went back to it in most of their guitars.Nick - From all my questions to my coach (thankfully he's a patient guy), here's what I know (or think I know). Bracing is installed mainly for two reasons - structural reinforcement (protect glue joints, provide durability and crack resistance, etc) and/or to transfer/control vibration and flexibility. The bracing in many mass produced guitars was altered from the original designs to increase durability so manufacturers weren't dealing with complaints about guitars cracking, warping, etc. and to improve the efficiency of the manufacturing process. But it cost the guitar sound qualities. I won't be worrying about durability - this guitar won't be the one I take fishing or camping with me. Therefore, we're focusing on sound quality and a little on tradition and craftsmanship (and my education about guitars and making them).
All the braces will get tapered. Not all the braces will penetrate through the kerfing and sides. All the bottom braces will be notched into the sides, the X brace and transverse brace will be notched into the sides. I think that's all (I get confused). If I understand correctly, the scallops and taper of the braces are part of the sounding process, changing and altering the flexibility of the top in selected areas. While the Martin plans we're using do provide dimensions for bracing, it appears those aren't set in stone and can vary based on the builder's preference. I will roughly taper the braces where they abut the X bracing, just to make it easier later. Other than that, all the final scallops and tapers are done after gluing and as part of the sounding step. The top itself can also get some more sanding as part of sounding the top. It's a fascinating process for sure.
One thing I've learned, you can mechanically follow a set of plans or videos and build a perfectly functional, attractive guitar. But there are steps where the art or magic come into play that differentiate a really good sounding guitar from a mass produced guitar. That's where my coach is proving so valuable and I'm sure glad he agreed to help me.
I know it doesn't need to be done, but seems reasonable to remove what you can and let the soundboard vibrate, without compromising the integrity of the build. I know it opens up the bottom end a good bit, and top end some, so it will depend on the sound you're looking for.
Of the two acoustics I have, 1 has mahogany back and sides, and the other is EIR. I'm not sure of the differences in brace pattern and scalloping though. What I do know, is that the mahogany is very mid-range-y compared to the EIR which sounds extremely full. That said, there are plenty of other differences too, like bridge and saddle material, body shape, and plenty of other things.
Lots of pieces that can alter the sound in a guitar, thats for sure! And then there's time... My mahogany guitar has opened up sound-wise and richened over the years some too. I'm sure an experienced luthier can foresee that to some extent too..
- Thread Starter Thread Starter
- #55
Completely agree. My coach has said a couple times this one will not reach it's best for a few months after it's a guitar. I asked him about different woods and his thinking is there are lots of woods that make good guitars. Different woods produce subtle differences in tone (as you have found) so it really comes down to what you like. Some are more difficult to work with, bend, etc. too. And as you also pointed out, there's so many ways and places you can change the sound - that's part of that experience, art, magic I was talking about.
This is my personal take and everyone will have a different view (which is a good thing). Commercially speaking, all mass production guitars are made to suit a larger spectrum of players with certain species (based on their inherent musical and mechanical properties) used to have a tested sound outcome with familiar results. That is the “result of one size fits all”. However, there are specific users that wants certain “voicing” to get the “sound” they are after or have already. It is all about the SOUND and tailoring it to suit your needs. Just like a well made “tailored” suit to fit you exactly. Not everyone arrives at that at the exact moment. It is sometimes determined by time, experience and sometimes getting a custom sound to fit a record project. It does take time to become “seasoned” at the sound that you want as a musician, but your preference then can also changed as you grown and develop your own style. I am still learning as I am going ....
Outside of paper and practice- I do have 2 dreds. that has mahogany back/sides and the other having rosewood back/sides. There is “audible” difference and suited to different situations. You don’t have to be a luthier or musician to hear it.
Outside of paper and practice- I do have 2 dreds. that has mahogany back/sides and the other having rosewood back/sides. There is “audible” difference and suited to different situations. You don’t have to be a luthier or musician to hear it.
Last edited:
- Thread Starter Thread Starter
- #57
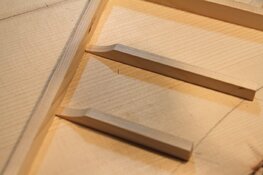
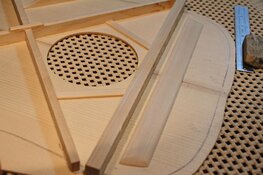
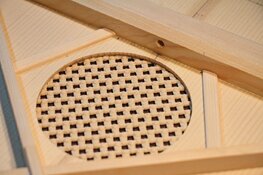
More progress on the top bracing yesterday. Cut out and shaped the upper transverse (popsicle), the two sound hole braces, and the four finger braces. I scalloped the inner face of the finger braces before gluing just because it's easier to do it before rather than after. That face abuts the X brace so running a chisel in there can be a little risky. None of these penetrate the sides so the outer face and the overall shape (arced top surface) will be done during sounding. Next I'll make the two lower tone bars. Once they're glued on, we're ready to sound the top. After that we get ready to glue the bottom and top to the sides.
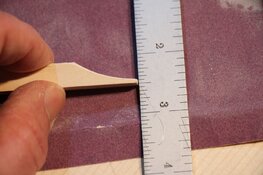


- Thread Starter Thread Starter
- #58
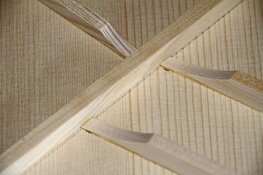
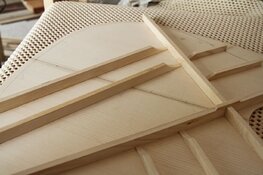
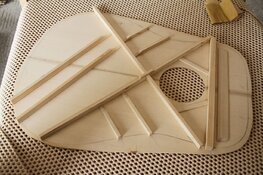
Top braces all glued in place, ready for shaping and tuning. I think I got the joints all nice and tight. My coach said some builders opt to chisel a notch in the X brace and then stuff the tapered end of the tone bar into that notch. We decided to just butt them tight against the X brace.


Last edited:
- Thread Starter Thread Starter
- #59
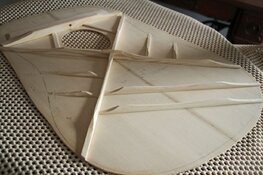
Today we got into the "magic" part of guitar building... shaping the braces and sounding the top. This is where we cut scallops and tapers into the braces, shave them down to get the right flex and save weight, and tap on the top listening to the sound. 95% done with a long chisel - which for me was a learning experience but once I got the hang of it went pretty well and I can see why chisels are the tool of choice.
Next I'll clean up the braces with a minimal amount of sanding. Then I'll cut and glue in the bridge plate. I'll need to make a cull for that since it's a thin piece of wood. I'll also make the cull shaped like the silhouette of the guitar which we'll use when we glue the top and back to the sides. Then we'll do the final shaving of the braces, cut notches in the sides / kerfing and glue in the top and bottom. It'll start to look like a guitar then.
Next I'll clean up the braces with a minimal amount of sanding. Then I'll cut and glue in the bridge plate. I'll need to make a cull for that since it's a thin piece of wood. I'll also make the cull shaped like the silhouette of the guitar which we'll use when we glue the top and back to the sides. Then we'll do the final shaving of the braces, cut notches in the sides / kerfing and glue in the top and bottom. It'll start to look like a guitar then.

Thank you so much for sharing your guitar building journey! I've always thought it would be cool to build my own, but just didn't/ don't have the means. I played one for many years until arthritis got me a few years ago & during the pandemic I discovered the uke, and I'm in love! It's alot easier for me to play and I've fallen in love with playing again! One day I will get me an authentic Hawaiian made one!  One again thank you for sharing! I've enjoyed reading about your build!


