My new shop.

Tony

Hardwood Enthusiast
Staff member
Global Moderator
Full Member
Messages
20,489
Reaction score
27,473
Location
San Antonio, TX
First name
Tony
I'm keeping the drill press, just gotta put it on a cart to make it mobile. Really just need to clean that corner up so I can get the midi lathe there. Drill press will probably stay there. And I'll build a stand for the midi lathe.

Did you get that big one from Rodney going?
 

woodtickgreg

scroll, flat, spin
Staff member
Administrator
Global Moderator
Founding Member
Full Member
Forum Moderator
Messages
19,725
Reaction score
29,622
Location
Eastpointe, Mi. usa
First name
Greg
  • Thread Starter Thread Starter
  • #262
Nope, it's a garage ornament:sarcastic: until I get the new workbench for the wood shop done. It needs to go where the pile of ash wood is.
 

rocky1

Creator of Shavings and Sawdust!
Full Member
Messages
8,998
Reaction score
16,548
Location
Way North Florida
First name
Rocky
I think I have come up with a plan for the radial arm saw. This means i have to do a little work on the saw first to get it operational. Definitely needs a new power cord, and may need new bearings for the carriage. But is a vintage dewalt and worth saving, all cast iron construction. The only wierd part is that it takes a 9" blade. I dont know if I can get a 10" on it because of the guard. I do want to keep the saw because of ken its cross cut capacity. It would be useful in breaking down all the slab lumber I have.


9" blades aren't easy to find, but Amazon carries a pretty good selection. Big box stores, local outlets, you usually pay an arm and a leg, IF you can find them. Not much difference in price on Amazon between those and 8 or 10 inch.
 

woodtickgreg

scroll, flat, spin
Staff member
Administrator
Global Moderator
Founding Member
Full Member
Forum Moderator
Messages
19,725
Reaction score
29,622
Location
Eastpointe, Mi. usa
First name
Greg
  • Thread Starter Thread Starter
  • #265
I got down in the shop for a couple of hours after work today.
I unscrewed and removed the front facia from the miter saw fence to access the screws and remove it.
20200107_172138.jpg Then removed the fence.
20200107_172459.jpg Then marked the counter........
20200107_172720.jpg And cut it off.
20200107_174007.jpg Then removed the table from the radial saw.
20200107_175319.jpg I'm not sure if I'm going to re use the table or not yet.
20200107_175325.jpg This fostoria light came with the saw, not sure if I'll use it on the saw or not. The light is worth more than I paid for the saw, lol.
20200107_175341.jpg Then I set the saw in place to see what needs to be done to make it fit so that it ends up being the same height as the miter saw fence.
20200107_180557.jpg Another view, I think its gonna be cool when I get it done. It may get moved forward a bit to align it with the fence.
20200107_180641.jpg Right now the saw base is 3/4" above the counter. I need to cut the table down and then measure it to see how much I need to raise it. The fence needs to be cut down also, lots of head scratching to do yet.
20200107_181033.jpg
Plus I still need to put a new cord on the saw before I mount it. The original cord is so hard that it wont bend anymore, it just cracks, lol.
To be continued..............
 
Last edited:

woodtickgreg

scroll, flat, spin
Staff member
Administrator
Global Moderator
Founding Member
Full Member
Forum Moderator
Messages
19,725
Reaction score
29,622
Location
Eastpointe, Mi. usa
First name
Greg
  • Thread Starter Thread Starter
  • #267
No work in the shop tonight, long cold day at work. But I did come home and download a parts and owners manual for the radial arm saw. Its approximately a 1956 vintage. I may get into the motor and change the bearings in it since I have to pull the cover to change the wires anyway. Pretty cool old saw actually.
 

woodtickgreg

scroll, flat, spin
Staff member
Administrator
Global Moderator
Founding Member
Full Member
Forum Moderator
Messages
19,725
Reaction score
29,622
Location
Eastpointe, Mi. usa
First name
Greg
  • Thread Starter Thread Starter
  • #268
I got the miter saw fence cut down tonight, just used a hand saw.
I still have to cut a end block for the fence and glue it in. Kinda waiting to see if I'm going to need to trim anymore first.
20200109_184720.jpg Next I need to cut down the table for the radial saw and get it re mounted.
20200109_184738.jpg Once I get the table back on I'll be able to see how much I need to raise the radial saw so the table is level with the miter saw fence. It's probably only going to need to come up a couple of inches.
20200109_184757.jpg
 

ripjack13

ɹǝʇɹɐqpooʍ
Staff member
Administrator
Global Moderator
Full Member
Messages
30,850
Reaction score
37,757
Location
Connecticut
First name
Marc
What's the abbreviation HMF stand for?
Head Mother F***er?
:lol2:
 

woodtickgreg

scroll, flat, spin
Staff member
Administrator
Global Moderator
Founding Member
Full Member
Forum Moderator
Messages
19,725
Reaction score
29,622
Location
Eastpointe, Mi. usa
First name
Greg
  • Thread Starter Thread Starter
  • #272
Didn't they make motorcycles??????????????????????

AMF has made everything at one time or another. Harley Davidsons for awhile. Bicycles, etc.
 

Gdurfey

Member
Full Member
Messages
4,053
Reaction score
7,962
Location
Florissant, CO
First name
Garry
one of my first motorcycle rides was on an AMF era Sportster in Myrtle Beach, SC with my bro-in-law. Didn't realize for another 20 or so years that my sister actually rode as well. Started my fascination with motorcycles and now never ending passion.
 

woodtickgreg

scroll, flat, spin
Staff member
Administrator
Global Moderator
Founding Member
Full Member
Forum Moderator
Messages
19,725
Reaction score
29,622
Location
Eastpointe, Mi. usa
First name
Greg
  • Thread Starter Thread Starter
  • #274
Making progress on the radial saw installation.
I cut a piece of 1/2" plywood for the top of the base cabinet to completely cover it and keep the saw dust out of the drawer. I glued and finish nailed it down.
20200110_184818.jpg I did end up reusing the table, I cut it down to fit and temporarily re fit it.
20200110_184844.jpg 2 sheets of osb from the counter brought it up to the right height.
20200110_190151.jpg I cut a block of 3/4" plywood to fill the end of the miter saw fence......
20200110_192025.jpg And glued and clamped it in.
20200110_192455.jpg When the glue dries on the fence I can re install it. The counter is now ready for the radial arm saw. I probably should add a filler strip between the base cabinet and the back splash.
20200110_195718.jpg
 

woodtickgreg

scroll, flat, spin
Staff member
Administrator
Global Moderator
Founding Member
Full Member
Forum Moderator
Messages
19,725
Reaction score
29,622
Location
Eastpointe, Mi. usa
First name
Greg
  • Thread Starter Thread Starter
  • #276
So to continue prepping the RAS for the install I worked on it today for a couple of hours. @Sprung You might find this part interesting. The tops for an RAS get pretty hacked up and need to be replaced from time to time. The way this one attaches bothers me, so I re engineered it. Originally you had to remove all 8 bolts that secured the top, this meant the leveling screws as well and then you would have to re level everything as you put the screws back in.
The silver screws are really all that's needed to hold the top on. The dark screws are the leveling screws.
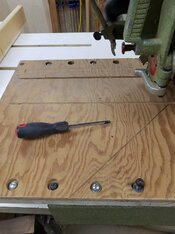
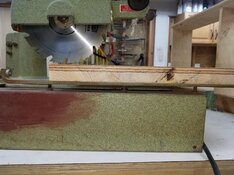
20200112_153358.jpg Here you can kinda see how the leveling screws work.
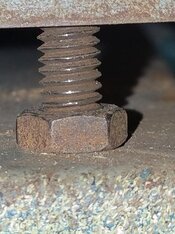
20200112_153450.jpg And a close up of the leveler and lock nut, theres a locknut underneath as well.
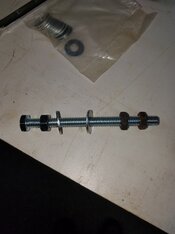
20200112_153549.jpg So my solution is to separate the leveling g screws and the top screws. I used 6 of the 4" 5/16 bolts.
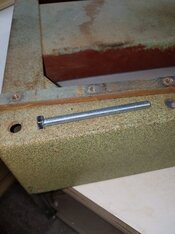
20200112_154407.jpg This is the bolt set up. The saw body goes between the washers, the top dark thin nut is a jam nut for against the top table mount bars.
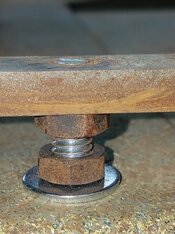
20200112_155946.jpg This is how it looks when installed. There are 6 like this, 3 per side.
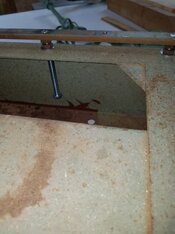
20200112_155254.jpg What you see underneath. I could have used shorter bolts but it gives me room for my hands and 2 wrenches underneath.
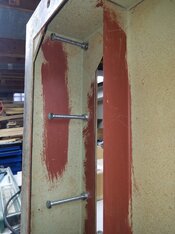
20200112_155816.jpg A view looking up from the bottom on one side.
20200112_162226.jpg
This will be a big improvement and make changing the top so much easier, I wont have to disturb the leveling screws once they are set. Now to change the top, lol.
 

woodtickgreg

scroll, flat, spin
Staff member
Administrator
Global Moderator
Founding Member
Full Member
Forum Moderator
Messages
19,725
Reaction score
29,622
Location
Eastpointe, Mi. usa
First name
Greg
  • Thread Starter Thread Starter
  • #277
Next I worked on the counter and fence again.
I clamped a 6' level to the fence and miter saw to align the fence.
20200112_164359.jpg The fences are shop made and so are the little oak clips that attach them.
20200112_164622.jpg Here you can see the clips on the back side.
20200112_164715.jpg I cut a piece of 2x down and filled this gap.
20200112_170852.jpg And here we are all back together after cutting everything down.
20200112_165746.jpg This is approximately how the RAS will sit, the top will get moved back a bit.
20200112_172217.jpg I need to find a really thin wrench or grind one down to fit the inside flats of the saw arbor. It takes 2 wrenches to get the blade on and off.
20200112_175238.jpg
 
Last edited:

woodtickgreg

scroll, flat, spin
Staff member
Administrator
Global Moderator
Founding Member
Full Member
Forum Moderator
Messages
19,725
Reaction score
29,622
Location
Eastpointe, Mi. usa
First name
Greg
  • Thread Starter Thread Starter
  • #279
Not really sure, I need to get a caliper on it to see. Hard to get in there with the blade still on. I need to get it off to change the bearings.
 

ripjack13

ɹǝʇɹɐqpooʍ
Staff member
Administrator
Global Moderator
Full Member
Messages
30,850
Reaction score
37,757
Location
Connecticut
First name
Marc
Ok. I found the tool at the rikon page.
Part - 105 P1-JL93070003
Wrench
In stock
$9.99

I'll measure mine to see if it'll work....
 
Top