Silver Maple Platter

William Tanner

Member
Full Member
Messages
2,304
Reaction score
4,139
Location
Eastern Washington
First name
Bill
The neighbor caddy corner across from us cut down four silver maple trees to make way for an addition to their home. This was on June 12, 2017. I heard the saw and hustled right over their. I took one large piece and promised to make the family something. I presented this platter to them today and they were pleased.

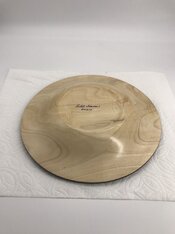
For almost three years the slab sat in my shop wrapped in three-ply paper. Cracks developed that reduced the size to approximately 12 inches. Cracks are the reason I only took one piece. We have tried all kinds of methods for preserving silver maple and we quit bringing it home. For the rim I used black Chestnut dye sanded back with Chestnut oyal blue dye over that. A black magic marker highlighted the edge. I used wipe-on poly as the finish.
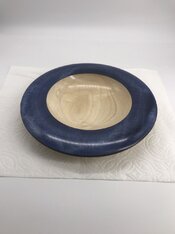
Silver maple platter.jpeg

Silver maple bottom.jpeg
 

Karl_TN

Member
Full Member
Messages
1,999
Reaction score
2,925
Location
Rosemark TN
First name
Karl
You may have heard about twice turning, but I would suggest rough turning the silver maple blanks several times while they're drying out. Keep the end grain coated between each turnings.

Last year I built a cheap cabinet kiln (some use a broken freezer or dishwasher) to help dry out my rough turnings. I find a full kiln can keep the 'outside' of my turnings from drying too quickly compared to the inside (area between the walls). On the other hand, a mostly empty kiln doesn't keep the moisture high enough during the initial drying time so I wait until the kiln is mostly full before adding heat.

Btw, nice looking platter.:good2:

-Karl
Ps. If you don't have time for rough turning then you might get better results coating blanks with Anchor Seal, thinned school glue or a dip in hot wax rather than using paper.
 

Nature Man

Member
Full Member
Messages
13,659
Reaction score
11,236
Location
Bulverde, TX
First name
Chuck
The stresses in wood are often revealed in the strangest of ways. Glad you were able to salvage this and complete a super nice platter. Chuck
 

DKMD

Sawbones
Staff member
Administrator
Global Moderator
Full Member
Forum Moderator
Messages
10,894
Reaction score
16,533
Location
Enid, Oklahoma
First name
David
Nice work! The colored rim is a nice touch.

I haven’t had much trouble with silver maple around here, but I do what Greg suggested... rough turn, anchor seal the end grain, and then throw them in a big cardboard box for a few months. If they start to mold, I’ll pull them out earlier. After a few months, I sticker them with pen blanks for spacers, and set them on a wire shelf until they’re dry.
 

Barb

Member
Full Member
Messages
2,682
Reaction score
4,774
Location
Wisconsin
First name
Barbara
Very nice looking platter! I'd like to try my hand at applying color too but haven't quite done it yet. It's on my list of to-do's
 

William Tanner

Member
Full Member
Messages
2,304
Reaction score
4,139
Location
Eastern Washington
First name
Bill
  • Thread Starter Thread Starter
  • #9
Thanks everyone for you comments and suggestions. Harvesting, processing and drying wood has always been an interesting subject. I have tried about every option for drying wood save the kiln process. Karl had some information on that process that I had not thought of. It never occurred to me that a full kiln was react different than one that is not. Makes sense. There is so much experience and knowledge on WB that it boggles the mind. If my turning buddy was still alive and healthy, I would go with a wood kiln. As a side note, by late buddy actually utilized three glass and pottery kilns for his glass work. We had discussed a wood kiln superficially back in that time. When we were heavy into cutting and processing turning wood we cut round blanks and went with the paper bag method. We also tried covering the side of the rounds in paraffin and that work. Unfortunately, we did so much of this that we ran out of storage space and actually stored blanks in a metal shed. We live in a desert. Other than a kitchen oven that turned out to be the hottest spot in town. We had planned to move those blanks before the summer heat but we didn't get to it in time. Some blanks perished but some actually survived fine.

Referencing the two attached photos. The three elm bowls were rough-turned five weeks ago for a club project. I pulled them out of their bags yesterday and they are drying nicely and will be turned again in the future. The second photo is a packaged ash slab. It is wrapped in three ply packing paper. This process has been shown out best success rate over the years. The silver maple was dried in this fashion. Again, silver maple has always been problematic for us in our climate. Next to the wrapped piece are unwrapped large cheery and Russian olive slabs. Not a crack. I don't process in any quantity anymore. If I did I would follow Karl's lead. Thanks everyone. Bill

elm bowls.jpeg

Ash slab.jpeg
 

Gdurfey

Member
Full Member
Messages
4,053
Reaction score
7,964
Location
Florissant, CO
First name
Garry
Great post Bill. Thanks. Yep, this group is pretty amazing....and glad you are part of it and included.
 
Top