Third guitar

DLJeffs

Member
Full Member
Messages
4,420
Reaction score
10,334
Location
central Oregon
First name
Doug
While waiting my turn in the spray booth for my first two guitars, thought I'd get a head start on #3. I decided to try a little different rosette. Cut wedges from some zebrawood thins I got from Jason Martin. I'll glue these up and then using my Dremel with the rosette attachment I'll trim it into a nice rosette circle. Then I'll route the next top and glue this zebrawood circle in place with some purfling trim. Once that dries and I sand it flat, I'll route a groove and glue in some abalone down the center of the zebrawood. Hopefully it'll work out as I envision.

Cut all this using a little Japanese saw I got for CHristmas. Made that little plexiglas pattern you see in the photo.
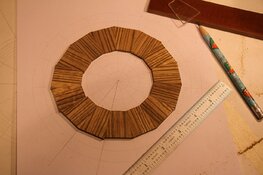
wedges to make rosette.jpg
 

El Guapo

Member
Full Member
Messages
4,222
Reaction score
4,915
Location
Edmond, OK
First name
Andrew
I’m loving your build threads! Other than aesthetic changes, are there any design changes you have planned for this build? Any different techniques or desired tonal qualities? You instrument builders are some of the most impressive woodworkers on here IMO.
 

DLJeffs

Member
Full Member
Messages
4,420
Reaction score
10,334
Location
central Oregon
First name
Doug
  • Thread Starter Thread Starter
  • #3
I’m loving your build threads! Other than aesthetic changes, are there any design changes you have planned for this build? Any different techniques or desired tonal qualities? You instrument builders are some of the most impressive woodworkers on here IMO.
Thanks Andrew. But these guitars would probably be scrap wood if I didn't have the guy who's helping me, helping me. I'm certainly no luthier. This one will also be a dreadnought (I only have side bender forms for a dreadnought). It'll have either ebony or myrtle back and sides. Other than that I don't know. We could maybe play with the bracing a little. But I expect it'll be a pretty standard Martin-based dreadnought.
 

El Guapo

Member
Full Member
Messages
4,222
Reaction score
4,915
Location
Edmond, OK
First name
Andrew
Thanks Andrew. But these guitars would probably be scrap wood if I didn't have the guy who's helping me, helping me. I'm certainly no luthier. This one will also be a dreadnought (I only have side bender forms for a dreadnought). It'll have either ebony or myrtle back and sides. Other than that I don't know. We could maybe play with the bracing a little. But I expect it'll be a pretty standard Martin-based dreadnought.
Tough to beat the rich sound of a Martin dreadnought!
 

DLJeffs

Member
Full Member
Messages
4,420
Reaction score
10,334
Location
central Oregon
First name
Doug
  • Thread Starter Thread Starter
  • #5
Had to remake my rosette - the first one wasn't wide enough. Doh! Anyway, remade the wedges, glued it up, cut it round (to the proper dimension this time). Then, routed the grooves in the top. Put purflings on the inside and outside, fit the zebra wood ring, then routed out the inside. I think I'll save myself a little sanding and deepen the dado for the zebra wood ring before I glue it in. But it's looking pretty good.

After I glue and sand the zebra wood, I'll route another dado inside the zebra wood to install an abalone ring. Plus I'll add one more purfling ring outside the whole thing to kind of finish it off.

rosette cut in.jpg

rosette relief.jpg

rosette vision.jpg
 

DLJeffs

Member
Full Member
Messages
4,420
Reaction score
10,334
Location
central Oregon
First name
Doug
  • Thread Starter Thread Starter
  • #7
Finished the rosette this morning after putting a final coat of finish on my gift swap for Tim. Came out really nice (the rosette, the gift is too but isn't totally finished yet so I'm withholding judgement). Had one tiny chip come out of the corner of one of the abalone sections (must have been cracked and I didn't see it) so I'll have to fill that with epoxy. Other than that I'm pretty pleased.

rosette close up.jpg
 

DLJeffs

Member
Full Member
Messages
4,420
Reaction score
10,334
Location
central Oregon
First name
Doug
  • Thread Starter Thread Starter
  • #11
Yes. You use a Dremel tool with a router head attached. That's what the 3/16" hole is for. A metal pin goes in there and the router head has a hole that fits over that pin so the Dremel rotates in a perfect circle. The router head lets you make very finite adjustments so you don't cut all the way through the top. So you route the grooves, glue in the zebra wood, abalone and purfling strips which are plastic. After they dry, I use a chisel and scrapers to roughly trim them close to the top and then a big sanding block to smooth it all out. Today I cut the groove in the back for the back strip and glued it in. I'll take a photo tomorrow and then scrape and sand the back strip smooth. After that, I'll trim off the excess material from the top and back and I'll be ready to bend sides and start making braces, etc.
 
Last edited:

DLJeffs

Member
Full Member
Messages
4,420
Reaction score
10,334
Location
central Oregon
First name
Doug
  • Thread Starter Thread Starter
  • #13
Finished the back strip this morning. Pretty straightforward process. Find the middle of the back, set up the Dremel to the desired depth. Then figure out how far away to clamp a solid straight edge-fence so the dado I cut is centered. Make a couple short test cuts outside the line where the back will be cut out so I can test fit the back strip and then cut the dado groove. I used a 0.125" bit, so I had to move my fence to the other side of my dado to achieve the final width to match the back strip I had. Then mixed up some epoxy and glued in the back strip.

Let the epoxy dry overnight, then this morning used scrapers to shave down the back strip. The shavings from the scraper looked like snake skins. Then used a big sanding block to finish smoothing out the strip. In my first guitar we waiting to install the back strip until after the body was done. This is a little more difficult because the back has a curve to it. So I decided to install the back strip while the back was still flat. Hopefully all the moving around and clamping and sanding won't result in it moving at all. But now I have both the top and back close to ready to make braces and glue to sides. All I need to do is layout the final position for each and trim off the excess. We'll also make the top thinner by sanding it because it's a little too think right now.

back strip glue in.jpg

back strip finished.jpg

back strip shavings.jpg
 
Last edited:

DLJeffs

Member
Full Member
Messages
4,420
Reaction score
10,334
Location
central Oregon
First name
Doug
  • Thread Starter Thread Starter
  • #14
Yesterday Andrew ( @El Guapo ) asked about the rosette. So while I had the camera out I took a couple shots to better explain how that gets done.
The first shot shows the Dremel and the two attachments. The silver router base allows you to very accurately set depth of cut by adjusting with the brass knobs.

The black jig attaches to the router base by those two screws. It allows me to very accurately adjust the distance the router bit is from the center pin. The center pin is a 3/16" metal pin that is seated in a hole drilled through the top of the guitar and into the base board. In the second photo you can see how the black base sets on the center pin. The black set screw locks the adjustment in place.

The last picture is some of the bits we use. These are the smallest I have, they're 0.03". The black outer band and the inner groove (this is where the sound hole will be cut out) in my rosette were made with this bit. They're pretty fragile so you have to be careful to always have the router running when you lower the bit into the top and anytime you're moving the Dremel. When I made this rosette, I used a 1/8" bit. I cut the inner most edge, then figuring out the width needed for my zebra wood plus two sections of purfling, I cut the outer edge. Then I just routed out the middle. But it's always smart to set up a test station where you can make test cuts and try out your rosette material for fit before cutting the actual top. Extremely small errors in measurement become very visible in the finished product.

rosette dremel tools.jpg

dremel on circle pin.jpg

rosette bits.jpg
 

El Guapo

Member
Full Member
Messages
4,222
Reaction score
4,915
Location
Edmond, OK
First name
Andrew
I definitely need more margin of error for anything I attempt! Thanks for walking us through the process.
 

DLJeffs

Member
Full Member
Messages
4,420
Reaction score
10,334
Location
central Oregon
First name
Doug
  • Thread Starter Thread Starter
  • #16
I definitely need more margin of error for anything I attempt! Thanks for walking us through the process.
The Dremel makes it pretty fool proof. The ticket is to always make a test cut so you can make very tiny adjustments and test the fit before making the final.
 

DLJeffs

Member
Full Member
Messages
4,420
Reaction score
10,334
Location
central Oregon
First name
Doug
  • Thread Starter Thread Starter
  • #18
No, I wish. My coach got really busy starting in November. That put a crimp on finishing getting the necks attached and starting the spraying. We have a couple options for spraying (there's one or two local guitar shops that might be willing to spray finish them as well). Then my coach caught covid so isolated himself for about 10 days. So right now, we need to make the final adjustments to attach the necks and fingerboards and then get them into the spray booths. After that we need to install frets, bridges, and tuners and then do the final set up adjustments. Then, maybe I'll be able to play them.
 

DLJeffs

Member
Full Member
Messages
4,420
Reaction score
10,334
Location
central Oregon
First name
Doug
  • Thread Starter Thread Starter
  • #19
Cut and radiused the back braces today. One of the more menial jobs but an important one to not take short cuts. You want the braces to be uniform and achieve the proper arc so they will glue up tightly so you don't get buzzing. Usually results in some scuffed knuckles and sore fingers.

back braces radiused.jpg

radius disc.jpg
 

DLJeffs

Member
Full Member
Messages
4,420
Reaction score
10,334
Location
central Oregon
First name
Doug
  • Thread Starter Thread Starter
  • #20
Glued the back braces in yesterday. So today spent a couple hours shaping and sanding the back braces. Then cut the center bracing for the middle three sections, sanded them and glued them in place. The center bracing for the two end sections will wait until I get the sides bent and glued up so I can fit them close to the end and neck blocks. Next up I'll start radiusing the X braces and the transverse brace. Gluing them in will wait until we sand the top to thin it a little.

back braces close up.jpg

back braces glued and shaped.jpg

center braces.jpg
 
Last edited:
Top