Workbench Build

Sprung

Amateur Sawdust Maker
Full Member
Messages
9,552
Reaction score
15,650
Location
Kewaunee, WI
First name
Matt
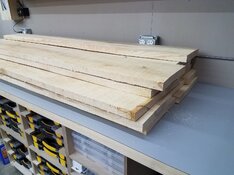
In my thread Setting Up Shop I showed the very start of my workbench build. It was simply cutting pieces to rough length for the top.
55.jpg

Well, I started 8 days of Staycation yesterday and started in on the workbench build. Figured I'd do a build thread on it. My goal is to have it as close to completion as I can before staycation is over.

Yesterday I made a couple quick Christmas gifts on the lathe - a stopper and an opener - and forgot to get pics before my wife wrapped them. I also prepped the shop for today's work - put things away, emptied the dust collector bin, etc.

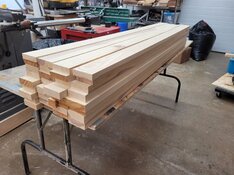
Today I started with edge jointing the rough boards and then ripping to about 2 3/4" width. My goal is a 2 1/2" thick top. After ripping to width, the boards got face jointed and then took a run through the planer.
56.jpg

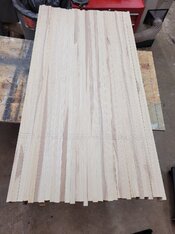
And oriented as it will be for the top. I drew a pair of lines and numbered each board to help with orientating and lining it all up during the glue-ups. I'll be gluing up the top in 6", or less, sections so that I can run each section across the jointer and then plane to thickness before gluing up into a whole top. The top will finish out to about 54" x 30".
57.jpg

This bench is being built from solid Ash. I have a Wilton vise that I previously restored that I will be using on this bench. I am still undecided on whether or not I want to install a tail vise of some sorts. I don't do much hand work, so I'm not sure how much I'd use it. Or if I want a vise handle sticking out that end of the bench, since it'll be oriented at a major walk-through area in my shop.
 

woodtickgreg

scroll, flat, spin
Staff member
Administrator
Global Moderator
Founding Member
Full Member
Forum Moderator
Messages
19,725
Reaction score
29,623
Location
Eastpointe, Mi. usa
First name
Greg
Man I'll be following this! You beat me to it, lol. I need to do the same thing. Mine will be made from ash as well.
 
Last edited:

Sprung

Amateur Sawdust Maker
Full Member
Messages
9,552
Reaction score
15,650
Location
Kewaunee, WI
First name
Matt
  • Thread Starter Thread Starter
  • #4
Couple weeks ago I bought the biggest bottle of glue I've ever bought. I know I'll be going through a lot of glue on this. Everything - top, legs, stretchers, etc. - is getting glued up from 4/4 stock. We'll see how much I have left once the bench build is done...

58.jpg

The bench in the last pic has freezer paper laid out on it. That's where I'm laying the boards to spread glue on them. Then I have more freezer paper on the RAS table and am putting it all together there.

59.jpg

1 of 6 glue-ups that will become the top done. And now further progress will have to wait until Monday since this weekend's plans will not allow me to get into the shop.
 

woodtickgreg

scroll, flat, spin
Staff member
Administrator
Global Moderator
Founding Member
Full Member
Forum Moderator
Messages
19,725
Reaction score
29,623
Location
Eastpointe, Mi. usa
First name
Greg
Note to self, see if I have enough clamps.
 

Sprung

Amateur Sawdust Maker
Full Member
Messages
9,552
Reaction score
15,650
Location
Kewaunee, WI
First name
Matt
  • Thread Starter Thread Starter
  • #7
Greg, there's never enough clamps. The number of clamps a woodworker needs is always the current number you have + 1.

But, one thing I did have to consider is if I had enough clamps of larger capacity to be able to clamp together the bench top in the final glue up - about 30". Thankfully I do.
 

Gdurfey

Member
Full Member
Messages
4,053
Reaction score
7,964
Location
Florissant, CO
First name
Garry
Question for the builder as well as the followers: if you wanted to use the old fashioned square bench dog clamping accessories, could you cut one of your boards, for example, take the third or fourth board in and cut it in lengths of a foot and leave a inch gap thus creating you square hole?? Does that make sense? I have now seen a lot of bench hardware using 3/4 or 1 inch round holes, but I like the look of those benches with the square holes.

just trying to learn.
 

woodtickgreg

scroll, flat, spin
Staff member
Administrator
Global Moderator
Founding Member
Full Member
Forum Moderator
Messages
19,725
Reaction score
29,623
Location
Eastpointe, Mi. usa
First name
Greg
Question for the builder as well as the followers: if you wanted to use the old fashioned square bench dog clamping accessories, could you cut one of your boards, for example, take the third or fourth board in and cut it in lengths of a foot and leave a inch gap thus creating you square hole?? Does that make sense? I have now seen a lot of bench hardware using 3/4 or 1 inch round holes, but I like the look of those benches with the square holes.

just trying to learn.
Yes you could do that. But there's way more stuff available for round holes like hold fast and clamping stuff. Not to mention the fact that its just easier to drill holes. Ill be drilling mine.
 

Wildthings

ASTROS '23 ALCS CHAMPIONS runnerup
Full Member
Messages
8,907
Reaction score
13,997
Location
Gulf Coast of Texas
First name
Barry
Yes you could do that. But there's way more stuff available for round holes like hold fast and clamping stuff. Not to mention the fact that its just easier to drill holes. Ill be drilling mine.
So will you be drilling with a round bit or a square one?
 

ripjack13

ɹǝʇɹɐqpooʍ
Staff member
Administrator
Global Moderator
Full Member
Messages
30,850
Reaction score
37,757
Location
Connecticut
First name
Marc
Everyone else is....so I will too.....:popcorn:

Lookin good Matt.
 

Sprung

Amateur Sawdust Maker
Full Member
Messages
9,552
Reaction score
15,650
Location
Kewaunee, WI
First name
Matt
  • Thread Starter Thread Starter
  • #14
I probably won't drill them right away, but as needed, but I plan to drill holes. I've already got a pair of holdfasts that I received as a gift a few years ago. And Greg is right - there are a lot of accessories for round holes.

I do have a pair of Kreg Bench Clamps that I used on the previous outfeed. They were great and I am currently planning on installing the two base plates I have into the new bench so I can make use of them. They are very handy. Though if I drill holes for the holdfasts, they may be a duplicate function, so maybe I'll use them elsewhere. (Now I'm just thinking out loud!)
 

Sprung

Amateur Sawdust Maker
Full Member
Messages
9,552
Reaction score
15,650
Location
Kewaunee, WI
First name
Matt
  • Thread Starter Thread Starter
  • #16
Made some great progress on the workbench yesterday and today.

Got the remainder of the sections of the top glued up. Marked one end for order and orientation because my marks on the top would soon be gone, once the pieces went through the jointer and planer.

60.jpg

Jointed and planed pieces for the legs. The offcuts from the top had enough length for the legs.

61.jpg

Then figured out how I wanted to glue them up and glued them up.

62.jpg

Ran the six portions of the top through the jointer and planer. Here's a glimpse of how the top will look.

63.jpg

Started gluing up portions of the top. I'll continue doing glue-ups tonight, with the hopes of being able to have the whole top glued up before I call it a day.

64.jpg

And here's the vise I will be using. A Wilton that I restored last year. I still need to make a new handle for it. I have decided to not install a tail vise - I can always add one in the future if I decide I want one.

65.jpg
 

Sprung

Amateur Sawdust Maker
Full Member
Messages
9,552
Reaction score
15,650
Location
Kewaunee, WI
First name
Matt
  • Thread Starter Thread Starter
  • #18
Goal achieved: Got the entire top glued up tonight!

66.jpg

My goal was a top that would finish out to 54" x 30" and 2 1/2" thick. Well, so far I'm close enough to be happy with the results. The top ended up finishing out at 29" (I had to reject a board that I was going to use in the top) and just a hair shy of 2 1/2" - maybe 1/32" shy, at most. Looks like I might end up finishing out about 56" length.

Tomorrow I will mill the glued up legs to size and start on getting board jointed, planed, and glued up for the stretchers. I will also be cutting the top to length.

My hope at the beginning of this staycation was to have a nearly finished bench by the end of the day Thursday. Depending on how the next couple days go, which will include me being gone most of Thursday morning, I should be close! I think the part that will likely slow me up will be doing to work on the underside of the top - mortises for the tenons that will be on the legs to set into and fitting the vise. I've not done mortices before, but being where they'll be and what it's for, I should be fine.
 

Nature Man

Member
Full Member
Messages
13,659
Reaction score
11,236
Location
Bulverde, TX
First name
Chuck
Congrats on the glueup! Looking fantastic! Wondering how much does it weigh? Chuck
 
Top