wood ID through end grain

phinds

Moderator
Staff member
Global Moderator
Founding Member
Full Member
Forum Moderator
Messages
9,935
Reaction score
17,745
Location
Cortland, NY
First name
Paul
For those of you who have not used my site for wood ID (shame on you :smile:) here's a smattering of the 3,000+ end grain pics from the anatomy pages. This should show pretty clearly why I keep telling everyone that the end grain can be so useful in doing wood ID:

These are all 1/4" x 1/4" cross sections

1.jpg 2.jpg 3.jpg 4.jpg 5.jpg 6.jpg 7.jpg 8.jpg 9.jpg 10.jpg
 
Last edited:

V. Kelly Bellis

Member
Full Member
Messages
58
Reaction score
54
Location
Ellsworth, ME
First name
Vance
Excellent sample specimens Paul. Thank you for doing this.
Could you please explain 1) how each specimen was prepared, and 2) how they were photographed?
 

phinds

Moderator
Staff member
Global Moderator
Founding Member
Full Member
Forum Moderator
Messages
9,935
Reaction score
17,745
Location
Cortland, NY
First name
Paul
  • Thread Starter Thread Starter
  • #4
Excellent sample specimens Paul. Thank you for doing this.
Could you please explain 1) how each specimen was prepared, and 2) how they were photographed?
Go to my wood ID site. Find any common wood. Find one of the "end grain updates" and click on the link.
 

phinds

Moderator
Staff member
Global Moderator
Founding Member
Full Member
Forum Moderator
Messages
9,935
Reaction score
17,745
Location
Cortland, NY
First name
Paul
  • Thread Starter Thread Starter
  • #6
Good job, well done! RE: http://www.hobbithouseinc.com/personal/woodpics/_endgrainUPDATE/index.htm
Consider expanding that page's discussion on process to include, camera used, lens, f-stop, and a sidebar on white balance, or a link to a favorite reference. Your website shows you've taken colorspace seriously; e.g., routine monitor calibration, x-rite color checker, etc.,
I use a point and click camera, although admittedly an expensive one that has a particularly good micro-pic capability and an auto white balance. It's the Canon SX40HS which is now long out of date but I believe there newer model, the SX70HS ($400 on Amazon, plus external memory card probably $20) has the same capabilities plus higher resolution.
 
Last edited:

TurkeyWood

Member
Full Member
Messages
204
Reaction score
150
Location
Suffolk, VA
First name
David
I have cut sections of wood sold to me as Dalbergia lanceolaria, monticola and palo-escrito for end grain photos. I plan to take pictures using a dissecting microscope in my lab. I have a camera that fits on top of the microscope that transmits the image to a widescreen TV (fancy huh?). The light source on the microscope is angled and the light level is adjustable. I plan on following your procedures for prepping end grain for photos per your website. My questions are:

1. Is 10X the recommended magnification you use for photos? I've read as much but just making sure.

2. I was wondering if cleaning the prepared end grain surface prior to photos is necessary to remove particles or dust from pores? I was thinking about a small vacuum or desktop compressed air to blow the surface off.

3. You have a ruler or measuring tape beneath each photo. I'm trying to figure out how to place it beneath the wood but flush with the surface being photographed. I could use a piece of wood placed beneath it that's just under the thickness of the wood surface to be photographed so the surface of the ruler is flush with the surface of the end grain to be photographed. I have small plastic scientific-grade rulers I plan on using.

I plan on posting the pics to the Wood ID section for review. Thanks!
 

phinds

Moderator
Staff member
Global Moderator
Founding Member
Full Member
Forum Moderator
Messages
9,935
Reaction score
17,745
Location
Cortland, NY
First name
Paul
  • Thread Starter Thread Starter
  • #8
You could lay a flat piece of paper on the wood like the ones I use for my non-end-grain pics. A ruler would be fine as long as it's very legible.

Once I have sanded the end grain to 1200 grit I rub it gently with my dry finger to remove dust and don't touch it after that. Compressed air blowers are a no-no since then can spew fine water particles on the wood and thus raise the grain and destroy all the work of the fine sanding.

10X to 12X is what I use ONLY because that's all that I think I can reasonably ask of my fellow woodworkers. For my own information. I have a microscope setup and go to 300X. I've done maybe 1,000 pieces that way as opposed to the 3,500 or so that I've done at 12X, and to be fair it's rarely any more helpful than 12X.
 
Last edited:

TurkeyWood

Member
Full Member
Messages
204
Reaction score
150
Location
Suffolk, VA
First name
David
I can’t remember if I thanked you for this info but I really do appreciate it. I think I’ll do regular sandpaper as I don’t have plans to do this often.
 

TurkeyWood

Member
Full Member
Messages
204
Reaction score
150
Location
Suffolk, VA
First name
David
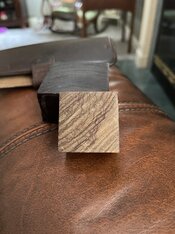
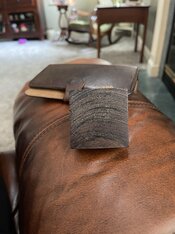
So I finally got around to sanding the three rosewood specimens I want to try to ID. Before I did I calculated the specific gravity of each specimen. The three specimens were sold to me as Dalbergia lanceolaria, Madagascar Rosewood Voamboana, and Aztec Rosewood. I did not take a moisture measurement, but they are very old pieces and have been inside my house for several months since I purchased them. I suspect they are below 12% moisture.

Specific gravities are:
Aztec Rosewood = 0.76
D. lanceolaria = 0.99
Madagascar Rosewood Voamboana = 1.13

My sanding was by hand using sandpaper I picked up a Lowe’s which may have affected my results. Having not done this before I felt like I was winging it. I used 80, 120, 220, 400, 800, 1,500 and 2,000 grit sandpaper (what Lowe’s had). Now that I’m thinking about it more, I should have stopped at 1,500 grit or found some 1,200 grit sandpaper.

I don’t expect accolades from the pictures I took using my cell phone. These are just to give you an idea of the engrain of each wood. I want to redo these before taking pictures with my dissecting microscope.

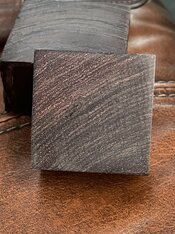
Aztec Rosewood, D. lanceolaria, then Voamboana. Need to blow these up to see pores. Of greatest concern are the black smudges on the D. lanceolaria. Also, it seems I have wood dust in the Voamboana pores. I “think” the Aztec Rosewood is D. palo-escrito. I’m not sure about the D. laceolaria as it smells just like Burmese Blackwood (D. cultrata) and the specific gravity is similar to Burmese Blackwood. I don’t know the specific gravity of D. lanceolaria. As for Voamboana, it has a higher specific gravity than known rosewoods from Madagascar. Gilmer Wood had a rosewood claimed to be from Madagascar for sale on their website many years ago. Although they claimed it was from Madagascar, they also indicated that it smelled like Kingwood or Camatillo and was hard and heavy. Well this wood is heavy, and it doesn’t look like the Camatillo I have. It does look more like Kingwood than Camatillo. The specific gravity is somewhat less than Camatillo/Kingwood.
Anyway, do I need to start the sanding process over or go ahead and take pictures with the microscope and see what we get?
IMG_2837.jpeg

IMG_2834.jpeg

IMG_2836.jpeg
 

phinds

Moderator
Staff member
Global Moderator
Founding Member
Full Member
Forum Moderator
Messages
9,935
Reaction score
17,745
Location
Cortland, NY
First name
Paul
  • Thread Starter Thread Starter
  • #11
I don’t expect accolades from the pictures I took using my cell phone. These are just to give you an idea of the engrain of each wood. I want to redo these before taking pictures with my dissecting microscope.
Search
Good pic, but you are right that more resolution is needed for any analysis. It would be best if you can get something like 10X or 12X in addition to microscope pics since it is unlikely that anyone here but me uses anything higher and thus very hi-mag pics don't allow our many other knowledgeable folks to participate. Do you have a camera in addition to your phone?
Anyway, do I need to start the sanding process over or go ahead and take pictures with the microscope and see what we get?
Unless you've done something to disturb the end grain since you did the sanding, there should be no reason to do it again.

Also, just to re-iterate my original post, I only go to 1200 grit. Only very rarely do I find that to be more useful than 400 grit. In only one case have I ever had to depend on my 300X pics to distinguish a wood. Here's that one case: https://woodbarter.com/threads/oops-my-new-tool-proves-useful.40592/#post-559422
 

TurkeyWood

Member
Full Member
Messages
204
Reaction score
150
Location
Suffolk, VA
First name
David
The microscope I call a dissecting scope is a stereomicroscope. Its magnification range is 7-45X. It’s very similar to this one. I hope to get the pics Monday.

IMG_2838.jpeg
 

Caesars Pallets

Member
Full Member
Messages
28
Reaction score
77
Location
Prescott, AZ
First name
Sean
@phinds
I just want to say thank you for all the information you provide on your website. I've used it countless times to ID or attempt to ID random wood that I've found on the side of the road. I'd be lost on a lot of this stuff without your site!
 

TurkeyWood

Member
Full Member
Messages
204
Reaction score
150
Location
Suffolk, VA
First name
David
Good pic, but you are right that more resolution is needed for any analysis. It would be best if you can get something like 10X or 12X in addition to microscope pics since it is unlikely that anyone here but me uses anything higher and thus very hi-mag pics don't allow our many other knowledgeable folks to participate. Do you have a camera in addition to your phone?

Unless you've done something to disturb the end grain since you did the sanding, there should be no reason to do it again.

Also, just to re-iterate my original post, I only go to 1200 grit. Only very rarely do I find that to be more useful than 400 grit. In only one case have I ever had to depend on my 300X pics to distinguish a wood. Here's that one case: https://woodbarter.com/threads/oops-my-new-tool-proves-useful.40592/#post-559422
My first attempt is posted in the wood ID section.
 

pinky

Member
Full Member
Messages
1,671
Reaction score
2,626
Location
Marco Island, Fl.
First name
John
@phinds
Any latin wood names ending in tiara? I'm aware of goncalvo alves. I have something marked that is hard to read. ????mietiara. 4 letters smudged out, the last 8 are somewhat legible.
 

phinds

Moderator
Staff member
Global Moderator
Founding Member
Full Member
Forum Moderator
Messages
9,935
Reaction score
17,745
Location
Cortland, NY
First name
Paul
  • Thread Starter Thread Starter
  • #17

pinky

Member
Full Member
Messages
1,671
Reaction score
2,626
Location
Marco Island, Fl.
First name
John
Thanks... what about goncalvo alves - muiracatiara maybe that's a common name?
 
Last edited:

phinds

Moderator
Staff member
Global Moderator
Founding Member
Full Member
Forum Moderator
Messages
9,935
Reaction score
17,745
Location
Cortland, NY
First name
Paul
  • Thread Starter Thread Starter
  • #19
Thanks... what about goncalvo alves - muiracatiara maybe that's a common name?
Yes, that's an alternate common name for goncalo alves, not a latin name.
 
Top