Basic Pen Making Tutorial

WoodLove

If I cant turn it, then it's time to burn it.
Full Member
Messages
1,295
Reaction score
1,147
Location
Winter Haven Florida
First name
Jamie
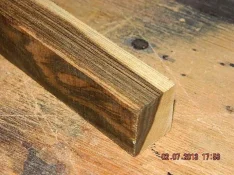
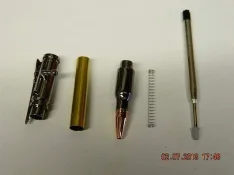
By request, I was asked by Bigg081 to post a thread on how to make a pen. Bigg081 ordered the pen used in this tutorial so I felt it was fitting to show how his pen was made. I am no expert, but I feel this will help those woodworkers who may be considering penmaking now or in the future. This particular pen kit is a bolt action pen kit in a gun metal finish. The blank being used is Texas Ebony.

P1- Lay out your pen kit and make sure all of the parts are there for assembly.

[attachment=18100]

P2- Select the blank you are going to use and cut it to the length needed for the pen. Cut just slightly oversized for the blank to be trimmed flush with the carrier tube.

[attachment=18101]
p1.webp

p2.webp
 
  • Thread Starter Thread Starter
  • #2
P3- Mark the center of the pen blank on each end, then drill the appropriate sized hole for the brass carrier tube to fit into. Glue the tube in place.


[attachment=18103]

P4- trim the end of the wood blank flush with the brass tube.


[attachment=18104]

P5-Make sure the blank and tube are fush and square. Be sure that any glue runout from the tube being glued into the pen blank is removed prior to mounting and turning as this can cause the tube to become stuck on the pen mandrel, of cause difficulties when the pen is assembled.

[attachment=18105]

p3.webp

p4.webp

p5.webp
 
  • Thread Starter Thread Starter
  • #3
P6- Install the pen blank onto the pen mandrel using the proper bushings for the type of pen you are making.

[attachment=18106]

P7-Turn the pen on the lathe the thickness of the bushings, leaving the blank thick enough for final sanding and finishing.

[attachment=18107]

P8-Notice the thickness of the blank is just proud of the bushings. this will be reduced by sanding the blank.

[attachment=18108]

P9-I use 5 different sanding grit from 150-600 grit. Sand the blank with the lathe spinning with each successively finer grit of sandpaper. After each grit work the sandpaper lengthwise to remove any sanding lines. This will improve the finished look of the pen greatly.

[attachment=18109]

p6.webp

p7.webp

p8.webp

p9.webp
 
  • Thread Starter Thread Starter
  • #4
P10-Select the finish and take your time to finish the wood. This is where the pen get's its character and sheen. The time taken at this step in the process will make a huge impact on the finished pen.

[attachment=18110]

P11-Remove the finished blank from the mandrel. Assemble the pen per the directions that came with the pen kit. These may vary greatly depending on the pen kit being used. Typically you will need to press-fit the ends of the pen. Take your time because once the pieces are pressed into place, if you had to remove them for any reason the kit will probably be ruined.

[attachment=18111]

P12-Once assembled, the pen is complete and ready for use....

[attachment=18112]

p10.webp

p11.webp

p12.webp
 
Thanks for posting. Good clear photos, well done indeed. Nice pen too, it shines.:good2:
 
Excellent tutorial Jamie. Thanks for posting it. I edited your first post and you can see here how I did it so your posts will be easier to read in the future. Again great tutorial.

:good2:
 
Woodlove, thanks for taking your time to post this. I have the wood blanks now from a lot of cool logs I’ve collected. Have the lathe. Just need to courage to give it a try. One question: Do you use any special turning tools? I have just a basic set of lathe tools, but really hope to not have to invest in hundreds of dollars worth of specialized tools for pen turning. What do you think?
 
  • Thread Starter Thread Starter
  • #10
I started turning pens within the last three months. I am still learning as I go. I would say that your cheapest route, which is the same thing I did to get started, was to purchase the basic pen starter kit from PSI for approximately 100 dollars (no endorsement for PSI). The kit includes 10 slimline kits, as well as pen chisels and other things you would need...... plus a dvd on penmaking. Hope this helps.
 
WOW!! Giving away all of our penmaker secrets!!:sarcastic:

J/K great tutorial. Pen making isn't too difficult. You just have to get used to turning to exact dimesions
 
  • Thread Starter Thread Starter
  • #12
Thank you Kevin for the help with the tutorial. I appreciate it.
 
WoodLove said:
I started turning pens within the last three months. I am still learning as I go. I would say that your cheapest route, which is the same thing I did to get started, was to purchase the basic pen starter kit from PSI for approximately 100 dollars (no endorsement for PSI). The kit includes 10 slimline kits, as well as pen chisels and other things you would need...... plus a dvd on penmaking. Hope this helps.

Thanks. I’ll go that route also when I get around to starting this new venture.
 
Gentlemen,

I received the pen in this tutorial today and its is perfect. The craftsman ship that Woodlove put into this is remarkable. Very impressed.
 
  • Thread Starter Thread Starter
  • #15
Im glad you like it. Im anxious to see you make something from the wood you've been scooping up here .....
 
Very cool build thread. I've never done a pen but if I ever decide to I'll come back to this for sure. Thanks for posting.
 
Very cool! Is this some of the TE I sent you? Looks similar to the blank I sent for Wildthings to turn for me... Can't Wait!!! :good2:

Jacob
 
  • Thread Starter Thread Starter
  • #19
Yes it is...... very nice Texas Ebony. You sent some beautiful blanks and will most likely see more of it in various styles in the coming weeks. I have about 15 pens to make..... then my next batch to ship out is 30-50 pens to Hobbit-Hut to help him stock his store that he is opening...
 
Back
Top