

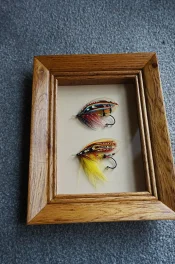
I have a few full dress salmon flies that I'd accumulated over the years and finally decided I needed to frame them before they got ruined. So I thought maybe someone on here might be interested in how to take a regular frame and turn it into a shadow box.
Step 1: Go to Goodwill, St Vincent de Paul, Habitat, anywhere that sells used home decor and check out their frames. You can usually pick up some really nice frames for a buck or two. You might have to do a little light sanding and apply a coat of wipe on poly to dress the frame up or remove scratches and dings, but for a buck you can't beat it.
Step 2: Decide how deep you need the shadow box to be. Lay out what you're going to frame, figure out how you plan to secure it inside the box, determine if you want it suspended above the matt board, and how much free space you want between the object and the glass. In my case, I wanted the flies suspended about 0.125" to 0.25" above the matt and wanted about the same free space between the flies and the glass. The flies are relatively flat so I needed roughly 0.375" for the actual flies. Adding all those dimensions up means I needed approx 0.75" of depth in my shadow box.
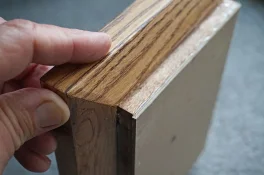
I had some 3/32" thick strips of maple laying around (leftover from when I made go bars for my guitar build). These were already 3/4" wide, so perfect for my box. I simply measured them to fit inside the frame, then used my sanding disc to put a 45 degree bevel on each end. By trial and error, I snuck up on the fit. You want this depth extension to fit inside the frame but not be so tight you bend the sides trying to make it fit. You can also use a sharp chisel to adjust the inside edge of the frame, since many frames aren't exactly square or may have some glue squeeze out, etc.
Once I had my depth extension cut and sanded to fit, I simply glued it together using Titebond. I glued mine together inside the frame, just be careful not to apply too much glue or you'll not be able to remove the extension from the frame when the glue dries.
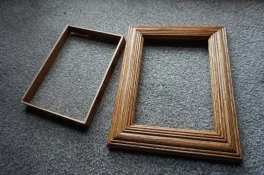
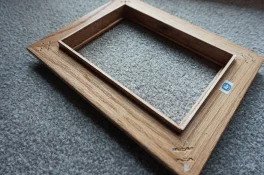
Step 3: Once the depth extension dries, remove it from the frame, do a little light sanding and then apply stain and finish. Note: if your frame isn't square, your extension may only fit exactly as you glued it, so place a piece of tape or make a pencil mark that aligns with another mark on the frame. I used a stain to match the frame. Another alternative is to stain the outside to match the frame, but paint the inside to match (or compliment) the color of the matt board you plan to use. White or black are often good choices for the sides. You can also cut matt board the same width as your depth extension and glue it to the inside of the depth extension. I applied a coat of wipe on poly satin finish just to seal it all.
Step 4: Place the depth extension on your matt board and carefully trace the INSIDE. I used an exacto knife with a pointed blade to get this as exact as I could. Then carefully cut your matt board and test fit it. It should fit snugly inside your depth extension with no readily visible gaps between the matt and the sides of your depth extension. If needed, use your exacto blade and steel ruler to make tiny trim adjustments. It's okay if you hold it up to the light and can see a little sliver of light, you just don't want any gaps visible to the naked eye. Next place the depth extension on a piece of backer board (stiff cardboard or even 1/8" plywood) and trace the OUTSIDE of the depth extension. This doesn't have to be as accurate since this backer board will sit flush to the outside of your depth board.
Step 5: Place three or four (more if necessary) strips of double sided tape on the back of the matt. Fit the matt board inside the depth extension. Place the depth extension on the backer board, align the edges, and then press the matt board downward so the double stick tape sticks the matt to the backer. If you don't care if the matt shows, you can simply make the matt the same size as the backer board and stick them together.
Step 6: Place your matt board and depth extension inside the frame (no glass for this step). Arrange the pieces you're going to frame. If you're going to attach these pieces, decide where the attachment points will be. In this case, I wanted to mount the flies using short, clear acrylic rods. I knew the point of the hooks on the flies would penetrate the rods about halfway to the barb on the hooks. So without moving the flies, I made a tiny mark at about that point. If you were going to use monofilament to secure your pieces (such as arrowheads or something) you would make a tiny mark where you needed holes to thread the monofilament through the backing. If you simply plan to glue the piece to the matt, the marks you make will help you know where to apply glue.
Step 7: Using a sharp drill bit the same diameter as my acrylic rods, drill holes through the matt and backer boards where you made your marks. I do this by first drilling thru the matt/backer using a 1/16" drill bit, drill right on the marks you made earlier. This locates the hole location so I can see it from the back. Flip the matt/backer board face down on a clean piece of scrap and drill the final hole from the back, pressing the matt down firmly on the scrap. This minimizes the potential for tear out that might be visible on your matt. Clean up any tear out or frizzy bits with a sharp razor blade. I also smooth out the little lips that raise up on the matt board.
Step 8: Next I used a tiny bit I got from my dentist to drill a hole in my acrylic rods. This is a little tricky because the rods are round. One method is to heat a needle and melt a tiny divot in the rod to help center the drill bit. A helpful technique is to take a wooden clothes pin and make grooves with the edge of a file to hold the rod helps. Use this like a small clamp to hold the acrylic rod as you make the holes. Drill a hole thru the rod, leaving about 1/16" or slightly more so you don't crack the rod. If you have more than one object to mount, drill a hole on each end of the rod. You'll trim these to length in the next step. I find leaving the rods long at this point gives me something to hold on to while drilling the tiny holes. Knowing I wanted the flies to be about 1/8" - 1/4" above the matt, I measured that dimension from the hole I just drilled, added the thickness of my matt and backer board and then cut of the rods to length. Sand the cut off edges smooth, round the end where I drilled the holes, and then fit the rod into the hole in the matt/backer board. Do this by pressing the rod in from the matt side. This forces any lips or raised bits down into the hole. If you push the rod in from the back, you force these lips out where they will be seen inside your shadow box.
Step 9: I inserted the flies into the holes in the rods and gently turned the flies/rods to the desired position. Checked the alignment by placing the frame on the depth extension. Check to ensure you left enough space that your objects won't contact the glass. Once your happy with the fit, glue the rods in place by applying a drop of super glue from the back. Don't get carried away with glue, these won't be seeing any pressure or movement. You don't want glue leeching through to stain your matt. For these flies, I mixed a little 5 minute two-part epoxy and using a needle, applied some inside the holes I drilled in the acrylic rod. Then I carefully stuck the point of the hooks through these holes and applied a tiny bit more epoxy at each point where the hook penetrated the rod. I used popsicle sticks or whatever I had to support the flies until the glue set up. If you aren't framing flies, this is the time to attach whatever you are framing or positioning it inside the depth extension box.
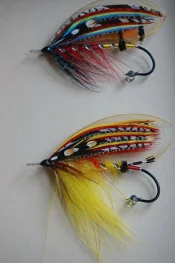
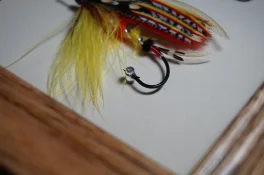
Step 10: Remove the frame from the depth extension and clean the glass. Place the glass back into the frame (careful not to get fingerprints on the inside), and then place the frame back over the depth extension. After making one last check to make sure everything is where you want it, hold the depth extension and backer board so they don't slip. You can tape these in place if it helps. Use hot melt glue to secure the depth extension to the frame and the backer board to the depth extension. If you push the bead of hot glue ahead of the tip, you can achieve a fine fillet of glue, just like a welder might achieve. You could also glue the backer board to the depth extension by applying a thin strip of glue to the edge of the depth extension but this introduces the possibility of getting glue on your matt, which might result in having to make another matt. So I opt to just glue it from the outside. You can't see any of these glue joints behind the frame anyway.
Step 1: Go to Goodwill, St Vincent de Paul, Habitat, anywhere that sells used home decor and check out their frames. You can usually pick up some really nice frames for a buck or two. You might have to do a little light sanding and apply a coat of wipe on poly to dress the frame up or remove scratches and dings, but for a buck you can't beat it.
Step 2: Decide how deep you need the shadow box to be. Lay out what you're going to frame, figure out how you plan to secure it inside the box, determine if you want it suspended above the matt board, and how much free space you want between the object and the glass. In my case, I wanted the flies suspended about 0.125" to 0.25" above the matt and wanted about the same free space between the flies and the glass. The flies are relatively flat so I needed roughly 0.375" for the actual flies. Adding all those dimensions up means I needed approx 0.75" of depth in my shadow box.
I had some 3/32" thick strips of maple laying around (leftover from when I made go bars for my guitar build). These were already 3/4" wide, so perfect for my box. I simply measured them to fit inside the frame, then used my sanding disc to put a 45 degree bevel on each end. By trial and error, I snuck up on the fit. You want this depth extension to fit inside the frame but not be so tight you bend the sides trying to make it fit. You can also use a sharp chisel to adjust the inside edge of the frame, since many frames aren't exactly square or may have some glue squeeze out, etc.
Once I had my depth extension cut and sanded to fit, I simply glued it together using Titebond. I glued mine together inside the frame, just be careful not to apply too much glue or you'll not be able to remove the extension from the frame when the glue dries.
Step 3: Once the depth extension dries, remove it from the frame, do a little light sanding and then apply stain and finish. Note: if your frame isn't square, your extension may only fit exactly as you glued it, so place a piece of tape or make a pencil mark that aligns with another mark on the frame. I used a stain to match the frame. Another alternative is to stain the outside to match the frame, but paint the inside to match (or compliment) the color of the matt board you plan to use. White or black are often good choices for the sides. You can also cut matt board the same width as your depth extension and glue it to the inside of the depth extension. I applied a coat of wipe on poly satin finish just to seal it all.
Step 4: Place the depth extension on your matt board and carefully trace the INSIDE. I used an exacto knife with a pointed blade to get this as exact as I could. Then carefully cut your matt board and test fit it. It should fit snugly inside your depth extension with no readily visible gaps between the matt and the sides of your depth extension. If needed, use your exacto blade and steel ruler to make tiny trim adjustments. It's okay if you hold it up to the light and can see a little sliver of light, you just don't want any gaps visible to the naked eye. Next place the depth extension on a piece of backer board (stiff cardboard or even 1/8" plywood) and trace the OUTSIDE of the depth extension. This doesn't have to be as accurate since this backer board will sit flush to the outside of your depth board.
Step 5: Place three or four (more if necessary) strips of double sided tape on the back of the matt. Fit the matt board inside the depth extension. Place the depth extension on the backer board, align the edges, and then press the matt board downward so the double stick tape sticks the matt to the backer. If you don't care if the matt shows, you can simply make the matt the same size as the backer board and stick them together.
Step 6: Place your matt board and depth extension inside the frame (no glass for this step). Arrange the pieces you're going to frame. If you're going to attach these pieces, decide where the attachment points will be. In this case, I wanted to mount the flies using short, clear acrylic rods. I knew the point of the hooks on the flies would penetrate the rods about halfway to the barb on the hooks. So without moving the flies, I made a tiny mark at about that point. If you were going to use monofilament to secure your pieces (such as arrowheads or something) you would make a tiny mark where you needed holes to thread the monofilament through the backing. If you simply plan to glue the piece to the matt, the marks you make will help you know where to apply glue.
Step 7: Using a sharp drill bit the same diameter as my acrylic rods, drill holes through the matt and backer boards where you made your marks. I do this by first drilling thru the matt/backer using a 1/16" drill bit, drill right on the marks you made earlier. This locates the hole location so I can see it from the back. Flip the matt/backer board face down on a clean piece of scrap and drill the final hole from the back, pressing the matt down firmly on the scrap. This minimizes the potential for tear out that might be visible on your matt. Clean up any tear out or frizzy bits with a sharp razor blade. I also smooth out the little lips that raise up on the matt board.
Step 8: Next I used a tiny bit I got from my dentist to drill a hole in my acrylic rods. This is a little tricky because the rods are round. One method is to heat a needle and melt a tiny divot in the rod to help center the drill bit. A helpful technique is to take a wooden clothes pin and make grooves with the edge of a file to hold the rod helps. Use this like a small clamp to hold the acrylic rod as you make the holes. Drill a hole thru the rod, leaving about 1/16" or slightly more so you don't crack the rod. If you have more than one object to mount, drill a hole on each end of the rod. You'll trim these to length in the next step. I find leaving the rods long at this point gives me something to hold on to while drilling the tiny holes. Knowing I wanted the flies to be about 1/8" - 1/4" above the matt, I measured that dimension from the hole I just drilled, added the thickness of my matt and backer board and then cut of the rods to length. Sand the cut off edges smooth, round the end where I drilled the holes, and then fit the rod into the hole in the matt/backer board. Do this by pressing the rod in from the matt side. This forces any lips or raised bits down into the hole. If you push the rod in from the back, you force these lips out where they will be seen inside your shadow box.
Step 9: I inserted the flies into the holes in the rods and gently turned the flies/rods to the desired position. Checked the alignment by placing the frame on the depth extension. Check to ensure you left enough space that your objects won't contact the glass. Once your happy with the fit, glue the rods in place by applying a drop of super glue from the back. Don't get carried away with glue, these won't be seeing any pressure or movement. You don't want glue leeching through to stain your matt. For these flies, I mixed a little 5 minute two-part epoxy and using a needle, applied some inside the holes I drilled in the acrylic rod. Then I carefully stuck the point of the hooks through these holes and applied a tiny bit more epoxy at each point where the hook penetrated the rod. I used popsicle sticks or whatever I had to support the flies until the glue set up. If you aren't framing flies, this is the time to attach whatever you are framing or positioning it inside the depth extension box.
Step 10: Remove the frame from the depth extension and clean the glass. Place the glass back into the frame (careful not to get fingerprints on the inside), and then place the frame back over the depth extension. After making one last check to make sure everything is where you want it, hold the depth extension and backer board so they don't slip. You can tape these in place if it helps. Use hot melt glue to secure the depth extension to the frame and the backer board to the depth extension. If you push the bead of hot glue ahead of the tip, you can achieve a fine fillet of glue, just like a welder might achieve. You could also glue the backer board to the depth extension by applying a thin strip of glue to the edge of the depth extension but this introduces the possibility of getting glue on your matt, which might result in having to make another matt. So I opt to just glue it from the outside. You can't see any of these glue joints behind the frame anyway.
Last edited:


