
Turn a bowl the old school way

Jonkou

Member
Full Member
Messages
3,019
Reaction score
8,672
Location
Alton Bay NH
First name
John
Working on a lesson plan for teaching bowl turning and figured I’d organize my thoughts and do a dry run here. Questions and comments welcome. This tutorial is to demonstrate a simplistic method for turning a bowl. It‘s meant to be a guide for newbies using just what came with the lathe. No chuck is needed and will only use two turning tools, a bowl gouge and a parting tool. Though this bowl is medium/large the principles are the same for turning any scale on any lathe.

Use a belt sander to make a flat spot on the face of the prepped blank, mount a faceplate on center (using a screw chuck here). Bring up a live center in the tailstock and lock it down.
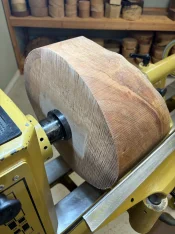
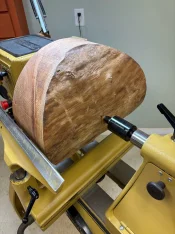
IMG_8589.webp IMG_8588.webp

Remove the waste with a bowl gouge until all surfaces are leveled. Not shaping anything yet, just seeing what there is to work with.
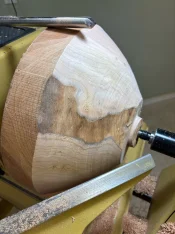
IMG_2700_Original.webp

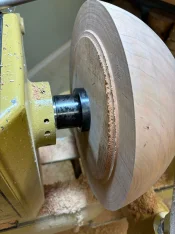
Rough out the outside to the desired shape paying particular attention to shape, scale and form.
Flatten the bottom in preparation for mounting a waste block and establish the rim.
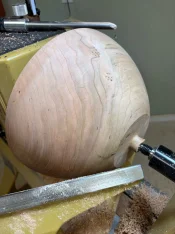
IMG_2702_Original.webp IMG_2701_Original.webp

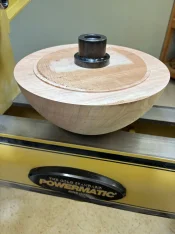
Minimum material has now been removed to reveal what there is to work with. Repair any defects if needed.
IMG_2703_Original.webp
 
My 2-cents..........glue blocks and face plates are "old school" (I know, because I'm old) as your title suggests - LOL

As I teach newbies, I teach rough-turning between centers on everything up to 12" diameter and then into a chuck for hollowing.

Bigger stuff with a face plate (if necessary) although I personally turn everything up to 16" diameter between centers (I'm experienced and careful) . Chucks are inexpensive compared to the price of lathes and some of the other tools, and so much easier. Rough turning between centers offers so much flexibility in lining up grain, etc. vs. kinda being stuck and the hassle of repositioning a face plate or glue-block.

But, I also understand everyone has their favorite method and it all works at the end of the day.
 
Last edited:
  • Thread Starter Thread Starter
  • #5
Next step is attach the faceplate with a solid wood waste block minimum 1/3 the dia of the piece being supported.
Remove the nub and dress the foot so it’s flat.

IMG_8590.webp IMG_8593.webp IMG_8594.webp

Scuff the foot and waste block with coarse sandpaper for a stronger bond. Bring up the tailstock and dimple the foot to find center, mark the outline of the waste block and pre check the glue up alignment.

The dimple will be invaluable later when reverse mounting the bowl to complete the foot.

IMG_8595.webp IMG_8596.webp

Test fit, all good

IMG_8597.webp

Butter the two surfaces with glue and mate them together. A cone on the tail stock works well to ensure a more precise alignment.

Normally use medium CA and can be back to turning in minutes. Recommend wood glue for newbies because it has much better shear strength in case of a catch.

IMG_8598.webp IMG_8599.webp IMG_8600.webp
 
  • Thread Starter Thread Starter
  • #6
My 2-cents..........glue blocks and face plates are "old school" (I know, because I'm old) as your title suggests - LOL

As I teach newbies, I teach rough-turning between centers on everything up to 12" diameter and then into a chuck for hollowing.

Bigger stuff with a face plate (if necessary) although I personally turn everything up to 16" diameter between centers (I'm experienced and careful) . Chucks are inexpensive compared to the price of lathes and some of the other tools, and so much easier. Rough turning between centers offers so much flexibility in lining up grain, etc. vs. kinda being stuck and the hassle of repositioning a face plate or glue-block.

But, I also understand everyone has their favorite method and it all works at the end of the day.
Hear you and agree, goal of this exercise is use what came with the lathe to keep expenditures to a minimum until sure they will stick with it.
Typically do the aligning when cutting and dressing the blanks, rarely turn rough stuff anymore where can’t read the grain. Exception would be natural edge bowls where do tween centers to balance the rim.

IMG_8601.webp IMG_8602.webp
IMG_8604.webp IMG_8603.webp
 
  • Thread Starter Thread Starter
  • #7
After the glue dries mount it on the lathe and remove the ugly from the top to get it balanced and minimize vibrations.

IMG_8609.webp IMG_8608.webp IMG_8614.webp

Shape the outside as desired, fix any surprises and shear scrape to minimize sanding.

IMG_8610.webp
IMG_8612.webp IMG_8613.webp IMG_8615.webp
 
  • Thread Starter Thread Starter
  • #8
Just a little more turning, refine the foot and establish the top of the undercut rim.

IMG_8617.jpeg IMG_8618.jpeg

Sand the outside to 400

IMG_8619.jpeg IMG_8620.jpeg IMG_8621.jpeg

Outside is complete, will hollow it next time. Don’t turn much big stuff anymore, too physically demanding and usually only work in 2-3 hr sessions no matter what I’m making. In the end it doesn’t matter what is left on the floor or how long it took to make, it’s the pleasure of the creative process that motivates me to keep going.

IMG_8622.jpeg
 
Last edited:
  • Thread Starter Thread Starter
  • #10
Undercut the rim first and establish the wall thickness (<1/4”) then hollow in stages to minimize flex while cutting. Remove the center cone in stages as you go.

IMG_8624.webp

The undercut rim traps the shavings

IMG_2711_Original.webp
IMG_2712_Original.webp IMG_2714_Original.webp IMG_2715_Original.webp IMG_2716_Original.webp

Set up to sand the inside next time

IMG_2717_Original.webp
 
Great step by step so far John, as expected.

The only things I might add would be:
  • General safety
  • Grain orientation and a few tips such as bowl gouge vs. roughing gouge and speed selection.
  • The pros and cons of wet / green wood versus dry as many just starting out may not know.
 
  • Thread Starter Thread Starter
  • #12
Sand the inside and outside to 600

IMG_8633.jpeg IMG_8634.jpeg IMG_8635.jpeg

Part off from the waste block, don’t go too deep and risk it breaking.

IMG_2719_Original.jpeg IMG_2720_Original.jpeg IMG_2722_Original.jpeg

Dress the waste block to use again or shape it to use as a jam chuck to complete the bottom.

IMG_2723_Original.jpeg

Use a chisel to remove the nub. Note - the dimple will be used for alignment.

IMG_2724_Original.jpeg IMG_2726_Original.jpeg
 
Last edited:
  • Thread Starter Thread Starter
  • #13
Mount the bowl on a reverse jam chuck and bring up the tail stock to lock it in. The drawer liner provides traction and protects the finished bowl surface.

IMG_2727_Original.jpeg IMG_2729_Original.jpeg IMG_2728_Original.jpeg

There isn’t much holding the bowl on so take your time and use light cuts. Turn as much of the foot as can without risking a failure.

IMG_2730_Original.jpeg

Remove the nub with chisels and sand to completion.

IMG_2732_Original.jpeg IMG_2733_Original.jpeg

Not part of the lesson plan but did want to complete turning the bottom to my normal standards.

IMG_2734_Original.jpeg IMG_8638.jpeg

Ready to apply your finish of choice.

IMG_8637.jpeg IMG_8636.jpeg

So that wraps it up… you too can turn a bowl with just a bowl gouge and parting tool using what came with your lathe. Accessories such as chucks, various turning tools, and countless other stuff are handy but not necessary. By them as needed as your skills increase.
 
Last edited:
Very nice tutorial John. Ought to be required reading for any new turner.

Too often, and too quickly, we as a society turn to buying a new tool, accessory, or gizmo to help solve problems. If one were to just take a step back and think about the situation, the solution may be as simple as a little ingenuity and tools at hand.
 
We sure 'nuf know those old traveling lathe masters wouldn't have carried 2500 dollars worth of additional tools that got used once a year. I bet the old timers had no more than 10 lathe tools and some of them likely did double duty from time to time. Saws make great parting tools if you are treadle lathe working. Your newer, high speed society and get bunches of them done now ideas didn't get traction until the last century. There were Several centuries where folks only made what they could use right then. With what they had right then. Those who had a lathe and chisel turned their bowl. Those who had a hatchet, chopped their bowl out and smoothed it with what they had on hand. Those who had neither, got a fire going and burned a bowl out. All the bowls still held food. These tutorials are a good reminder that 10 bucks with time goes farther than 100 bucks with no patience.
 
Back
Top