Brazilian Pepper Tree HF

barry richardson

Moderator
Staff member
Global Moderator
Full Member
Messages
10,597
Reaction score
17,596
Location
Buckeye AZ
First name
Barry
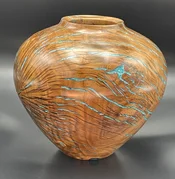
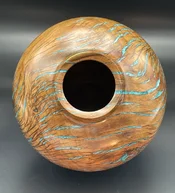
So I posted some roughed out blanks I picked up a while back, just finished this one. I usually put crushed turquoise w/resin in the cracks, but this had so many cracks it seemed like too much work, So it is filled with justrsin and turquoise mica flakes. It pops pretty good. First time turning Brazilian Pepper Tree, its hard stuff. About 9"x9"....
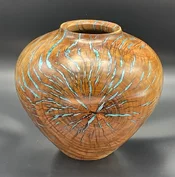
pp11.webp pp3.webp pp22.webp
 
I normally prefer natural wood pieces but that one could change my thinking. Very unique, special vase. I'd be interested in hearing a little more detail how you filled all those cracks / applied the resin. Did you paint it on? Use a hypodermic and fill every crack one by one?
 
Last edited:
  • Thread Starter Thread Starter
  • #17
I normally prefer natural wood pieces but that one could change my thinking. Very unique, special vase. I'd be interested in hearing a little more detail how you filled all those cracks / applied the resin. Did you paint it on? Use a hypodermic and fill every crack one by one?
Thanks Doug, First I cleaned out the cracks and widened the hairline cracks with a pointy dremel tip. The cracks that went all the way through were taped from behind and/or plugged with shreds of leather. I used 2-part 5 min epoxy for the resin mixed in small batches with the mica powder. With an area facing up, slather on the resin working it into the cracks and tried to leave the resin proud of the surface, rotate the piece a bit and repeat. It probably took about 10 batches. It was almost all blue and covered in resin after that. Put it back on the lathe and turned away the resin down to the wood surface, then went back over it to fill voids with more resin. It was a lot of work, Im hoping I can streamline the process in the future. One could submerge the entire blank in a form and use casting resin, then turn away the excess, but that would take a lot of resin, and I think a pressure pot is used for that method, which I dont have...
 
Last edited:
Thanks for describing how you did that Barry. You filled the cracks so fully I kind of suspected you did each one individually. At least with the 5 min epoxy you didn't have to worry too much about the epoxy dripping out of the crack. And being able to turn off the excess epoxy on the lathe would be way easier than sanding or scraping it off - which is what I would have to do. You put a lot of work into that and it shows.
 
One could submerge the entire blank in a from and use casting resin, then turn away the excess, but that would take a lot of resin, and I think a pressure pot is used for that method, which I dont have...
You are right, Barry, a pressure pot and a lot of resin required for that option. A pricey alternative with most of the resin ending up as wispy strings everywhere. Ask me how I know that…..

IMG_4974.webp
 
I knew we were going to see some great pieces once you got to it - you delivered! Great job Barry!
 
Back
Top