Custom Wood Pen ("kitless")

Sprung

Amateur Sawdust Maker
Full Member
Messages
9,556
Reaction score
15,663
Location
Kewaunee, WI
First name
Matt
Ok, starting on what will be custom pen #4. This one will be my first wood one.

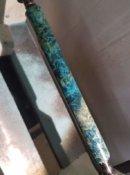
Wood is Boxelder Burl, stabilized & dyed by myself.
4A.jpg

Sorry I missed the steps to get from the rounded blank to what is pictured below. I just decided to take pics and post my progress on this one.

After rounding the blank, I measured what lengths I would need for both the cap and body portions. I left both a little long, so I can clean up the ends from the centers after shaping later.

I then drilled out each section. I think I used 9/16" for the cap (drilled it almost 3 weeks ago, so I can't remember) and I used 11mm on the body. Based upon the measurements I've thus far been working with, I drilled the cap 66mm deep and the body 73mm deep. How deep I'll need to drill on other pens will always depend on the design.

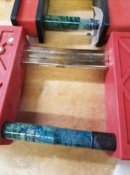
After that I turned some ebonite rod down to diameter to slide in, leaving it all a little long to give me something to trim up later. I made a shoulder for the body of the pen as I want a band of ebonite as an accent between the two halves of the pen.

I then epoxied them in, currently in clamps. I'll let it sit in clamps for at least 24 hours, but more likely 48 hours. The epoxy I'm using - System Three T-88 - is the best epoxy I've used, but does have a long cure time.
4B.jpg
 

Sprung

Amateur Sawdust Maker
Full Member
Messages
9,556
Reaction score
15,663
Location
Kewaunee, WI
First name
Matt
  • Thread Starter Thread Starter
  • #3
Made some great progress today.

Mounted it up in the collet chuck - you can see an example of the chatter you'll get if it's not supported with a live center. So I used a center bit and gave a nice place for a 60 degree live center to sit. This is the body of the pen in the collet chuck. I have a Beall collet chuck, as well as a set of metric collets. I work mainly in metric for this - my taps and dies are all metric. And it's an easier system of measurement than SAE.

4C.jpg

4D.jpg

Turn down your tenon for barrel to cap threads. I'm using a 13mm x 0.8 triple lead tap and die set for this pen. So this tenon is about 12.9mm.

4E.jpg

Then out came the center bit again. This is an important first step before drilling any holes to ensure it's centered.

4F.jpg

I've drilled to a depth of about 75mm with a 7mm bit. The drilled with a 9.25mm bit. That is followed by a 10mm x 0.75 tap. Lubrication for using taps and dies can be done with a task specific fluid. But many use cheap cooking spray, which is what I'm using, and it has worked well thus far.

4G.jpg

I used this tap & die holder from NeilsNiche.com. Very well made and works well!

4H.jpg

Shot of the collet chuck - it's threaded 1"-8tpi to mount right up on the spindle threads.

4I.jpg

And here it is with the tap holder to thread the 13mm x 0.8 triple lead threads for body to cap. Triple lead taps are expensive, but made a little more reasonable if you can join in on a group buy. Others use double lead taps, which are also custom made. If you want to give this a try without spending a lot of money, start with regular single lead taps. If you do buy custom double or triple lead taps and decide this isn't for you, you should be able to easily re-sell them - there's always people looking to buy the taps and dies.

4J.jpg

And threaded. Some put a relief at the bottom of the threads. I prefer to put a little relief inside the cap - I think it looks cleaner that way. But that's just my preference.

4K.jpg

Please not that I may not be giving drill bit dimension in every instance - each pen is different, dependent upon many variables - so what I'm doing may not work for what you may do. There is a certain level of hands on learning and experimenting with this to really learn - and to make it your own. And making custom pens is really all about making it your own or customizing it to the needs or desire of your customer.
 

Sprung

Amateur Sawdust Maker
Full Member
Messages
9,556
Reaction score
15,663
Location
Kewaunee, WI
First name
Matt
  • Thread Starter Thread Starter
  • #4
Now I have the cap piece in the collet chuck.

4L.jpg

Center drilled, then drilled a 10mm hole 66mm deep. Followed by a 12.2mm drill deep enough for the section to fit in. The tap with the 13mm x 0.8 triple lead tap. (Sorry, forgot the pic of that.)

4M.jpg

And body and cap together! Left the band of ebonite for an accent in the finished pen.

4N.jpg

Now on to the section. Turn a 9.9mm tenon and then thread with a 10mm x 0.75 die to correspond with the female threads in the body of the pen. And drill it just a little with a 7mm bit for clearance for the cartridge or cartridge converter.

4O.jpg

4P.jpg

Turn it around, do some more drilling - 3 different bits - then tap for the feed threads. Check that the section fits. I'm using JoWo #6 nibs. I had an extra JoWo #6 feed after using a nib in swap in a pen for someone. So I took an extra #6 kit nib to stick in it. This is now my test feed/nib.

4Q.jpg

And now you have a basic pen that could write just fine, if you wanted to use it (but forget about capping it.)

4R.jpg

I made a special mandrel to hold the section (along with a live center) for shaping. Whatever shape I put on it, I'm looking for a diameter of 12mm after shaping, sanding, and polishing so that it just fits nicely into the cap without being too tight or too loose.

4S.jpg

And now it's beginning to look even more like a pen!

4T.jpg

Now after some shaping. I have a pair of mandrels I made that can hold the cap and body sections for shaping. Wanting to make this a straight pen of consistent diameter for its full length, I mounted one end in the collet chuck and a live center on the other end. Shaped (most of it) and sanded to 600 grit. Still need to shape the ends, but you get a good look here as to where I'm going with this. I'm not quite to the finishing step yet and haven't decided which finish I'm going to use, but am leaning toward a Tru-oil finish for this pen.

4U.jpg
 
Last edited:

Sprung

Amateur Sawdust Maker
Full Member
Messages
9,556
Reaction score
15,663
Location
Kewaunee, WI
First name
Matt
  • Thread Starter Thread Starter
  • #5
BTW, for anyone following along at home, I have used 8 different drill bits (not including the center bit), 3 taps, and two dies to make this pen. And this is a basic pen. Oh, add 2 more drill bit sizes that I used to drill out the wood blanks to insert the ebonite sleeves. If I was adding in other features, such as a clip or finials or rings, I could easily end up using some more drill bits/taps/dies.
 

Sprung

Amateur Sawdust Maker
Full Member
Messages
9,556
Reaction score
15,663
Location
Kewaunee, WI
First name
Matt
  • Thread Starter Thread Starter
  • #6
Got to sneak in the shop for an hour or so and used that as an opportunity to finish this pen up.

I put each piece in the collet chuck and shaped the ends.

4V.jpg

I them mounted each piece with its corresponding mandrel. These are ones I made from aluminum - I eventually want to make some new ones from stainless steel and make more for the other sizes of taps and dies I have.

4W.jpg

Pieces got sanded from 320 grit through 12,000 micromesh. Grain was wetted and sanded back a couple times along the way. Then I polished them with some Hut UltraGloss, followed by some Renaissance Wax. In this pic, the left is sanded up to 12,000 and the right is finished up.

4X.jpg

And the completed pen. I want to go back and polish the threads a little, but will call this one done. To polish just the threads, I'll put some blue painter's masking tape on the body of the pen and use a nylon brush w/ some Hut UltraGloss in the rotary tool.

4Y.jpg

4Z.jpg

Overall I'm happy with how this pen turned out and am thinking about maybe offering this one up for sale. This is custom pen #4 for me and my first time sleeving a material that won't take threads with a material better suited for threading.
 

Sprung

Amateur Sawdust Maker
Full Member
Messages
9,556
Reaction score
15,663
Location
Kewaunee, WI
First name
Matt
  • Thread Starter Thread Starter
  • #8
Fantastic pen Matt,way above my pay grade.

Troy, honestly this pen wasn't difficult to make. It just takes time and proper planning. I think I have about 3 hours into making this pen. My biggest challenge so far in making custom pens was probably getting started - it took me a while to acquire/afford the tooling needed.
 

ripjack13

ɹǝʇɹɐqpooʍ
Staff member
Administrator
Global Moderator
Full Member
Messages
30,855
Reaction score
37,759
Location
Connecticut
First name
Marc
See, now this is what I wanted to see. Thank you Matt. Thank you for taking pictures and explaining the process as you went.
 

Sprung

Amateur Sawdust Maker
Full Member
Messages
9,556
Reaction score
15,663
Location
Kewaunee, WI
First name
Matt
  • Thread Starter Thread Starter
  • #12
See, now this is what I wanted to see. Thank you Matt. Thank you for taking pictures and explaining the process as you went.

Thanks, Marc - it's not an exhaustive tutorial that gives you every little detail or measurement, but it hopefully gives enough information for a person to get started if they want to make a fully custom pen. This design is about as basic as you can get (except for the sleeving wood part - going with straight acrylic acetate or alumilite or ebonite blank would be even simpler) and you can get far more complex from here. There's still lots of things one has to figure out, but that's part of making a pen be your own instead of a direct copy of someone else's design.
 
Top