
Femisphere, a Type of Streptohedron

trc65

Member
Full Member
Messages
7,823
Reaction score
24,451
Location
Cameron, Illinois
First name
Tim
Just to get it out of the way.....

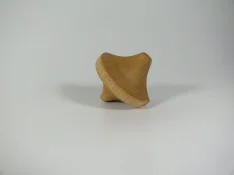
The femisphere is a solid that has one single surface, two edges, and four vertices.

And that's all I'm going to say about definitions!

Here's what I'm talking about;
IMG_4777.webp

It looks and sounds complicated, but really a simple, but precise,
process. There is a PDF at the bottom of this post describing the process in more detail. Also, if you want to explore geometric shapes in more detail and complexity, I'd recommend picking up the book WOODTURNING FULL CIRCLE by David Springett.


Ok, let's get going.

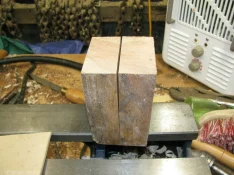
Start by taking a block a couple inches longer than the thickness and cut it in half lengthwise. You want a good cut surface as the next step is to glue it back together.
IMG_4780_copy_1408x1056.webp

Next, glue it back together. I used CA because it's quick, but when I get ready to turn several of these I plan to use newspaper and wood glue. I just trust that type of joint more. When you glue it up, make sure you get glue in the areas that will remain after turning so the whole thing doesn't fly apart.

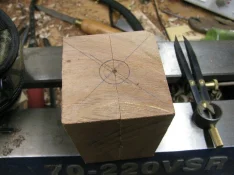
Next mark the centers which must be on the cut line. I use a punch on one end to align the drive center and draw a circle on the other end to align a cup center on the tail stock.
IMG_4781_copy_1408x1056.webp

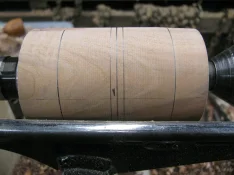
Mount it on the lathe an turn it round.

Next, draw a center line, and then a line on either side of that to mark the width of the edge (1/4" in this example). Then measure diameter and mark lines transferring that number to the length.
IMG_4783_copy_1408x1056.webp

Now, make a template for the curve using the radius. I just use a piece of hardboard and cut it on the bandsaw.
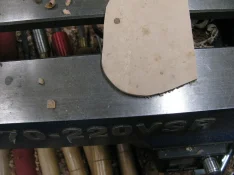
IMG_4784_copy_1408x1056.webp
 

Attachments

  • Thread Starter Thread Starter
  • #2
Back to the lathe now, I use a parting tool to take the diameter down on each end so there is room to work. You can see on the left how I've removed some of the waste. On the right I've started cutting the curve. The diameter at each end after turning will equal the measurement of the edge marked on the center (1/4"), but don't take the diameter down that small until you are almost done with your curves. If you do, the risk of twisting the blank off increase greatly (damhikt).

IMG_4788_copy_1408x1056.jpg

While cutting the curve check progress often with your curve template.

IMG_4785_copy_1408x1056.jpg

When you get it as close as possible, sand out any tool marks and repeat on the other side.
When you get to this point, both curves should match and the diameter on each end should match the width of the center edge.
IMG_4789_copy_1408x1056.jpg

The next step is too cut off the waste on each end with a saw. Don't try to use a parting tool or you will break it off and risk tearing the grain. Next use a flat chisel and gently pry the two pieces apart.


Yeah, I know, the blade on my table saw is dull, ugly cut...
IMG_4792_copy_1408x1056.jpg

From now on, it's just glueing and sanding. First, sand the flats of each piece so you've got good mating surfaces to glue it back together. Use a sheet of sandpaper on a hard flat surface. On this piece I actually used a six inch belt sander, but I wouldn't recommend that. These pieces are hard to hold onto and it's very easy to sand an uneven surface.

When you are ready to glue them back together, rotate one piece 90° and glue. The edges won't match exactly, but get them centered as close as possible. Notice how the points are too long, those will just be sanded off so ignore them. Focus on lining up the curves IMG_4791_copy_1408x1056.jpg
 
Last edited:
  • Thread Starter Thread Starter
  • #3
After glueing, knock of the points with course sandpaper, and then start working on the curves.

I used lots of CA glue to fill less than perfect edges here, but it sands off quickly.

IMG_4793_copy_1408x1056.webp

I use a small drum in a Jacobs chuck for the sanding. Just make sure that the drum is smaller than the radius of the curves. Also, don't use the course 60x or 100x grit paper that came with your drums, it will make a mess of the curves quickly. Instead, I've been using 220x paper attached with double sided tape. It removes the waste fairly quickly without leaving deep scratches that will be a pain to remove.

IMG_4794_copy_1408x1056.webp

After the drum, sand by hand to your desired level and finish.

IMG_4795_copy_1408x1056.webp

I think I've covered most of the important points, if not. I'm sure someone will let me know. If something is unclear, just ask and I'll try to clarify and add to this guide.
 
After glueing, knock of the points with course sandpaper, and then start working on the curves.

I used lots of CA glue to fill less than perfect edges here, but it sands off quickly.

View attachment 218785

I use a small drum in a Jacobs chuck for the sanding. Just make sure that the drum is smaller than the radius of the curves. Also, don't use the course 60x or 100x grit paper that came with your drums, it will make a mess of the curves quickly. Instead, I've been using 220x paper attached with double sided tape. It removes the waste fairly quickly without leaving deep scratches that will be a pain to remove.

View attachment 218786

After the drum, sand by hand to your desired level and finish.

View attachment 218787

I think I've covered most of the important points, if not. I'm sure someone will let me know. If something is unclear, just ask and I'll try to clarify and add to this guide.
Excellent description. That seems to be something I can follow.
 
  • Thread Starter Thread Starter
  • #5
Something else occurred to me as I was mindlessly fidling with it in one hand while reading tonight. The definition that it has only one surface. To understand that all you need to do is make one and sand it on the spinning drum. You sand the whole thing (except for the two edges) simply by rotating the femisphere without ever losing contact with the single face.

In addition to being a curiosity and fun to watch it waddle across a surface when "rolled", I find it oddly relaxing much in the same way as meditation balls are when spun in the hand.

They call me Captain Queeg...
 
Captain Queeg,

Are you making more? If so, here is an idea, use a bigger block so you can spin the 2 halves before turning, that way when you re-split it, you could line up the grain to make it look like it was done from a solid....or am I just out there?
 
  • Thread Starter Thread Starter
  • #7
That's a good idea!

I will be making more, these are going to be stocking stuffers this year so will probably be making a dozen or more. Most will be out of small scraps that are lying around, but will definitely try some large pieces rotated before turning.
 
Back
Top