Fourth guitar - Panama Exocet

DLJeffs

Member
Full Member
Messages
4,426
Reaction score
10,347
Location
central Oregon
First name
Doug
  • Thread Starter Thread Starter
  • #21
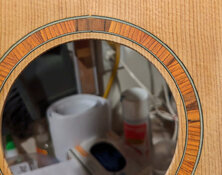
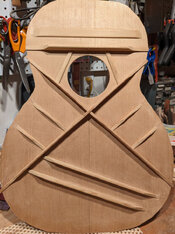
The top is finished as far as I want to go until my coach can check it over. The repair to the tear out by the sound hole is almost invisible. The bracing looks good and I can hear a nice ring in the top when I tap it. Won't get a good picture of the sound until the scallops are carved in the braces. And I still need to make and glue in the bridge plate but I have a couple design questions about that for my coach before I cut the plate, so I'll wait. He might be driving over this way this week end. He's trying to get 14 acoustics done in the shop.

sound hole tear out repair.jpg

top bracing finished except for bridge plate and scalloping.jpg
 

DLJeffs

Member
Full Member
Messages
4,426
Reaction score
10,347
Location
central Oregon
First name
Doug
  • Thread Starter Thread Starter
  • #22
Had a wee set back over the last few weeks. I brought my top, sides and back home from my coach's shop as he was trying to clean up things in anticipation of the owner stopping by. I put it in the radius disc with a weight on top to keep it more or less in the correct shape. But... We suspect the humidity was drastically different between his shop and my house because the back bowed badly in the wrong direction. Being in the radius disc, it dried more on the side with the braces than on the other. It's weird because none of the backs we had been working on in his shop moved at all, and most of those weren't even kept in a radius disc, they were just left flat on the shelf. Then to add insult to injury, I was messing with it, trying to gage if it would flex back when I glued it into the sides and cracked the lower bout all the way up to the first brace. Many bad words were uttered. So we let it sit, hoping it would acclimate and straighten out enough to go ahead and glue it into the back. But yesterday my coach stopped by and we decided the braces had to come off and and I'll re-brace it. So that was this morning's task. Went pretty smooth actually, took about an hour, hour fifteen minutes. Used a hand plane until I got within a sixteenth or so, then the chisel, then cabinet scraper, and finally a palm sander with 220 grit. Only barely nicked the back once or twice. That's one thing I've noticed - my skills with a chisel have improved drastically. So anyway, now I just need to stop by the shop and pick up a new set of back braces to sand and glue on. The two little cleats are just temporary to keep the crack from growing any until we get it in the sides. I glued the crack right after it happened but removing the brace where the crack stopped might have potentially allowed the crack to grow again. It won't hurt the guitar because that end gets glued to the heel block.

back removing sitka bracing.jpg

back after removing sitka bracing full view.jpg
 
Last edited:

DLJeffs

Member
Full Member
Messages
4,426
Reaction score
10,347
Location
central Oregon
First name
Doug
  • Thread Starter Thread Starter
  • #24
Finally got back to this guitar. After removing the back braces, the back flattened right out again, so it must have been the bracing that warped funny. Made new braces from spruce and glued them on. The back now looks like it's supposed to. Then I carefully chiseled off the two cleats I glued over the crack. Then I cut notches where the braces on the back and top will set in the sides. And glued the back on. You glue the back on first because that's the part you can see thru the sound hole. By gluing it first, you can flip it over, clean up any glue drips, etc. before gluing the top on.

back to sides 2nd time.jpg

While that's drying I started making the bridge. I started with a blank from the cocobolo board. Hand planed it to thickness, then used the chisel to thin the wings. Drilled the holes (using the ebony bridge as a pattern) and sanded it all to 150 grit. The main body still needs a slight arch on top and we need to route the slot for the saddle but my coach has a jig for that so I'll wait until I go to his shop on day. It's going to look cool with the cocobolo rosette and bridge. The binding will also be cocobolo as will the fingerboard and the headplate. It's going to be an attractive guitar even if it doesn't sound good.

bridges.jpg

cocobolo bridge on top.jpg
 
Last edited:

DLJeffs

Member
Full Member
Messages
4,426
Reaction score
10,347
Location
central Oregon
First name
Doug
  • Thread Starter Thread Starter
  • #26
Back is glued up and finished. I probably have a little glue residue to sand away. Next up is to shape the top braces to tune the top and then I'll glue it onto the sides. Then I'll have a guitar shaped box, ready for heal plate and binding.

Notice the last section of center brace is sort of triangular shape. I made it that way so it covered that crack I made in the sapwood. It reinforces that crack so it never opens up again. Because this is the back and generally stiffer than the top and not critical to the sound, a little wider section of bracing won't have any noticeable effect. And you need a mirror to see way down there inside the guitar so no one ever sees my boo boo.

back glued to sides.jpg
 
Last edited:

DLJeffs

Member
Full Member
Messages
4,426
Reaction score
10,347
Location
central Oregon
First name
Doug
  • Thread Starter Thread Starter
  • #28
Hoping to get back in my coach's shop today if the roads are drivable. I need his help tuning the top braces before I glue it on. Then we'll trim off the excess, route the dados for binding, bend the cocobolo strips for binding and glue on the binding. After that it's a bit of sanding. Then mortising the neck block and fitting a neck. Hopefully have some more pics soon.
 

DLJeffs

Member
Full Member
Messages
4,426
Reaction score
10,347
Location
central Oregon
First name
Doug
  • Thread Starter Thread Starter
  • #29
Got the top braces shaved down and the fretboard is shaped and fret kerfs cut. Here's a pre-view of what it'll sort of look like. Call me biased but I think it's going to look really awesome. The fretboard won't extend that far into the sound hole, it's just not trimmed to length yet.

top with bridge and fretboard.jpg
 
Last edited:

DLJeffs

Member
Full Member
Messages
4,426
Reaction score
10,347
Location
central Oregon
First name
Doug
  • Thread Starter Thread Starter
  • #30
Got the top braces tuned up and sanded, then glued the top onto the sides. So now it's a guitar shaped box.
top glued on.jpg

body glued up back view.jpg

body glued up front view2.jpg

This is a close up of how some of the braces are notched into the sides for strength and durability.
body glued up close up of brace notched.jpg

body glued up top view laying in disc2.jpg
The lines on the top are just shadows from the sun through the window behind it.


Next I'll trim off all the excess using a flush cut router with a washer. Since the top and back are both slightly rounded, the router will sit at an angle and the washer will ensure the bit doesn't contact the sides. After that it'll be cutting the dado and gluing in binding.
 
Last edited:

DLJeffs

Member
Full Member
Messages
4,426
Reaction score
10,347
Location
central Oregon
First name
Doug
  • Thread Starter Thread Starter
  • #31
All trimmed and pretty. I forgot, the next step is to make and glue in the end graft (the little decorative piece that covers and cleans up the end where the sides come together. That will be made from cocobolo also. THEN we get to bind it.

Trimming off the excess top and back is a little nerve racking for me. One little catch with the router bit and you can chip out beyond where the kerfing glues them in place. And that would be a major repair job. So I go real slow taking small passes until the bearing rests against the side. I almost chickened out completely and went to a hand plane and chisel - but I would be there until next week doing it that way.
top trimmed.jpg body in dreadnaught case.jpg

back trimmed.jpg
 
Last edited:

Arn213

craM de la craM # RipJack City!
Full Member
Messages
2,805
Reaction score
4,736
Location
Knickerbocker, NY
First name
Arn
This is looking terrific- this large size parlor and the OM is my favorite shape, not to take away from the a dred as it has the most powerful projection. You did really well on the composition of the back side as the undulating grain followed the shape/pattern going narrow at the upper bout and going wide at the lower bout. It is my favorite aesthetic look grain formation as it accentuates the shape more.

Great that you are going to do a slotted headstock as it would look better than a solid paddle headstock. I hope you incorporate a volute where the neck shaft transitions into the headstock as it will give it some stability and it compliments a slotted headstock.

The rosette colors are fantastic and that orange compliments that brownish coloration on the back and sides. You have that “dialogue” going with the bridge and fretboard color wise. Having said that, I don’t know what your plans are detailing the headstock, but I hope you will continue the “playful dialogue” and tie in the colors of the rosette/fretboard/bridge so you have a continuum and consistent relationship.

I hope you do the same with the binding and incorporate some of that orange in as a multiple ply. Perhaps bind the fretboard so everything looks custom tailored/detailed.

Just pushing you a little beyond what is comfortable or the standard of what is typical- go for it Doug, make it more unique, dynamic, more exciting and reach for the guitar’s highest potential as far as style and aesthetics…….you have the skill set to bring it to that next level & then some.

Arn
PS- once you start, you will never stop……
 
Last edited:

DLJeffs

Member
Full Member
Messages
4,426
Reaction score
10,347
Location
central Oregon
First name
Doug
  • Thread Starter Thread Starter
  • #35
Thanks for the feedback and positive comments and support Arn. I've really enjoyed building and learning about guitars. I don't know how many, if any, more I'll make. I have four of them stacked in my bedroom now. But it was always a sort of reassuring feeling when I have one in progress - sort of like having something to look forward to.

Regarding #4 here - yes, the headstock will be slotted and will have a cocobolo headplate. I'm hoping we'll be able to inlay my flying fish logo but there may not be enough room. Plus we no longer have access to a CNC. But that'd be okay if the fish isn't on there. The binding will be cocobolo - in fact I have the strips and the bender here at home and will bend them after I get back from fishing and right before my coach and I get together to do the binding. He has a full selection of bearings for the router so it's easier to go to his shop and set up the router. Plus, based on the first three guitars, binding is way easier with two people. The neck itself will be mahogany and yes, it'll have a stabilizing/strengthening volute (bird's beak in Martin terminology) at the transition to headstock. The only thing we probably won't do is bind the fretboard because the fretboard is cocobolo. All the cocobolo bits are cut from the same board my dad brought back from Panama.
 

Arn213

craM de la craM # RipJack City!
Full Member
Messages
2,805
Reaction score
4,736
Location
Knickerbocker, NY
First name
Arn
Thanks for the feedback and positive comments and support Arn. I've really enjoyed building and learning about guitars. I don't know how many, if any, more I'll make. I have four of them stacked in my bedroom now. But it was always a sort of reassuring feeling when I have one in progress - sort of like having something to look forward to.

Regarding #4 here - yes, the headstock will be slotted and will have a cocobolo headplate. I'm hoping we'll be able to inlay my flying fish logo but there may not be enough room. Plus we no longer have access to a CNC. But that'd be okay if the fish isn't on there. The binding will be cocobolo - in fact I have the strips and the bender here at home and will bend them after I get back from fishing and right before my coach and I get together to do the binding. He has a full selection of bearings for the router so it's easier to go to his shop and set up the router. Plus, based on the first three guitars, binding is way easier with two people. The neck itself will be mahogany and yes, it'll have a stabilizing/strengthening volute (bird's beak in Martin terminology) at the transition to headstock. The only thing we probably won't do is bind the fretboard because the fretboard is cocobolo. All the cocobolo bits are cut from the same board my dad brought back from Panama.

Yes, I know how special that Panama rosewood is as it came from your Dad. It’s a great way to use it and pay tribute to him- maybe think of something to inject in the guitar that is memorable of who and what your Dad is to you.

Trust me a little on binding the fretboard- not trying to influence you, but I am looking at the whole picture of what would elevate this build to that next level of consistency and appropriateness with the colors and details that you have going on. Try to visualize how you have the yellow (fretboard & bridge), the brown on the back and sides, the orange with brown on the rosette. You have an analogous color scheme. Working with “color or color”. Stay with me a bit and I’ll walk you through. If you lay out those colors out- cut a little sample and spread them out. What I want you to look at is the combination or probability of using those 3 or 2 colors for the binding. Let’s take the fretboard and isolate it. You have yellow as the dominant color. We have to consider the back and sides and how the binding combination would work with that as well.

Let’s have a 3 piece lamination binding scenario of orange/yellow/brown and back to the yellow of the fretboard. You can simply that further and use a 2 piece binding lamination of orange/brown binding back to the yellow fretboard.

Let’s deal with the back and side binding that will also affect the yellowish tan soundboard. You can use the 3 or 2 binding approach option I gave you and see how it works as a whole. My take on that is that you consolidate to a 2 ply binding of orange/brown- the orange on the outside and the brown in the inside.

Headstock overlay- you can go multiple ways. You can use the yellow as the headstock overlay and then go back to the brown to orange binding combo. That would create color relationship with everything you have. Now you can go for that darker frame on the headstock- use whatever drop off you have from your dad’s Panamanian rosewood. That pulls the color from the back and the little accent from the rosette to “continue” the dialogue. If you now take the binding scheme of brown (outside)/orange (inside) back to the brown headstock overlay.

I know this is a lot of information and what helps me visualize this is from being on the interior design side, being able to apply color theory and be able to work out the color combination so you have consistency and continuum.
 

Arn213

craM de la craM # RipJack City!
Full Member
Messages
2,805
Reaction score
4,736
Location
Knickerbocker, NY
First name
Arn
Your flying fish logo you can incorporate and squeeze that in by “scaling it” down (AutoCAD term) to work with the size/scale/proportion of what you have to work with. Like the top of the headstock. It will be smaller, but you will have it in there.
 

DLJeffs

Member
Full Member
Messages
4,426
Reaction score
10,347
Location
central Oregon
First name
Doug
  • Thread Starter Thread Starter
  • #38
Yes, I know how special that Panama rosewood is as it came from your Dad. It’s a great way to use it and pay tribute to him- maybe think of something to inject in the guitar that is memorable of who and what your Dad is to you.

Trust me a little on binding the fretboard- not trying to influence you, but I am looking at the whole picture of what would elevate this build to that next level of consistency and appropriateness with the colors and details that you have going on. Try to visualize how you have the yellow (fretboard & bridge), the brown on the back and sides, the orange with brown on the rosette. You have an analogous color scheme. Working with “color or color”. Stay with me a bit and I’ll walk you through. If you lay out those colors out- cut a little sample and spread them out. What I want you to look at is the combination or probability of using those 3 or 2 colors for the binding. Let’s take the fretboard and isolate it. You have yellow as the dominant color. We have to consider the back and sides and how the binding combination would work with that as well.

Let’s have a 3 piece lamination binding scenario of orange/yellow/brown and back to the yellow of the fretboard. You can simply that further and use a 2 piece binding lamination of orange/brown binding back to the yellow fretboard.

Let’s deal with the back and side binding that will also affect the yellowish tan soundboard. You can use the 3 or 2 binding approach option I gave you and see how it works as a whole. My take on that is that you consolidate to a 2 ply binding of orange/brown- the orange on the outside and the brown in the inside.

Headstock overlay- you can go multiple ways. You can use the yellow as the headstock overlay and then go back to the brown to orange binding combo. That would create color relationship with everything you have. Now you can go for that darker frame on the headstock- use whatever drop off you have from your dad’s Panamanian rosewood. That pulls the color from the back and the little accent from the rosette to “continue” the dialogue. If you now take the binding scheme of brown (outside)/orange (inside) back to the brown headstock overlay.

Have you ever seen a black-white-black purfling binding on a fretboard? That would mirror the rosette perfectly.
I know this is a lot of information and what helps me visualize this is from being on the interior design side, being able to apply color theory and be able to work out the color combination so you have consistency and continuum.
Thanks for taking the time to explain this through for me. Just to clarify, the Panamanian rosewood back and sides my coach sourced for me - I think he found an old set at Thompson Guitars - they're always trading stuff or finding stuff that one doesn't want or can't use anymore, etc. The cocobolo is what my dad brought home - it's used in the rosette, bridge, binding, end graft, and headstock overlay. That rosewood should darken considerably when I get around to sanding and french polishing it. The cocobolo should look alot like the rosette in color, maybe like the bridge since it's freshly carved. The fretboard is cocobolo, freshly cut from the same board so it will have that orangey - yellowish brown color too with prominent grain stripes. I suppose I could glue a small binding strip along the outside of the fretboard but unless I want to add another type of wood, I'd need to find some Panama rosewood strips 23" long x 3/8" wide and 3/32" thick (roughly). I could glue a black ebony strip on each side but I don't think I'd like that much contrast. Since the binding will be cocobolo, I think the fretboard being cocobolo as well will make a nice transition between the main body and the neck. Then the headstock overlay will be cocobolo as well so completes the flow of cocobolo through the entire guitar. I do plan to include a black-white-black purfling strip between the cocobolo binding and the spruce top, but not between the cocobolo and the Panama rosewood. I think the only other thing I hope we can include is the flying fish inlay but that'll depend on if we can find access to a CNC somewhere. I think my coach knows a guy who rents him time on it so that might be an option. That'll be fancy enough for my tastes.
 
Last edited:

Arn213

craM de la craM # RipJack City!
Full Member
Messages
2,805
Reaction score
4,736
Location
Knickerbocker, NY
First name
Arn
Have you ever seen a black-white-black purfling binding on a fretboard? That would mirror the rosette perfectly.
Yes- it traditionally is used for arch tops or hollow body. *EDIT: oops, I reversed it, w/b/w is the traditional. Look up D’Angelico, D’Aquisto and Benedetto. I thought about the b/w/b binding as it is on the rosette trim and you have that color ways on the center back strip of the back side with the alternating chevron pattern. That route would be good too- it is on the conservative side, however you have to build whatever is easy on the eyes for you based on your personal preference and aesthetics…….but, that can grow and change over time as you keep building. But, each build, challenge yourself and find little ways, by doing little things or unexpected things, off the beaten path or even out of your comfort zone. As the great late Miles Davis said, “Don’t play what’s there, play what’s not there.”

My bad on my mixing on the wood- but, great to see your Dad’s wood are in there.
 
Last edited:

Arn213

craM de la craM # RipJack City!
Full Member
Messages
2,805
Reaction score
4,736
Location
Knickerbocker, NY
First name
Arn
I was going to ask you if you are planning to do any inlays- dots, snowflakes, etc.
 
Top