Guitar project #5

scrimman

Termite extrodinare
Full Member
Messages
540
Reaction score
431
Location
Texas
First name
Sean
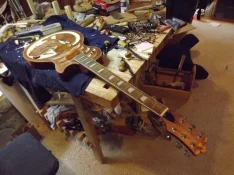
The guy I carved up the explorer guitar for (the dragon guitar) gave me an idea about carving a skull onto a guitar ala the Punisher. Well, guitar project #2 was just sitting around.
[attachment=16847][attachment=16848]
I'd carved a little 'Kilroy' character into the headstock, but other than that its a straight Saga guitar kit. Being that it was my first electric I wasn't feeling too ambitious...just wanted to see how it would go together.
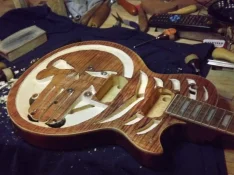
Well, since it wasn't able to run away fast enough it became fodder for my new 'skull' guitar project. I wanted to reshape the neck anyhow. Well, this is where I"m at about 8 hours into it:
[attachment=16850][attachment=16849]
The holes for the electronics are going to be a problem; gotta figure a way to cover them back up again. Not sure if I want to cover them from above or below. But I think overall its going to help me design the guitar I'm going to make that magnificent hunk of Mahogany I got on the auction a while back.
kilroy guitar 002 ico.webp

kilroy guitar 005 ico.webp

mcallen woodcarving show 2013 019 ico.webp

mcallen woodcarving show 2013 018 ico.webp
 
  • Thread Starter Thread Starter
  • #6
Sloooooooow going today. Deep cut designs, I'm finding, are a hassle because making 'fills' with veneer is tedious. I took a piece of typing paper, put it on top of the design, and made a rubbing. Then, I cut out the rubbing and glued it to some thin cardboard.
[attachment=17221]
From there, I applied the new pattern to some Mahogany (?) veneer I've got and cut IT out. Then comes the slow, slow tweeking it into place.
[attachment=17222]
I reckon about another 2 weekends and I'll have it to where I can start carving the detail into the skull and such.
This guitar body is a 'sandwich' much like those Blue Mahoe guitar bodies that Joe Rebuild treated us to pictures of the other day. I'm hoping that the killer figure in the cap goes all the way through the wood on the cap, but I'm afraid its only going to wind up being a thin veneer because the cap carved almost ridiculously easily.

applying vener 002 sm.webp

applying vener 026 sm.webp
 
I'll be watching this thread for sure. Awesome stuff.
 
  • Thread Starter Thread Starter
  • #9
Another moment or two this Sunday was available for me to work on 'ole smiley, so I continued to fill in the gaps with the Mahogany veneer:
[attachment=18150]
[attachment=18151]
[attachment=18152]
But before I could finish with his 'chin', I noticed that whoever was doing the router work when they made my guitar body got a little wild with it and made some of the routes too deep, so I wound up having to fill those in with some veneer chips to strengthen that part of the body and make the transition of that veneer piece smoother:
[attachment=18153]
[attachment=18154]
I might wind up having to route them out again so that the tone/volume pots fit again, but I need that part of the body to be stronger that what it was thanks to my zealous carving. It'll give me an opportunity to judge how deep the routes need to be, and how to best adjust the carving to allow for them. Its not the easiest thing to deal with, but its well worth it for the education I'm getting.
Next time I'll get to fill in those gaps in his teeth, place the 'chin' veneer, and start working on shaping the skull.

woodcarving show 2013 Harlingen 021sm.webp

woodcarving show 2013 Harlingen 023sm.webp

woodcarving show 2013 Harlingen 025sm.webp

woodcarving show 2013 Harlingen 028sm.webp

woodcarving show 2013 Harlingen 029sm.webp
 
  • Thread Starter Thread Starter
  • #10
Now I've started adding the relief to the carving to make it pop.
[attachment=18582]
It turns out I was right; all that wonderful curl on the top of this guitar is only veneer. Too bad, that skull with the fiddleback would have been outstanding. I think I'll try to keep it around for the edging, though.
I think I need to break out those skull studies I did in art class all those years ago; this guy ain't lookin' right quite yet.

001 sm.webp
 
  • Thread Starter Thread Starter
  • #11
Spent a little time with the guitar this evening. I managed to get most of the skull shaped, so next comes a lot of time with the fingernail files. Those little emery boards are a lifesaver when it comes to detail sanding. That, and time with my brand new wood burner. Which, of course, broke. Luckily it had just enough life in it to shade in most of the eye sockets and nose. Anyhow, here is the current update.
[attachment=18904]

Punisher Guitar 004sm.webp
 
Looking awesome. I have to admit, that I didn't know where you were going with this one and then when you start contouring the skull, I could see where you were going. Awesome work. Looking great.
 
  • Thread Starter Thread Starter
  • #13
Its been a while, but I was finally able to work on the guitar a bit. This is what she looked like after a bit of a paint and dye job:
[attachment=24218]
But, to me. the fretboard looked way off...too much brown in a red, black, and white guitar. So after a bit of ebony stain on said fretboard:
[attachment=24219]
Hopefully this weekend I'll be able to put the final clear coat on her, wire her up, tune her up, and rock out a bit.

001sm.webp

003sm.webp
 
  • Thread Starter Thread Starter
  • #14
Well, here it is; the final product. Well, at least it will be when I get the problems with the neck pickup figured out....
[attachment=25849]
[attachment=25851]
[attachment=25853]
Hope y'all found it useful, or at least entertaining.
And on to the next project.....

final 1.webp

final 2.webp

final 3.webp
 
Back
Top