Log breakdown tutorials

Jonkou

Member
Full Member
Messages
1,924
Reaction score
5,124
Location
Alton Bay NH
First name
John
PLAN A…

Cut up an ash log today and was surprised the checks went end to end of a 4 footer. That’s why I leave them to dry for a year to remove free moisture vs cutting out the pith early. In this case it doesn’t matter because the plan was to cut production blanks for dying anyway. Should get 25+ premium qtr sawn blanks out of it and a lotta smalls.

The 3 big checks go the full length.
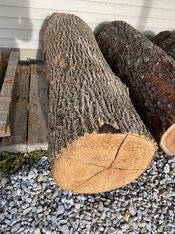
4C78D521-854A-47B4-BAAF-2E879D485EA2.jpeg

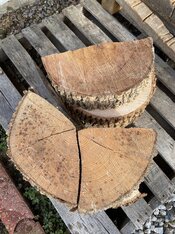
Cut a few inches off each end to remove small end grain checks.
30D11F9F-9F4F-4734-A115-A67383798617.jpeg

Crosscut the log into 7” thick cookies, this allows extra length on the billets to be removed when cutting into blanks after drying.
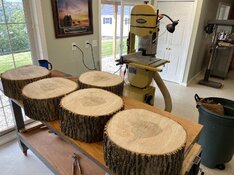
3E63DACE-3258-4B00-BB37-0EBCDDE17D9F.jpeg

Lay out the billets between the defects
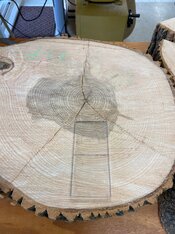
C50B5C56-C20E-4D1F-B56E-8444C6A22BF4.jpeg

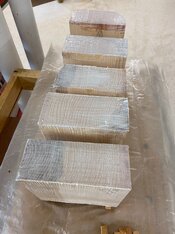
Cut out the billets and anchor seal the end grain. Will cut into production blanks when dry in a few years.
D1929A65-BF3D-4E93-B942-9E552A705E1C.jpeg

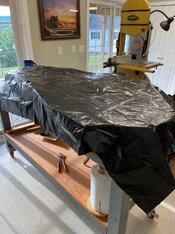
Got one cookie completed and will get back to the rest next time, cover with plastic to keep the moisture in and eliminate checking.
622CCB09-2CA1-4868-AA8D-9DBA1FB16C2E.jpeg
 
Last edited:

scootac

Member
Full Member
Messages
711
Reaction score
1,551
Location
Pennsylvania
First name
George
Cut up an ash log today and was surprised the checks went end to end of a 4 footer. That’s why I leave them to dry for a year to remove free moisture vs cutting out the pith early. In this case it doesn’t matter because the plan was to cut production blanks for dying anyway. Should get 25+ premium qtr sawn blanks out of it and a lotta smalls.

The 3 big checks go the full length.

View attachment 232063

Cut a few inches off each end to remove small end grain checks.

View attachment 232064

Crosscut the log into 7” thick cookies, this allows extra length on the billets to be removed when cutting into blanks after drying.

View attachment 232065

Lay out the billets between the defects

View attachment 232066

Cut out the billets and anchor seal the end grain. Will cut into production blanks when dry in a few years.

View attachment 232068

Got one cookie completed and will get back to the rest next time, cover with plastic to keep the moisture in and eliminate checking.

View attachment 232069
Is that a museum or a shop....and who cleans it???
😳
 

Mike Hill

Board Whoarder
Full Member
Messages
7,762
Reaction score
18,127
Location
Nashville, TN
First name
Mike
Ok, how do you do your blank cuts. Some kind of schmancy hold down or wedges?
 

Jonkou

Member
Full Member
Messages
1,924
Reaction score
5,124
Location
Alton Bay NH
First name
John
  • Thread Starter Thread Starter
  • #7
Ok, how do you do your blank cuts. Some kind of schmancy hold down or wedges?
Nothin schmancy, I use two old finger clamps I got from my Dad 60 something yrs ago. Here’s some pics of them in use. When rip cutting cookies this big it’s paramount that the blade is sharp, the saw is perfectly tuned and proper feed speed and technique is used.

Completed the last two cookies today, first one done.

CF3391FA-EF84-4548-BFF1-5076F2DC1527.jpeg E1537C29-D1B2-4B1C-A965-372D04D00228.jpeg

Removing the pith and check is the first cuts, makes two manageable pieces to cut the billets from.

C6E8EBDE-8A13-44CE-857A-D03F629806BB.jpeg 09B2CA17-0973-4295-B069-54BFEADA4667.jpeg 0807B815-655C-490F-804D-ED4ABB6093F0.jpeg E49178CA-186A-4237-A73F-DD89E8DB948B.jpeg

continued
 
Last edited:

Jonkou

Member
Full Member
Messages
1,924
Reaction score
5,124
Location
Alton Bay NH
First name
John
  • Thread Starter Thread Starter
  • #8
Billets are laid out in a manageable cutting sequence. Care was taken to ensure a flat surface when cutting the cookies with the chain saw for stability on the band saw table. Use the old finger clamps to guide the cut on the layout lines. Usually use two finger clamps but had to take the pics with one of them.

D09C5A25-85D1-4C93-A860-4EE5A9ABAB4C.jpeg
5AB6E325-EDAB-4E6E-8A47-0563D2418299.jpeg 2F4191AC-5E9A-4FC3-89A9-940703548112.jpeg
7F382F63-6BF3-4120-8158-946027105D81.jpeg 9033000A-7E7A-439D-8FF3-00A76BBF73B6.jpeg 2BE4AFF7-FC67-40BF-B951-257C6852347E.jpeg 4A089367-01D2-447F-B4A3-A37B3F776029.jpeg D4FD7E2C-D0E0-46D6-86DD-781ED71E3F4F.jpeg 0B539A1C-74D8-4C8A-8462-7452828C112C.jpeg

The final booty from the entire log (all 5 cookie) sealed and ready to stack for drying. Defect free billets are the priority, multi use spindles are from the scrap.
- 25 qtr sawn production billets
- 3 flat sawn production billets
- 25 2x2x7” min spindles
- 26 1.5x1.5x 7” min spindles

C6EBF5C0-79B6-4F10-9192-B4D118184816.jpeg
 
Last edited:

Jonkou

Member
Full Member
Messages
1,924
Reaction score
5,124
Location
Alton Bay NH
First name
John
  • Thread Starter Thread Starter
  • #9
The last step as billets is after the anchorseal is dry they go in a bag for a couple weeks to slow down the drying process and help them stabilize. For the first few days check them regularly to ensure no mold. These are lookin good, no mold no checks.

07A2A561-9DDD-4FDA-BE32-07082A2CC0E4.jpeg
1AFA91EE-A926-4BC1-8418-064298F32808.jpeg
 

OneEye

Member
Full Member
Messages
11
Reaction score
35
Location
Southern NH
First name
Bill
@Jonkou thanks so much for the picture tutorials, they make everything so understandable. As you can imagine, I've been seeing an awful lot of wood on the street lately, what with all the storms, but I hadn't figured out how to process it since I don't have all kinds of equipment. This post explained so much.

Oh, and your shop. Pretty much what I've always dreamed of, right down to the view of the lake. I doubt I could ever keep it as tidy as yours for more than an hour though.
 

Jonkou

Member
Full Member
Messages
1,924
Reaction score
5,124
Location
Alton Bay NH
First name
John
  • Thread Starter Thread Starter
  • #12
PLAN B…

So here’s the sister log of the one above, same size, same defects to work around. The first bandsaw cuts can be a handful with those big cookies so using a different approach. Split it into three the old school way, will dice into 6ish” lengths with the chainsaw then cut into blanks on the band saw. No billets this time as the log is about 12%.

IMG_1601_Original.jpeg
 
Last edited:

Jonkou

Member
Full Member
Messages
1,924
Reaction score
5,124
Location
Alton Bay NH
First name
John
  • Thread Starter Thread Starter
  • #13
Primary goal is to make production and small bowl blanks suitable for dying with these. Cut all three split pieces into segments, most 6.5”.

IMG_6019.jpeg IMG_6021.jpeg IMG_6023.jpeg

Got the segments onto the work bench and laid out the cut lines with balanced grain alignment while avoiding the defects. The goal here is quality over quantity and quarter sawn when the wood allows.

IMG_6025.jpeg
IMG_6024.jpeg
IMG_6026.jpeg IMG_6027.jpeg IMG_6028.jpeg IMG_6029.jpeg

Will get them on the bandsaw next time.
 

Jonkou

Member
Full Member
Messages
1,924
Reaction score
5,124
Location
Alton Bay NH
First name
John
  • Thread Starter Thread Starter
  • #15
Cut into billets, lots of scrap for the burn pit.

IMG_6030.jpeg IMG_6031.jpeg

16 qtr sawn/16 flat sawn, not a bad haul.

IMG_6035.jpeg

Cleaned up the saw and changed out the blade for cutting rounds. Used a 3tpi .032 x 3/8 wet wood blade for the straight cuts, switching to a 4tpi .025 x 3/8.

IMG_6033.jpeg

Lay out the blanks.

IMG_6034.jpeg

Calling it a day, covered and will finish them next time.

IMG_6036.jpeg
 

Jonkou

Member
Full Member
Messages
1,924
Reaction score
5,124
Location
Alton Bay NH
First name
John
  • Thread Starter Thread Starter
  • #16
Cut into blanks and sealed with Treesaver. After the sealer dries they go in a bag for a couple weeks to help them stabilize.


IMG_6037.jpeg IMG_6038.jpeg
IMG_6039.jpeg
 
Last edited:
Top