Mossberg S51M Restoration

Sprung

Amateur Sawdust Maker
Full Member
Messages
9,763
Reaction score
16,348
Location
WI
First name
Matt
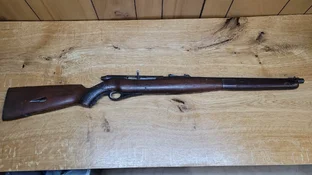
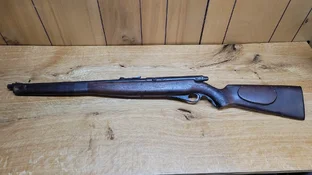
Last year, when I was visiting my parents, my father gave me his grandfather's Mossberg S51M. It's definitely seen better days. I decided I want to make it shoot again. The bones are good - it just needs some attention and a few parts. I have no idea the last time this gun was shot - my great-grandfather died 43 years ago, shortly before I was born.

Today I finally got a chance to start getting into it.

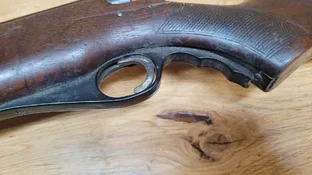
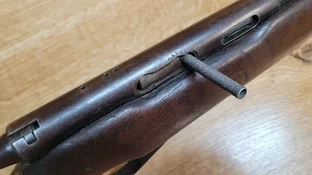
Stock is definitely broken - and was previously repaired and was still used after it, despite it not being a good repair. Trigger guard is broken. Cocking handle went missing at some point and was replaced with whatever fit.

I've found a site that offers replacement parts and ordered new parts for the cocking handle and a new trigger spring. I also purchased a used, in good condition, trigger guard off eBay. Will be waiting on parts to arrive.
1.webp

2.webp

3.webp

4.webp

5.webp

When my great-grandmother died when I was a kid (probably about 12-ish years old?), we all got to take something we wanted from her house. I took a few tools from the garage, including this screwdriver. I thought it fitting to use my great-grandfather's screwdriver in the restoration of his rifle...

6.webp
 
Last year, when I was visiting my parents, my father gave me his grandfather's Mossberg S51M. It's definitely seen better days. I decided I want to make it shoot again. The bones are good - it just needs some attention and a few parts. I have no idea the last time this gun was shot - my great-grandfather died 43 years ago, shortly before I was born.

Today I finally got a chance to start getting into it.

Stock is definitely broken - and was previously repaired and was still used after it, despite it not being a good repair. Trigger guard is broken. Cocking handle went missing at some point and was replaced with whatever fit.

I've found a site that offers replacement parts and ordered new parts for the cocking handle and a new trigger spring. I also purchased a used, in good condition, trigger guard off eBay. Will be waiting on parts to arrive.
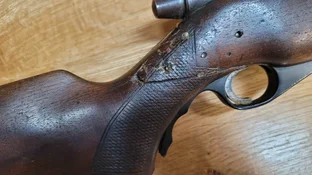
View attachment 291516

View attachment 291517

View attachment 291518

View attachment 291519

View attachment 291520

When my great-grandmother died when I was a kid (probably about 12-ish years old?), we all got to take something we wanted from her house. I took a few tools from the garage, including this screwdriver. I thought it fitting to use my great-grandfather's screwdriver in the restoration of his rifle...
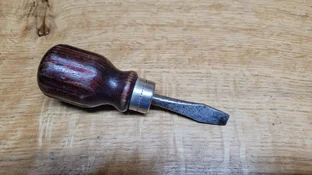
View attachment 291521
This will be fun to watch!
 
  • Thread Starter Thread Starter
  • #3
The stock was cracked pretty good, but I got out my favorite epoxy - System Three T-88, with a nice, long open time - and mixed some up, thinned it with a little lacquer thinner, and put it in a syringe with a needle to get it into the areas it really needed to get. That was after I had cleaned up remnants of glue from the long ago previous repair.

20260731_164544.webp

20260731_164541.webp


20260731_205936.webp

20260731_205941.webp

Also started cleaning up parts. Need to get some wire wheels for my dremel and some gun bluing before I can go much further. There's a pretty decent amount of rust to deal with, but thankfully nothing too serious, and certainly no pitting. (Except maybe the plate on the butt stock - that's pretty rusted and probably has a few pits.)

20260731_204744.webp

20260731_205952.webp
 
  • Thread Starter Thread Starter
  • #5
The site I ordered parts from is Jack First Gun Parts. I had never heard of them before yesterday, but came across them in my search for a cocking handle. They seem to specialize in reproducing parts for old/obsolete guns.
 
I'll be following this one Matt. I love those Mossbergs.
Looks just like the one I refinished years ago.
Here...let me toot my horn..
 
  • Thread Starter Thread Starter
  • #8
I'll be following this one Matt. I love those Mossbergs.
Looks just like the one I refinished years ago.
Here...let me toot my horn..

Nice, Marc! I'm not doing a complete refinish, like you did, though it certainly would like a lot nicer if I did. Decided that I wanted to do more of a cleanup and keep as much of the patina and wear as I can.
 
  • Thread Starter Thread Starter
  • #9
Took off the clamp this evening. It ain't perfect, but it'll do. Wasn't going for perfect anyway - just a functional repair. Seems solid now. I left in the nails from the previous repair, figuring they would help with strength. Had to drive one in just a little further with a punch, as it was protruding just a little bit. I did also wick in a little thin CA in a couple spots that looked like the could benefit from it, where I couldn't get any epoxy into with the needle.

13.webp

14.webp

I saw somewhere where someone had shown the results of cleaning up old stocks with magic eraser. So I tried it, but instead of water I used denatured alcohol. I think it did a great job of cleaning it up and took only a little bit of time.

15.webp

I applied a 50/50 mix of boiled linseed oil and mineral spirits tonight. Wood was thirsty and it took in four good coats, about 20 minutes apart. Let it sit for a while after the fourth coat and then buffed it out with a dry cotton towel. I'll let it dry/cure for a day or two and determine if I want to add another couple coats, or if it's good to go and then consider whether or not I should put some paste wax on it.

16.webp

17.webp

At this point, I'm waiting on deliveries before I can do anything else. Wire wheels and gun blue from Amazon. Trigger guard from an eBay purchase. And a trigger spring and cocking handle parts from Jack First. In addition to that, we've got a couple of busy weeks coming up, so this might sit on the backburner for a bit. I at least wanted to get the stock finished before then so it could cure during that time I'll be busy with other things.
 
Last edited:
  • Thread Starter Thread Starter
  • #10
We're back home now from our busyness and travelling to visit family, so am getting back to this project as I have time. Last night, after we got the camper unloaded and parked in its spot at home, I was able to sneak in a little time working on this and dedicated it to starting to wire wheel (with a flex shaft variable speed rotary tool and dremel sized wheels).

Pretty much all of the rust is surface rust, so it's pretty easy to deal with. But the one exception is the butt plate. I've cleaned the loose rust off it, and it's definitely pitted, which was obvious before I even started. Going to take some time to smooth this out and make it look nice before it gets reblued. I may not take it all the way to getting all the pitting out, depending on how deep they go and how much material I need to remove, but definitely want to clean this up. I'm trying to keep this rifle with as many original parts as possible, only replacing what's broken, missing, or worn out.

37a60868-cb5e-4bb6-b0c1-d26ec0843d9e.webp
 
Back
Top