New to resin casting

DWasson

Member
Full Member
Messages
464
Reaction score
1,134
Location
Michigan
First name
Dan
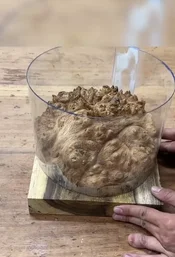
I am new to resin casting and trying to figure things out. One thing I would like to do would be to make custom sized molds for some unique pours. I have been reading that polypropylene sheets work for these since resin will not stick to it. Is that likely what was used to make this mold? This is pretty close to what I’m trying to do.

If polypropylene sheets are the way to go, where is a good source to get them where you’re not getting killed on shipping. I looked on Amazon, but even though I put in polypropylene, I was getting all kinds of different items returned, including PET plastics, and HDPE.

Any help would be greatly appreciated.
Thank you.

IMG_1472.webp
 
When I cast those beetles I made molds from 1/16" HDPE sheets I got from Lowes. Glued together with acrylic glue and then sealed the edges with silicon caulking. I waxed the inside surfaces with paste wax and they released pretty well - I think I only broke one side. Of course, that wouldn't work to well if you're trying to make round molds.
 
Yes, what I’m trying to do is round.
So you need something flexible but with enough strength to contain the resin while it cures. Or preformed shapes that you can just slice away after the resin cures. They might not be big enough but think about those silicon glasses they give out during beer festivals and stuff. The resin won't stick to the silicon and you could reuse them.
 
  • Thread Starter Thread Starter
  • #5
Those would be great for smaller pieces, thank you. I’m also planning lager things, like what is in that picture. I also have some of Jerry’s cholla that is in the 3”-5” range that he want to play with. Maybe for the cholla I can build a melamine square form, but some of the larger other pieces I’m wanting to cast would end up with a ton of wasted resin if it were cast square. And that stuff’s expensive! 😬
 
I use 1 gallon plastic jugs that I get for free from the pool supply store near me. I go dumpster diving for empty muriatic acid jugs, clean them out and cut off the top to get a free round mold that is about 7" tall and 6" in diameter. A 1/2 gallon jug that was used for Clorox or some other liquid can be used for a smaller mold that's about 4" in diameter and 7" tall. Square molds don't work for me-there's too much waste with resin as expensive as it is.
 
Hi guys, i’m watching this thread because I’m looking for the same solution as @DWasson …. a way to make customized round molds for casting.

I’ve only casted maybe five or six times, and each time I’ve used a disposable plastic container. One time I used a solid plastic tub that came from a self pick strawberry farm and another time I used the container from a large canister of Clorox wipes. But reusing random containers are not always exactly sized and therefore wastes resin. The containers also have to be really deep, because in my case, I’m using a vacuum chamber. So for casting a piece that’s 2 inches thick, I want my container to be at least 4 inches tall so the epoxy doesn’t overflow when bubbling. I’m definitely interested in what you all come up with!
 
  • Thread Starter Thread Starter
  • #8
I was working on my education at YouTube University this morning. I saw someone who had used thin Lexan polycarbonate sheets to make a large round 2” deep mold, and completely covered it with tuck tape.

Maybe that could work for deeper as well? Hmmmm, maybe??
 
Lexan polycarbonate is not cheap. Low density polyethylene (LDPE) or the super thin polypropylene (like what soda bottles, water bottles, etc). are flexible enough. You could try hitting up any local dairy/ice cream businesses to see if you can garner any used ice cream tubs? Or buy a big tub of ice cream and treat your family to some goodness, providing no one is lactose intolerant etc etc.
 
Tyvek type tape releases nicely, old butter containers and such, plastic measuring containers, etc. Also, and I can’t get to the shop for a bit, but I think I bought a mold release spray from Woodcraft that helps the resin to not stick. For smaller turnings, such as pen sized molds, a bunch of companies make silicone molds. My wife uses similar for soap making.
 
On a side note, I would like to try making my own stabilising setup. Can I just build the vacuum chamber at home or do I need a specific one? I want to stabilise wood for handplane parts.
 
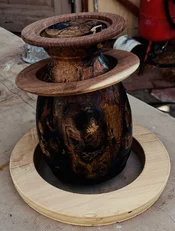
Ok, I've been watching this and decided to offer something I've done a couple 3-4 years ago. I know I don't have the pieces to actually show what was done, but all of you have sense enough to comprehend what I'm going to try and explain. Picture 3/4" thick MDF rings, 1/2"-3/4" wide, stacked and each ID fitting about 1/8" larger that the OD of the form. In this particular case, the rings were all the same OD/ID. After getting all the rings needed, including one piece of rounded flat MDF without the hole for the bottom and 2 extra to make up for having enough resin. I glued each piece, shot a pin nail into each piece at 180 degrees to keep them from moving. When all were nailed with the form centered inside, I either used clamps or possibly all the lead plates I have to glue the pieces, several hundred pounds. Nah, I didn't use the lead, but could if necessary.
I poured the resin, (Aluminite), let it sit about a week, then took it out of the tank. When I did turn it, I was disappointed because of all the cracks in it. That's why 3-4 years of sitting around and not getting finished.

Now that I'm ready to finishit, I do not want to just abg it, box it or do anything that will cause a lot of wasted resin, so I've come to the conclusion I'll need to use up all the 1/4, 1/2 and 3/4" MDF lying around here by making rings again. As you can see, there is going to be some work to keep the inside 1/8 wider than the form. That's why I'm going to be using all different thickness MDF pieces because of the shape of the piece.

As you can see in the picture, the smallest ID's will not fit past the foot, so I've decided to make the smallest pieces about 3/16" larger in ID. Then I'll cut them in half, and when gluing, lay them down on succeeding pieces that fit. That should work. That's my plan.

When doing a shaped form that needs casting, in order to save on resin, it would be best to use a shaped mold fit to the form you are going to cast. I've done about 4 now over the years, and have not been disappointed.

If this looks like rambling or instructional, please let me know.

As far as cutting the rings, I use my TSS which is really easy. I'll glue about 5 pieces and then turn them to fit, I'll keep doing that until I run into the situation that the middle of the form needs smaller pieces. To me it's really easy, but if all you have a is a Saber Saw, then that's doable also. Even a bandsaw would be ok, but you have to make sure the blade entry point is sealed in order to keep from having resin from leaking out. When I have rings preglued, I usually seal the inside so resin doesn't go too far into the wood or leak out. Any questions, please ask............... Nubs
IMG_7575.webp
 
Hi @Nubsnstubs I really like your suggestion. Your description makes good sense. I’m going to give this a try when I have a chance. I think I can easily turn these rings on the lathe all in one shot. If I need 4 inches of depth, and 7 inches of diameter, and the mold needs to be cylindrical shaped, then I could stack 4 inches of MDF together plus a piece for the bottom. Then I glue them all together. I could then screw a faceplate on and turn the mold. (as long as the screws for mounting faceplate only penetrate the bottom piece of MDF.) Then I would seal the inside with a coat of some old finish. Does this sound like it would work?
 
On a side note, I would like to try making my own stabilising setup. Can I just build the vacuum chamber at home or do I need a specific one? I want to stabilise wood for handplane parts.
I think one could make a DIY stabilizing system. The heart of it will be the vacuum pump. For most woods, you need to hold the vacuum for a minimum of 4 hours, better 8 hours. So you need a pump that can do that. Pulling full vacuum creates a lot of heat in the pump seals (because there's no "fluid" flowing through the pump to carry that heat away). Oiled vane pumps seem to be the best for this application. It doesn't have to be a high volume vac pump - low volume will take a little while to pull full vac on the tank, depending on how big your tank is of course, but once it gets there it should be able to hold it there.

The tank needs to be structural strong enough to withstand full vacuum. Most metal pans, tanks, etc will work fine. If you go with a plastic tank I'd do some research to make sure you won't crater the tank under vacuum. The lid is a critical part. It's best if you can see inside the tank to check for bubbles escaping the wood and to see if your resin is foaming and needs to be regulated so it doesn't overflow your container. Tempered glass works well, but you'll need a rubber ring around the lip of your tank so you can get a good seal.

All the plumbing and valves should be easily sourced through any hardware supply such as Grainger or McMaster.

A toaster oven is also an important and useful piece of equipment to have. You use it to dry your wood before stabilizing and you use it to heat cure the stabilized wood after you take it out of the vac tank. I don't recommend using an oven that you also plan to keep using to cook food in.
 
Last edited:
Hi @Nubsnstubs I really like your suggestion. Your description makes good sense. I’m going to give this a try when I have a chance. I think I can easily turn these rings on the lathe all in one shot. If I need 4 inches of depth, and 7 inches of diameter, and the mold needs to be cylindrical shaped, then I could stack 4 inches of MDF together plus a piece for the bottom. Then I glue them all together. I could then screw a faceplate on and turn the mold. (as long as the screws for mounting faceplate only penetrate the bottom piece of MDF.) Then I would seal the inside with a coat of some old finish. Does this sound like it would work?
It wood work. Even if the screws were too long, after you finished the turning, plug the holes and then do your casting. It won't leak as the pressure is equal throughout the tank except the wood cavities. If the bottom is sealed with a good filler, it won't leak. What I have done is to locate center of the bottom on the outside and locate it with a screw into the wood being cast as that assures a centered piece when you've remove it from the pressure tank and ready for for turning. ........... Nubs
 
Back
Top