Nickel Plating Lever Cap

Asssiss

Member
Full Member
Messages
456
Reaction score
1,407
Location
Brazil
First name
Emerson
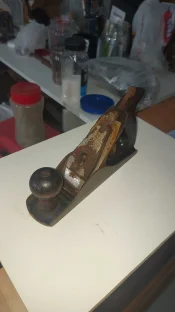
Hello folks...I have many planes ...one plane I still needing is the Lie-Nielsen # 10 1/4 but not avaible for while...

I always want a Millers Falls plane and now I have one. ⁶Similar a Stanley #3...
The plane arrived today and just for comparsion about prices around the world I paid $95 for it.

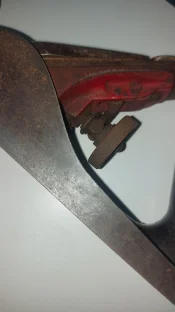
I need to confess one thing.I hate planes where the lever cap is not shine as new.Rust is to me very bad at lever cap .Paul Seller talk about history and patina at each plane and he thought we need to clean just a little and keep the history at plane.

I am agree in part... so all my planes I need the lever cap brand new appearence.

I recovery some and here is how I did it.
I"ll add new pictures each time I have.
Here the video where I learnt how to do:
Here the history about Millers Falls hand planes:
I"ll start this week .

Some pictures:


Very bad appearence
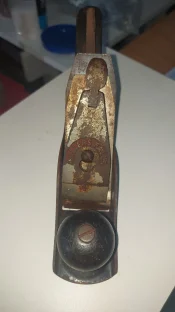
IMG-20250521-WA0062.jpeg
Knob and handle are good condition
IMG-20250521-WA0064.jpeg
Brass wheel
IMG-20250521-WA0071.jpeg
Nickel source
IMG-20250521-WA0076.jpeg
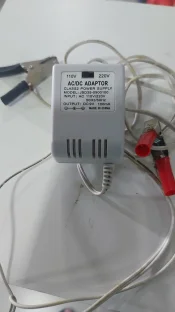
Power source
IMG-20250521-WA0074.jpeg
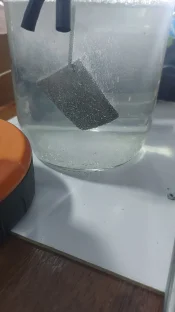
Starting the process
IMG-20250521-WA0083.jpeg
Normally I clean and keep the patina at back...no new plating
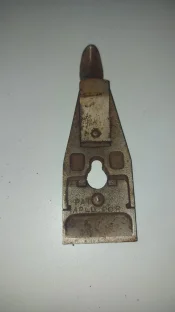
IMG-20250521-WA0088.jpeg
The blade and cap are gone...a new Hock kit is waiting
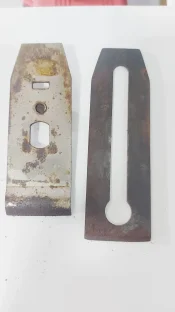
IMG-20250521-WA0085.jpeg

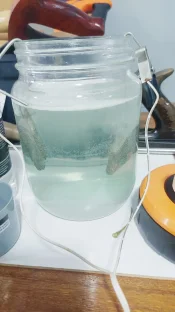
Actual solution beeing green
IMG-20250521-WA0093.jpeg
Thanks for attention
 
Last edited:
  • Thread Starter Thread Starter
  • #2
Here some pictures from others lever caps done before...
I prefer spray the paint and clean the letters. Before spray I used a toothpick with little cotton at sharp point and apply vaseline at each letter...clean easy after.

Here how green a solution been (old one)
Screenshot_20250521_201730_WhatsApp.jpg
Stanley lever cap bad condition
IMG-20220823-WA0076.jpg

IMG-20220823-WA0078.jpg
Outside solution ready to polish
IMG-20220824-WA0004.jpg
Polished
IMG-20220825-WA0063.jpg
Sanded and ready to start the process of nickel plating
IMG-20220825-WA0059.jpg
Spray paint
IMG-20220826-WA0045.jpg
Ready...the black spots at orange paint is Autosol after polished...after dried I cleaned .
IMG-20220827-WA0014.jpg
Record was not so bad
IMG-20221021-WA0057.jpg
But I prefer like this
IMG-20221021-WA0055.jpg
Thanks for attention
 
Last edited:
  • Thread Starter Thread Starter
  • #4
Some pictures from another Stanley lever cap:

Before nickel plating
IMG-20210716-WA0047.jpg
Just out of solution with a dull appearence and nickel excess at surface.
IMG-20210721-WA0052.jpg
First polished
IMG-20210721-WA0037.jpg
Logo service
IMG-20210721-WA0042.jpg
The Black spots of Autosol...after dry I cleaned use a toothpast and tooth brush...just a light use for no damage at paint.
IMG-20210721-WA0041.jpg
I saved all lever caps at paper and plastic...they are all spare lever caps
 
Last edited:
  • Thread Starter Thread Starter
  • #6
Hello folks I just add two short videos at YT...They were from my last nickel platinng in 2023/10.

The quality of image is not so good because was from WhatsApp videos.


Thanks for attention
 
Hello folks I just add two short videos at YT...They were from my last nickel platinng in 2023/10.

The quality of image is not so good because was from WhatsApp videos.


Thanks for attention
Process really brightens it up! So nice! Chuck
 
  • Thread Starter Thread Starter
  • #8
Process really brightens it up! So nice! Chuck
Some more pictures:
I just finished the clean and sand step and tomorrow if the solution be ready I"ll start the nickel plating itself...

The solution at power only when I am at home and never over night...I like to be alert.

More smooth surface means better quality nickel plating.

So bad
IMG-20250522-WA0062.jpeg

IMG-20250522-WA0058.jpeg
Rough sanded
IMG-20250522-WA0065.jpeg
Must to take all paint off
IMG-20250522-WA0067.jpeg
I sanded 120 until 5000 (but can stop at 1500)
IMG-20250522-WA0069.jpeg
Lacquer thinner at paint
IMG-20250522-WA0074.jpeg
Cleaned and sanded
IMG-20250522-WA0079.jpeg
Like a mirror
IMG-20250522-WA0083.jpeg
Almost ready
IMG-20250522-WA0089.jpeg
One more short video...only sanded yet...sorry for the sound but I love to work with Music


Thanks for attention
 
Last edited:
Some more pictures:
I just finished the clean and sand step and tomorrow if the solution be ready I"ll start the nickel plating itself...

The solution at power only when I am at home and never over night...I like to be alert.

More smooth surface means better quality nickel plating.

So bad
View attachment 273450

View attachment 273451
Rough sanded
View attachment 273452
Must to take all paint off
View attachment 273453
I sanded 120 until 5000 (but can stop at 1500)
View attachment 273454
Lacquer thinner at paint
View attachment 273455
Cleaned and sanded
View attachment 273456
Like a mirror
View attachment 273457
Almost ready
View attachment 273458
One more short video...only sanded yet...sorry for the sound but I love to work with Music


Thanks for attention
All the difference in the world!
 
  • Thread Starter Thread Starter
  • #10
Please look how the solution is changing and beeing green (means good quality nickel source)...

Starts here
IMG-20250521-WA0083.jpeg

IMG-20250521-WA0093.jpeg
We are here
IMG-20250522-WA0089.jpeg
The target
Screenshot_20250521_201730_WhatsApp.jpg
 
Last edited:
  • Thread Starter Thread Starter
  • #11
Hello folks...the process is going on...
The YT short video:

I read at place if the voltage is lower the better will be the nickel plating.
I have some old sources here and for this step I changed for this:

Lower voltage
1,2V
IMG-20250523-WA0135.jpeg
Thanks for attention
 
Last edited:
Hello folks...the process is going on...
The YT short video:

I read at place if the voltage is lower the better will be the nickel plating.
I have some old sources here and for this step I changed for this:

Lower voltage
1,2V
View attachment 273527
Thanks for attention
Fascinating process!
 
  • Thread Starter Thread Starter
  • #13
Hello folks ...during the final part something was wrong and the surface of lever cap showing some spots without nickel plating...
I"ll start all process again from zero.

Can be that change of power source ...can be any contamination at solution becuse is black now. I"ll use all that way I always did..

Tomorrow I"ll filter the solution and see what is inside the jar.
IMG-20250524-WA0086.jpeg
Thanks for attention
 
Last edited:
  • Thread Starter Thread Starter
  • #14
Hello folks...I hope tomorrow I can starts the all process again from zero.

I filtered the soluion and didn't find nothing visible...so I discarded it.

See how black the solution was :

IMG-20250525-WA0003.jpeg
Must to be green after the process and it is ready to use for new "mission".This is garbage.
IMG-20250525-WA0005.jpeg
Thanks for attention
 
Last edited:
  • Thread Starter Thread Starter
  • #15
Hello folks...I just started all process again...the solution is the first step....tomorrow I"ll sand all lever cap again (the worst part).

I believe I found the contamination source...but not the reason.

See the pictures below:
The solution starts forming again
IMG-20250526-WA0038.jpeg
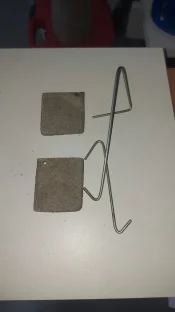
These hooks I always used at before process
IMG-20250526-WA0028.jpeg
They always intact at final and good quality nickel plating
IMG-20250526-WA0030.jpeg
This hook is misses some body parties
IMG-20250526-WA0033.jpeg
This is not pure nickel (is stainless steel) and this parts mixed at solution....one more thing when I was puting salt at first solution I put it too much (escape from spoon)...so extra salt and extra current (less voltage but more current)I believe the mistake was here...At final of this journey "ll know
IMG-20250526-WA0036.jpeg
I"ll use this source all process as always did
IMG-20250526-WA0040.jpeg
Thanks for attention
 
Last edited:
  • Thread Starter Thread Starter
  • #16
Hello folks...I just started all process again...the solution is the first step....tomorrow I"ll sand all lever cap again (the worst part).

I believe I found the contamination source...but not the reason.

See the pictures below:
The solution starts forming again
View attachment 273614
These hooks I always used at before process
View attachment 273615
They always intact at final and good quality nickel plating
View attachment 273616
This hook is misses some body parties
View attachment 273617
This is not pure nickel (is stainless steel) and this parts mixed at solution....one more thing when I was puting salt at first solution I put it too much (escape from spoon)...so extra salt and extra current (less voltage but more current)I believe the mistake was here...At final of this journey "ll know
View attachment 273618
I"ll use this source all process as always did
View attachment 273619
Thanks for attention
Almost do the same mistake...the stinless steel inside the jar (liquid) and mixing with pure nickel...
I changed the wire and put back outside the liquid...only nickel now in contact with solution..
Here the wire outside and no contact
IMG-20250526-WA0054.jpeg

IMG-20250526-WA0055.jpeg
Here inside and in contact...since 2023 my last time..a check-list can help at step by step...I saw after 5 minutes and I believe I can save the solution....but only in the future I"ll know...I don't want to discharge this solution....will be a lesson
IMG-20250526-WA0038.jpeg
Now I can understand all mistake was the stainless steel in contact with solution...both during formation of green solution and during the processe itself...instead of sending nickel to lever cap I added stainless steel because the wire was inside the jar and not outside as must to be.

Because low quality will be easier than I was thinking
IMG-20250526-WA0059.jpeg
Like fish scales
IMG-20250526-WA0061.jpeg
 
Last edited:
  • Thread Starter Thread Starter
  • #17
Almost do the same mistake...the stinless steel inside the jar (liquid) and mixing with pure nickel...
I changed the wire and put back outside the liquid...only nickel now in contact with solution..
Here the wire outside and no contact
View attachment 273621

View attachment 273622
Here inside and in contact...since 2023 my last time..a check-list can help at step by step...I saw after 5 minutes and I believe I can save the solution....but only in the future I"ll know...I don't want to discharge this solution....will be a lesson
View attachment 273623
Now I can understand all mistake was the stainless steel in contact with solution...both during formation of green solution and during the processe itself...instead of sending nickel to lever cap I added stainless steel because the wire was inside the jar and not outside as must to be.

Because low quality will be easier than I was thinking
View attachment 273625
 
  • Thread Starter Thread Starter
  • #18
Compare this two videos...one the wire outside and only at lever cap is inside...and the wire covered with "extra nickel"...


The other video the wire inside the solution adding stainless steel and ruining the job

 
  • Thread Starter Thread Starter
  • #19
Hello folks ...now the solution and lever cap are ready and I started the process again....

Ready to start again

IMG-20250527-WA0022.jpeg
The numbers are "leaving" because sand paper.
IMG-20250527-WA0024.jpeg
Here the YT short video:

Thanks for attention
 
Last edited:
Back
Top