
Oak Limb Gall

Nubsnstubs

Where is it???
Full Member
Messages
4,466
Reaction score
10,840
Location
Tucson, Arizona
First name
Jerry
I got this Gall up in Walnut Grove, Arizona about a year ago. About a month ago I decided to give it a chance to survive on my lathe, rather than being firewood. It worked out really good on the outside, but when I got to hollowing it, boy, it got tough. I had to use my steady, and then I was still having doubts as to whether it was going to survive. It was the absolute hardest wood I have ever turned. Worse than Desert Ironwood. Anyway, take a look.

This is what I brought home from W. G. It laid around for months before I started on it.
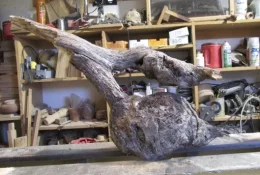
IMG_0004.webp


I was looking for the center of it in this picture after I cut the waste off it, which might become a bottle stopper in the future. The only way to get accuracy in measuring it was to set that piece of plywood up against the tailstock to get the diameter, 4 1/2". It worked out so next was mounting it toget the most out of the blank.
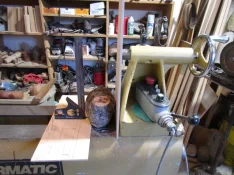
IMG_0005.webp


It's mounted, and ready for the abuse I'm about to subject it to.
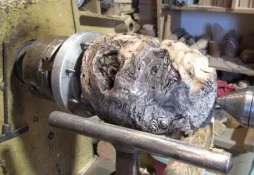
IMG_0006.webp

I didn't think about taking pictures while in work except this next picture. I had put about 10 coats of CA with sanding each coat. I used medium CA on all the coats, and had very good results, so on the 11th coat, I decided to use thick CA. Boy, that was a disaster as this piece ended up with ribs about a 32nd thick that I couldn't get sanded out even with 180 grit, so decided to use my skew. I don't need to say anything more about that as the picture speaks volumes.
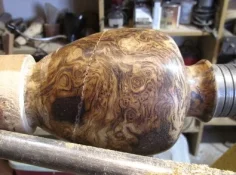
IMG_0010.webp

I had to get my bowl gouge and turn it down past the cut without losing the shape. No pictures again, but here is the finished piece. It's 4"od x 5 9/16" tall. In total of filling, there were a lot of small holes that filled very easily, and then about 4-5 others that actually need filler which was the shavings , plus very little fake turquoise. One spot in this picture is about 5 o'clock 2" above the foot.
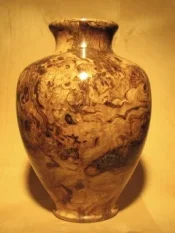
IMG_0039.webp

This picture shows a filled spot just above the 9 o'clock area. The shavings are just a little darker than what the picture shows, but still looks good.
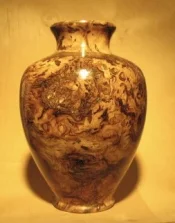
IMG_0038.webp

This doesn't show any of the larger spots needing filling, but there were a bunch of tiny holes I filled.
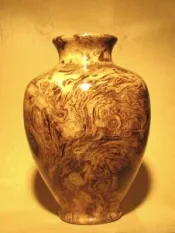
IMG_0037.webp

Here is the mouth showing a lot of the turquoise filler. There were a lot of bug tracks there and only at that location.
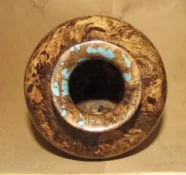
IMG_0044.webp


I couldn't get pictures of the bottom, but it started out having a short finial, but broke off so I just put a nipple on it. All in all, this is probably the prettiest piece of wood I've found up in Walnut Grove and certainly will not be the last.

For some reason, I just can't get my camera to come in with good crispy pictures like the ones of that New York guy and DLJeffs. My camera is pretty good, or was when I first got it about 8 years ago. The other camera I use does the same even on auto focus, but I'm thinking it's my eyes instead. ............ Jerry (in Tucson)
 
Beautiful color and grain!!!
Your photo might be a bit better if you had a different color background.....as is, it's too close to same color as the wood.
Or....maybe not.
Worth a try at least.
 
Fantastic vase, Jerry. That was certainly worth the time and effort you put into it. I really like this one.
 
I got this Gall up in Walnut Grove, Arizona about a year ago. About a month ago I decided to give it a chance to survive on my lathe, rather than being firewood. It worked out really good on the outside, but when I got to hollowing it, boy, it got tough. I had to use my steady, and then I was still having doubts as to whether it was going to survive. It was the absolute hardest wood I have ever turned. Worse than Desert Ironwood. Anyway, take a look.

This is what I brought home from W. G. It laid around for months before I started on it.
View attachment 242375


I was looking for the center of it in this picture after I cut the waste off it, which might become a bottle stopper in the future. The only way to get accuracy in measuring it was to set that piece of plywood up against the tailstock to get the diameter, 4 1/2". It worked out so next was mounting it toget the most out of the blank.
View attachment 242376


It's mounted, and ready for the abuse I'm about to subject it to.
View attachment 242378

I didn't think about taking pictures while in work except this next picture. I had put about 10 coats of CA with sanding each coat. I used medium CA on all the coats, and had very good results, so on the 11th coat, I decided to use thick CA. Boy, that was a disaster as this piece ended up with ribs about a 32nd thick that I couldn't get sanded out even with 180 grit, so decided to use my skew. I don't need to say anything more about that as the picture speaks volumes.
View attachment 242379

I had to get my bowl gouge and turn it down past the cut without losing the shape. No pictures again, but here is the finished piece. It's 4"od x 5 9/16" tall. In total of filling, there were a lot of small holes that filled very easily, and then about 4-5 others that actually need filler which was the shavings , plus very little fake turquoise. One spot in this picture is about 5 o'clock 2" above the foot.
View attachment 242380

This picture shows a filled spot just above the 9 o'clock area. The shavings are just a little darker than what the picture shows, but still looks good.
View attachment 242381

This doesn't show any of the larger spots needing filling, but there were a bunch of tiny holes I filled.
View attachment 242382

Here is the mouth showing a lot of the turquoise filler. There were a lot of bug tracks there and only at that location.
View attachment 242383


I couldn't get pictures of the bottom, but it started out having a short finial, but broke off so I just put a nipple on it. All in all, this is probably the prettiest piece of wood I've found up in Walnut Grove and certainly will not be the last.

For some reason, I just can't get my camera to come in with good crispy pictures like the ones of that New York guy and DLJeffs. My camera is pretty good, or was when I first got it about 8 years ago. The other camera I use does the same even on auto focus, but I'm thinking it's my eyes instead. ............ Jerry (in Tucson)
Man!! Maybe some day when I will grow up I'll find something like this (h.e. double hockey sticks - I cannot even find any Dover Chert) That is beautiful. Skabetti-ish even!
 
Last edited:
Great job Jerry. It sounds as if you put a lot of time and effort into it and the results show!

Three thoughts come to mind about your camera and the sharpness of your pictures. I would check you auto focus mode and ensure it’s set up to the correct mode for a static item. The second would be to use an auto or aperture setting. By narrowing your aperture you’ll get more depth of field for an overall shaper picture. And third would be to consider the use of a tripod to ensure the camera is as steady as possible.

Even with the slight blur, it’s easy to see the quality of this piece. Nice job!!
 
  • Thread Starter Thread Starter
  • #13
Looking pretty decent for trash... I would say it's well worth the effort I put into it to get to see that there piece of firewood. :sofa:
Frankie ole boy, that's exactly what the few locals that live up there think of any piece of wood. Every time I go up there, I have to sneak a piece or two from Mary's firewood pile. Then, I gotta listen to her griping that I'm taking her future heat, as she lives off grid. Been that way since about '94 I believe. Straw house, solar, wind and generators and she's happy there.

Actually, that piece was found deeper into the forest where she lives and I just need to look for more when I go there again in a week or two. I don't know why I want more as I have at least a thousand pounds or more of all kinds of Oak burls that I suppose is Scrub Oak if that's really the name of it. It creeps along the ground and sprouts up sticks that don't get more than an inch or two on od and not much more than several feet high.

Look in your statement in the reply for the bold "I". Is that a typo or what? I'm kinda confused. You're gonna have to understand it for me. :lol2:........... Jerry (in Tucson)
 
Frankie ole boy, that's exactly what the few locals that live up there think of any piece of wood. Every time I go up there, I have to sneak a piece or two from Mary's firewood pile. Then, I gotta listen to her griping that I'm taking her future heat, as she lives off grid. Been that way since about '94 I believe. Straw house, solar, wind and generators and she's happy there.

Actually, that piece was found deeper into the forest where she lives and I just need to look for more when I go there again in a week or two. I don't know why I want more as I have at least a thousand pounds or more of all kinds of Oak burls that I suppose is Scrub Oak if that's really the name of it. It creeps along the ground and sprouts up sticks that don't get more than an inch or two on od and not much more than several feet high.

Look in your statement in the reply for the bold "I". Is that a typo or what? I'm kinda confused. You're gonna have to understand it for me. :lol2:........... Jerry (in Tucson)
That was kinda along the lines of" it looks easy when someone else does it...“ I didn't do a minutes work, but I sure enjoyed looking at that hollowed out oak gall.

I have turned several pine galls and am waiting to find a decent oak gall to exercise my patience on. No hurry, I got plenty of stuff that is waiting for me to stack or process or even just burn at the moment...
 
Here on the plateau we tend to get bell burl on the oaks. Shallow soil ruins the taproot and then the tree starts rotting from the inside and building burl, healing tissue to keep the tree from just falling over. I bought one years ago for 50 bucks. Had a small pen turned out of it then sold the stump to another wood worker for 50 bucks...
 
Great job Jerry. It sounds as if you put a lot of time and effort into it and the results show!

Three thoughts come to mind about your camera and the sharpness of your pictures. I would check you auto focus mode and ensure it’s set up to the correct mode for a static item. The second would be to use an auto or aperture setting. By narrowing your aperture you’ll get more depth of field for an overall shaper picture. And third would be to consider the use of a tripod to ensure the camera is as steady as possible.

Even with the slight blur, it’s easy to see the quality of this piece. Nice job!!
The other suggestion I thought about is to check the white balance setting. Notice your first 4 photos have accurate color but the next 3 of the posed vase have a prominent yellow tint. That's because you took them inside or under an incandescent light (probably). Different light produces different color spectrums. This web link explains it pretty well...
white balance explained

Natural sunlight is best (most of the time). But neon lights, incandescent light, LED, halogen, tungsten, they'll all produce off colors unless you select the appropriate white balance setting. I don't know what kind of camera you have but somewhere in one of the buttons or dials or settings, you should see a light bulb or a sun symbol or something, sometimes it will simply have the letters WB or AWB. Most cameras will then allow you to select for full sun (usually a sun); shadows (usually a cloud or a silo with a shadow symbol), night time (a crescent moon), neon lights (long rectangles), incandescent (lightbulb) LED (usually it'll say LED), or Average While Balance (AWB, which is a combination which will get you close). If you don't want to mess with the white balance, try to always take your subject in natural light.
 
Back
Top