

After a massive number of requests (1) for a solar kiln post I just happen to have one on how to do a simple version that can be expanded to whatever size you want. It was my first one and I think it is a good primer on what you need to get you started for very little or no money.
Solar Kiln
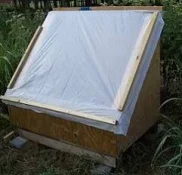
If you are a woodworker, whether flat work or lathe, carver or stock maker, at some time or other we all think how cool it would be to have a kiln. Cutting stock then getting it dried for future use, stacked high without paying someone else to do it or buying kiln dried stock. Well, count me as one of those. I thought about it a lot since I started turning lures and making game calls then finally bit the bullet, did some research and built my own. The difference is I went solar. Yep a solar kiln which dries wood in far less time than air drying with the added benefit of costing exactly zero to run.
After a bit of searching online I came to the conclusion that you could build one of these as fancy or as simple as you wanted. One that would do a 100 BF at a time or 3000 BF the main difference was simply size. In reality all you are building is a greenhouse which is simple enough. I happen to work around places were I can get free material so the original plan was to use only recycled or repurposed wood. I then had 4 trees delivered so I did buy some wood to get mine going but you could do one from material you have on hand.
Mine is approximately 5’ wide 4’ high at the back 1’ high at the front and 4’ deep. But like I said you can make it any size you like but an important feature is a sloped roof that can face south to gather as much sunlight as possible. For now mine is covered with heavy plastic but I will replace that with roofing of some kind. The other thing you need is air flow. My kiln has spaces between the floor boards and I added screened vents near the top. I might get a solar powered fan to help things along but for now this is working.
Here is a photo log and a few tips of how I built mine. Really nothing to it and you can do the whole thing with hand tools. So, let’s take a quick look about putting together a solar kiln.
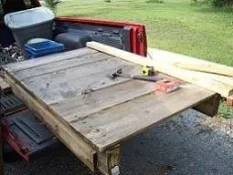
I started with a shipping pallet I was given at a local warehouse. To this I added a back framed up with 2x4s. Just a simple rectangle with some extra support in the middle to screw the back to later. I nailed this to the pallet then made the sides.
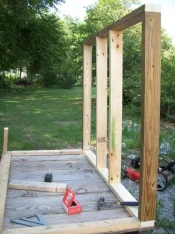
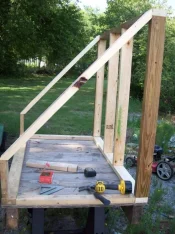
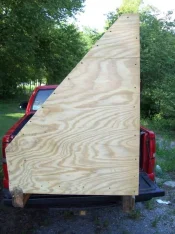
It turned out my sides were at a 45 degree angle which made layout easier but that was an accident. I framed in the front with a removable panel that fits between the ends pieces.
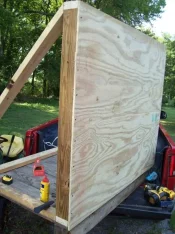
I measured the back and cut a piece of ½” pressure treated plywood to cover it and screwed it into place. Drill a few 2” holes near the top of the back and cover with a screen for air flow. I took 4’x4’ pieces of plywood and screwed one to the each end then used a saws all to trim the excess. Finally I covered the front panel with plywood letting it overlap the sides and bottom a bit to keep out the weather. I used a couple of screws to hold it in place. This piece is removable to help loading and unloading the kiln.
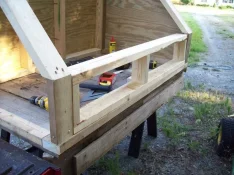
The top is a simple frame to hold the plastic and is removable. Mine has a board that clips over the top and back to hold it in place with no screws needed. I used drywall screws and staples because that is what I had on hand. Had some 8P nails so used them, too. This was a budget build to show folks it can be done on the cheap. Of course if you have to buy everything and go big it is going to cost you a bit.
The benefits of a solar kiln besides the zero run cost is the efficiency in drying the wood. Air drying takes about one year per inch of thickness whereas a solar kiln can dry the same piece in about 5 weeks. I tested mine with thicker split wood and it did a great job.
Yes you can run one in winter. It won’t be as hot but it will be warm enough and painting the interior black will help greatly. Mine will get a coat of black paint soon along with some type of roofing that will help hold in the heat.
To load the kiln split the wood and take out the pith (middle) since that is where most checks begin. Coat the ends with AnchorSeal, latex paint or wax then stack loosely in the kiln leaving room for air flow. Once it is loaded and closed resist the temptation to open it up to check in a couple of weeks trust me it is working. If you don’t have a meter to check the moisture content you can weigh one piece of wood when you put it in then weigh that piece each time you check the kiln to see how much it has lost.
Solar Kiln
If you are a woodworker, whether flat work or lathe, carver or stock maker, at some time or other we all think how cool it would be to have a kiln. Cutting stock then getting it dried for future use, stacked high without paying someone else to do it or buying kiln dried stock. Well, count me as one of those. I thought about it a lot since I started turning lures and making game calls then finally bit the bullet, did some research and built my own. The difference is I went solar. Yep a solar kiln which dries wood in far less time than air drying with the added benefit of costing exactly zero to run.
After a bit of searching online I came to the conclusion that you could build one of these as fancy or as simple as you wanted. One that would do a 100 BF at a time or 3000 BF the main difference was simply size. In reality all you are building is a greenhouse which is simple enough. I happen to work around places were I can get free material so the original plan was to use only recycled or repurposed wood. I then had 4 trees delivered so I did buy some wood to get mine going but you could do one from material you have on hand.
Mine is approximately 5’ wide 4’ high at the back 1’ high at the front and 4’ deep. But like I said you can make it any size you like but an important feature is a sloped roof that can face south to gather as much sunlight as possible. For now mine is covered with heavy plastic but I will replace that with roofing of some kind. The other thing you need is air flow. My kiln has spaces between the floor boards and I added screened vents near the top. I might get a solar powered fan to help things along but for now this is working.
Here is a photo log and a few tips of how I built mine. Really nothing to it and you can do the whole thing with hand tools. So, let’s take a quick look about putting together a solar kiln.
I started with a shipping pallet I was given at a local warehouse. To this I added a back framed up with 2x4s. Just a simple rectangle with some extra support in the middle to screw the back to later. I nailed this to the pallet then made the sides.
It turned out my sides were at a 45 degree angle which made layout easier but that was an accident. I framed in the front with a removable panel that fits between the ends pieces.
I measured the back and cut a piece of ½” pressure treated plywood to cover it and screwed it into place. Drill a few 2” holes near the top of the back and cover with a screen for air flow. I took 4’x4’ pieces of plywood and screwed one to the each end then used a saws all to trim the excess. Finally I covered the front panel with plywood letting it overlap the sides and bottom a bit to keep out the weather. I used a couple of screws to hold it in place. This piece is removable to help loading and unloading the kiln.
The top is a simple frame to hold the plastic and is removable. Mine has a board that clips over the top and back to hold it in place with no screws needed. I used drywall screws and staples because that is what I had on hand. Had some 8P nails so used them, too. This was a budget build to show folks it can be done on the cheap. Of course if you have to buy everything and go big it is going to cost you a bit.
The benefits of a solar kiln besides the zero run cost is the efficiency in drying the wood. Air drying takes about one year per inch of thickness whereas a solar kiln can dry the same piece in about 5 weeks. I tested mine with thicker split wood and it did a great job.
Yes you can run one in winter. It won’t be as hot but it will be warm enough and painting the interior black will help greatly. Mine will get a coat of black paint soon along with some type of roofing that will help hold in the heat.
To load the kiln split the wood and take out the pith (middle) since that is where most checks begin. Coat the ends with AnchorSeal, latex paint or wax then stack loosely in the kiln leaving room for air flow. Once it is loaded and closed resist the temptation to open it up to check in a couple of weeks trust me it is working. If you don’t have a meter to check the moisture content you can weigh one piece of wood when you put it in then weigh that piece each time you check the kiln to see how much it has lost.
