
Stabilizing box lid panels

DLJeffs

Member
Full Member
Messages
7,400
Reaction score
18,824
Location
central Oregon
First name
Doug
I had a couple panels for box lids that I felt were kind of soft and would benefit from stabilizing. I also had a couple left over pieces of a nice burls slice I got from Boeng in Indonesia a couple years ago. The pieces would fit in my vac tank but I don't use the full tank, it'd take a couple gallons of resin to cover the pieces. Nor would they fit in the cutoff milk jugs and things I was using for stabilizing smaller pieces - like reel seat and pen blank sizes. So I bought two small pieces of 1/16" acrylic and made a tall, slender box. Perfect I thought. I even filled it with water to check for liquid tightness. BUT,,, when starting to fill the thing, I broke one of the sealed edges, so it would no longer hold liquid. Quickly pulling it out and removing the panels, I poured the resin back into the jug and regrouped. I tried to re-seal the joints but I think the presence of resin in there kept the acrylic glue from reacting. Plus I had added a caulking layer of clear silicon which also buggered up the lot. The frame was still pretty solid so I figured out I'd put a plastic bag inside and fold it over the top edge. I found a bag, tested it for holes, and fit it onto the frame. It worked pretty well. I was able to stabilize 3 panels with less than a half gallon of resin with no leaks. The panels are in the oven curing now.
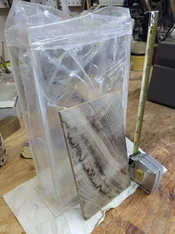
frame for stabilizing box lid panels.webp
 
I had a couple panels for box lids that I felt were kind of soft and would benefit from stabilizing. I also had a couple left over pieces of a nice burls slice I got from Boeng in Indonesia a couple years ago. The pieces would fit in my vac tank but I don't use the full tank, it'd take a couple gallons of resin to cover the pieces. Nor would they fit in the cutoff milk jugs and things I was using for stabilizing smaller pieces - like reel seat and pen blank sizes. So I bought two small pieces of 1/16" acrylic and made a tall, slender box. Perfect I thought. I even filled it with water to check for liquid tightness. BUT,,, when starting to fill the thing, I broke one of the sealed edges, so it would no longer hold liquid. Quickly pulling it out and removing the panels, I poured the resin back into the jug and regrouped. I tried to re-seal the joints but I think the presence of resin in there kept the acrylic glue from reacting. Plus I had added a caulking layer of clear silicon which also buggered up the lot. The frame was still pretty solid so I figured out I'd put a plastic bag inside and fold it over the top edge. I found a bag, tested it for holes, and fit it onto the frame. It worked pretty well. I was able to stabilize 3 panels with less than a half gallon of resin with no leaks. The panels are in the oven curing now.
View attachment 294965
Sounds like a lucky save!
 
  • Thread Starter Thread Starter
  • #4
I had some successes and some failures with this batch of box lid panels. The two fancy end grain pine slices from Byron in Taiwan (via Phil) warped badly during stabilization / curing. I tried to sand them to get a workable panel but they got pretty skinny. Then they both had a natural crack along one of the grain lines and the one I worked on first broke in two. I didn't even try the other because it was warped much worse than the first one. The slice of burl from Indonesia (Boeng) was a success. It solidified nicely, feels very heavy now, and all the tiny voids and punky looking spots were solid now. I did not stabilize the slice of figured aspen from that stump because it sanded down beautifully as is. I wiped on a thin coat of 1lb cut shellac just to bring out the figure. There's shadow on the lower half of the photo so the pieces look darker than they are.
box lid panels stabilized.webp
 
I had some successes and some failures with this batch of box lid panels. The two fancy end grain pine slices from Byron in Taiwan (via Phil) warped badly during stabilization / curing. I tried to sand them to get a workable panel but they got pretty skinny. Then they both had a natural crack along one of the grain lines and the one I worked on first broke in two. I didn't even try the other because it was warped much worse than the first one. The slice of burl from Indonesia (Boeng) was a success. It solidified nicely, feels very heavy now, and all the tiny voids and punky looking spots were solid now. I did not stabilize the slice of figured aspen from that stump because it sanded down beautifully as is. I wiped on a thin coat of 1lb cut shellac just to bring out the figure. There's shadow on the lower half of the photo so the pieces look darker than they are.
View attachment 295002
The fact you had partial success is encouraging. Seems we try to harness the sheer forces of nature sometimes, and it doesn’t always work out. Keep plugging away! Love your boxes! Chuck
 
I read somewhere that you can take a metal fixture that holds the wood in shape and do the whole thing with that on. Supposedly you can even straighten out warped boards. The resin ends up holding it in place later and the fixture keeps it straight during the process.
 
Last edited:
  • Thread Starter Thread Starter
  • #7
I read somewhere that you can take a metal fixture that holds the wood in shape and do the whole thing with that on. Supposedly you can even straighten out warped boards. The resin ends up holding it in place later and the fixture keeps it straight during the process.
Never seen such a device but it makes sense. These started out true and flat and seemed that way when I took them out of the resin. So sometime during the curing bake-off procedure they cupped and warped badly. Disappointing for sure. I liked the way the dark reddish grain lines flowed across the panel. As soon as I took them out of the oven and still hot to the touch I saw the warp and put one under a big steel plate I have, probably 25-30 lbs weight. Didn't budge.
 
Back
Top