The Conestoga Wagon build

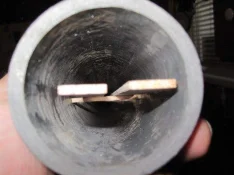
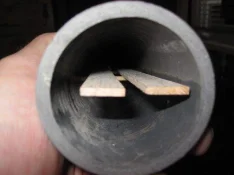
Just a couple of shots of the inside of the steaming tube. I have 1/8" dowels drilled throughout the tube to support the stock.
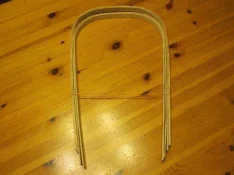
I also have 4 hoops complete, and 2 in the forms. 2 more to steam tomorrow and I should be installing them by Wednesday with any luck at all.
[attachment=13175]

[attachment=13176]

[attachment=13177]
IMG_2948.webp

IMG_2949.webp

IMG_2951.webp
 
Oh that's cool, I can see it already. Are you sewing the canvas yet?
 
Kevin said:
Oh that's cool, I can see it already. Are you sewing the canvas yet?

I still have to purchase the canvas Kevin, but I do intend to sew the canopy. I'm not sure how yet but I have been thinking about it. I don't have a problem sitting down at a sewing machine in the name of a cool woodworking project. I still have some more wooden pieces to add though and a little more metal.
 
Nothing sissy about sewing man. Men who poo poo the needle and thread are insecure with themselves. Ask any Army Ranger or Air Force Para Rescue member if sewing is sissy. :biggrin:
 
Can't wait to see the hoops on, it's gonna be cool! :good::good2:
P.S. My mom tought me how to embroider when I was 8, I think that's what led to model building! Yes I can still sew a button on! I always say I can make, fix, or build anything,.....I guess I can sew too. :blush:
 
Got home from work today and fired up the stovetop steam bending machine to get the final 2 hoops bent. Once all that was going on, I headed to the shop to drill, sand and install the existing 6 hoops onto the wagon. Here's a peak at what I got done today.
[attachment=13226]

[attachment=13227]

[attachment=13228]

[attachment=13229]

[attachment=13230]

IMG_2952.webp

IMG_2953.webp

IMG_2954.webp

IMG_2955.webp

IMG_2956.webp
 
I started out the day by installing the last 2 hoops on my wagon. My intention was to install the ridge beam as well, but somebody (and I wont mention any names, but his initials are K-E-N-B-O) read the measurements wrong and cut his ridge beam 2" too short. :dash2:

So that will be a project for tomorrow.

I decided that since I had all the hoops installed, I would proceed with making a few little accessories. I decided on an axe for today. I would like to say that the hardest thing about making this axe was not making it perfect. I pride myself on having things "just right" and at one point, there was an imperfection in the axe head and I tried to correct it. I had to stop myself. In all the pictures of the tools that I have looked at, there was not one perfect axe head. These things were pounded out by blacksmiths. There was no such thing as perfect. So I held back and managed to get it a little imperfect. I'm pretty happy with the results of this.
If any of your give a rats @$$ about the history of this wagon, you should really look it up. It's quite the read. There is a lot of history on these puppies.
The picture that the axe is laying on, is one that I found on a pioneer website that I printed out and used to model my axe after.
Hope you like it so far.
[attachment=13305]

[attachment=13306]

[attachment=13307]

[attachment=13308]

[attachment=13309]

IMG_2959.webp

IMG_2960.webp

IMG_2961.webp

IMG_2962.webp

IMG_2963.webp
 
Kenn, this thing is looking great! It's so cool to look at now that it's all coming together. :good::good2: One question, what are you going to do with it when it's done? Display it in your home?
 
woodtickgreg said:
Kenn, this thing is looking great! It's so cool to look at now that it's all coming together. :good::good2: One question, what are you going to do with it when it's done? Display it in your home?

Thanks guys. I have no idea what I'm going to do with it. I've been asking myself that every since I started the build. The body of the wagon is 3' long and with the tongue, it's 5' long and stands over 2' high. I've thought of some way that I could make a functional item out of it, but I'm drawing a blank. For now, it will be displayed in my home. I know my father on the east coast has his eye on it. I may just give it to him. The fun for me is building it.
 
Kenbo said:
woodtickgreg said:
Kenn, this thing is looking great! It's so cool to look at now that it's all coming together. :good::good2: One question, what are you going to do with it when it's done? Display it in your home?

Thanks guys. I have no idea what I'm going to do with it. I've been asking myself that every since I started the build. The body of the wagon is 3' long and with the tongue, it's 5' long and stands over 2' high. I've thought of some way that I could make a functional item out of it, but I'm drawing a blank. For now, it will be displayed in my home. I know my father on the east coast has his eye on it. I may just give it to him. The fun for me is building it.
Ha Ha, I knew it was big, that's kinda why I was wondering. :biggrin:
 
Spent some more time on the wagon today. Finally got my ridge pole cut and installed in the wagon. It really makes the hoop assembly solid. I also made my version of a 2 man cross cut saw. I made the blade on the scroll saw and shaped, drilled and pinned some dowels for the handles. I tried to make a barrel, but it didn't work, so I turned it into a bucket. I really don't think that I like the bucket, so I don't know if i will keep it or not. I will most likely make another one to take it's place. I also made a tools chest for the back end of the tongue. I made the hinges to match the hinges on the side box. I like making these wooden hinges. They're pretty cool. Anyway, that's the days progress. I need a nap now.
[attachment=13340]

[attachment=13341]

[attachment=13342]

[attachment=13343]

[attachment=13344]

[attachment=13345]

[attachment=13346]

[attachment=13347]

IMG_2964.webp

IMG_2969.webp

IMG_2970.webp

IMG_2971.webp

IMG_2972.webp

IMG_2975.webp

IMG_2976.webp

IMG_2977.webp
 
I like the saw and the bucket! :good::good2: Most people will look at this and not have any idea how much work is really in it! But we know! Awesome job Ken.
 
Joe Rebuild said:

I broke the tooth while tapering them on the blade. I was quite upset at first, but then thought that it looked a little more authentic. After all, teeth break right? So the answer to your question is.................yes. :blush:
 
Ken, Your attention to detail is commendable. I can not imagine doing such little details- makes my clunky fingers :wacko1::wacko1: ache just thinking about.
But next you are going to have to start 4 or 6 of these. :yipee::yipee:


[attachment=13368]

I mean come on now a wagon needs ponies to really be a wagon --Right? :drinks::rotflmao3::rotflmao3::rotflmao3: Should only take a couple more hours. :rotflmao3::rotflmao3::rotflmao3::wacko3:

horse 001s.webp
 
That wagon spent some time on the south end of the Chisolm, and that saw spent some time making Osage dust. Thus the broke tooth. Lucky it got out of Texas with only one missing.

Ken it's a really beautiful piece of work. If you sell it, don't cut yourself short. Scroll down and look at the price of this aged model. :shok:
 
Thanks guys. Yard work got in the way of the wagon build today, but I did locate some awesome chain to hang my feed trough from. That was all I got done.
[attachment=13386]

[attachment=13387]

[attachment=13388]

IMG_2978.webp

IMG_2979.webp

IMG_2980.webp
 
Kevin said:
That wagon spent some time on the south end of the Chisolm, and that saw spent some time making Osage dust. Thus the broke tooth. Lucky it got out of Texas with only one missing.

Ken it's a really beautiful piece of work. If you sell it, don't cut yourself short. Scroll down and look at the price of this aged model. :shok:

Wow!! I mean, that is a beautiful model, but $3500.00. It's much smaller than mine as well. I do like the oxen harnesses that he has on his. Gives me an idea for something to add to mine. Thanks for the link Kevin.
 
Back
Top