
Workbench Build

Sprung

Amateur Sawdust Maker
Full Member
Messages
9,779
Reaction score
16,381
Location
WI
First name
Matt
I had hopes that whenever I posted a build thread on a workbench, it would be a "forever" bench - something of solid wood, such as the $1/BF red oak I saw posted on Craigslist. However, for a variety of reasons, that build isn't happening anytime soon. However, I still need a workbench, seeing as I left my two rickety ones behind when we moved. Even though it's not the bench I would like to eventually build, I am still happy with the direction I'm going. The idea with this build is to build a bench quickly, yet have it be sturdy and have some mass to it.

Doing this build with 4x4's and 2x4's for the base, 3 layers of 3/4" plywood for the top, hardwood to edge the top and for the vise. A lot of the joinery in the base will be lag screws, which I can always tighten as the wood dries more or if they work themselves lose somehow. Got a nice vise to put on it. Don't have a tail vise yet and don't have the money to buy one, but have some ideas. I eventually plan to build drawers for some storage underneath it.

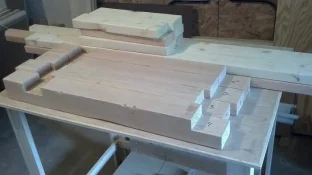
After buying the wood over a month ago, I *finally* got a chance to get started today. Cut the 4x4's to length for the legs and notched them out for the 2x4's for the stretchers. Cut all the 2x4 pieces needed in the base to length. Sanded everything with the ROS with 120grit to smooth it all out a little bit. I've got some dark blue milk paint on hand, much more than I need for the project my wife had me buy it for, so I'm giving serious thought to putting a couple coats on the base and making it look a little nicer.

Next step will be to assemble the base, then layer the plywood and build the top. Then trim out the top, install the vise, and attach the top. Then apply a quick coat of some sort of finish and start using it!

To prove that this is actually happening, here's a pic of where I left off earlier today:
IMG_20140627_181852_989.webp

While I didn't get to spend the whole day in the shop, I was quite productive with the time I was able to spend out there!
 
  • Thread Starter Thread Starter
  • #3
You will love havin a vise

Oh, I know I will. I've spent so much time creatively clamping things or trying to hold things in my small metal vise that I'm very much looking forward to having a vise. And so looking forward to having a good, heavy bench that doesn't rack when you look at it funny.
 
  • Thread Starter Thread Starter
  • #4
Some more progress today. Had to call it quits when I ran out of lag screws. However, it was also getting too hot in the garage to keep working, so running out of lag screws gave me a good reason to call it quits for the day before the heat started to really get to me. Today was a day that I was real happy that I own three drills - one corded and two cordless. They all had different bits in them that I was using and I was thankful that I didn't have to keep changing bits every other minute. Really speeds up the process when you don't have to change bits!

Here's how it's looking right now. I'm happy with the progress I've made and how it's turning out. Real steady and solid already and while it doesn't weigh a lot yet, it'll get a lot of heft to it when I put the top on it and even more whenever I can get a chance to build a storage cabinet to go under it and fill that with tools. One of the top stretchers is, as you can see, shorter than the other. This is because the vise will be going there. I made the back stretcher longer so that the plywood top will still be supported. I doubt a 2 1/4" thick lamination of plywood will sag or flex much, if at all, but since the vise is cast iron and steel and heavy, I wanted to make sure there was some support there if needed. Planned top size is 7'x2', plus a little extra that will get added on when I edge the plywood top.

IMG_20140628_124942_031.webp

Drilled holes and cut short pieces off some 1" poplar dowel I had laying around to get the lag screws something to bite into wherever I needed to run one into end grain. As of right now there will be a total of 16 plugs like this in the bench and it took less than 20 minutes time to drill the 1" holes, cut the dowel to rough length, then pound in with a mallet and a small dab of glue. While this is a quick build, I do want this bench to hold up to abuse. Spending the few extra minutes on a small detail like this will pay off in the end. Please ignore the marks from the forstner bit jumping. That's what happens when your wife unexpectedly opens up the door to the garage and you jump a little bit in surprise as you're starting to drill the hole.

IMG_20140628_125006_873.webp

Have decided that I will be painting the base dark blue with a couple layers of milk paint. I think it will dress it up a little bit. I figure I might as well spend a little bit of extra time and make it look a little nicer than simple box store 4x4 and 2x4 construction. (If I had a jointer and planer and could clean it up, it would be a different story. But, then again, if I had a jointer and planer, I'd probably be building this bench out of $1/BF oak.) After I get some more lag screws, I'll install the bottom short stretchers and then the base will be done, so I'll paint it at that point. My milk paint process, that I've had success with, is a coat of dewaxed shellac, followed by however many coats of milk paint desired, then a couple coats of danish oil, then a coat of paste wax. Sounds like a lot of steps, but it's real simple, takes less time than one things to do, and I've been happy with how it has turned out on the couple items I've thus far finished with milk paint.
 
Last edited:
How many cross Braces (stiffners) you going to put in your top frame Matt?
 
  • Thread Starter Thread Starter
  • #6
How many cross Braces (stiffners) you going to put in your top frame Matt?

Short ways like the two that are already there? There will be one more - in the middle. I actually have the top one in the middle in place - did it after I took the pics posted. Since the top is so thick, it won't need a lot of cross bracing. If I was going with a thin top, like 3/4" or 1", I'd definitely feel the need for more, but not with 2 1/4" of plywood.

Wanted to get the three cross braces for the bottom in today too, but, as stated, had ran out of lag screws. You can see two of them in place already, just sitting there, held in place with the clamps.
 
It is coming along real good. I made my last one with 2X4 Frame and braces then put a solid core (2-3/4" thick) door for the top. That added about 65 pounds to it.
Get some more lag screws and get that thing finished. More pictures and instructions, good build thread.
 
  • Thread Starter Thread Starter
  • #8
Getting more lag screws tomorrow! But who knows when my schedule will allow me to get back at it. Will try to get more in progress pics along the way, instead of a "here's where I ended up at the end of the day" shot.
 
Looking good Matt. Where possible, it's always better to use carriage bolts versus lag screws unless you're also gluing the surfaces of the timbers being fastened by the lag bolts, and of course that's only where both surfaces are flat grain. Glue is worthless where one face of the wood is end grain.

Like Mike said you're going to love having a vice. I have some vices I have been trying to get rid of for decades would you like them?
 
Subscribed! Looking good so far, gonna be a fun one to watch.
 
  • Thread Starter Thread Starter
  • #11
Thanks Kevin and Greg! Kevin - yes, I'm using glue where I can. Definitely know about the end grain and glue - made that mistake a few times quite some time ago and definitely learned from it. I probably should have use carriage bolts, but it's a little late for that now. If this bench ever self-destructs and I need to rebuild the base, or if I have problems with it, I'll redo it with carriage bolts.

Like Mike said you're going to love having a vice. I have some vices I have been trying to get rid of for decades would you like them?

Yes, I have gone far too long without a vise. Katy let me buy this one and I'll be using it as a front vise. It's been sitting in the garage waiting for me to build the bench for almost two months now. Since budget is always a concern, I was thinking of fashioning a tail vise with a pipe clamp, much like the vise Fret440 made and featured somewhere on the forum, probably in his guitar build thread. What do you have laying around for vises that you've been trying to get rid of and what would you be looking to get for them? If I'm able to, I would love to pick up a vise for the tail end, and maybe even an extra one to save for the next bench build - whenever that might be.
 
I probably should have use carriage bolts, but it's a little late for that now.

Not at all. Looking at your pics, I don't see anywhere that a lag screw exists that you couldn't remove them and drill for carriage bolts. But if you glued them also that isn't necessary. In fact if the glue job was good, the screws aren't even serving a purpose now - you could probably remove them and re-purpose them. They only served as clamps until the glue dried - but if you leave them, they only serve as peace-of-mind.
 
  • Thread Starter Thread Starter
  • #13
Hmm, @Kevin , you've given me some food for thought. Glued joints are fine, but there's some end grain joints (the short cross braces) that I'll have to consider switching over to carriage bolts. Going to Menards tomorrow when we're in town grocery shopping, so I could easily pick up carriage bolts instead of lag screws and change over some of the joints where it would help. Wouldn't take much work to switch them out at this stage either.
 
Last edited:
  • Thread Starter Thread Starter
  • #14
No pics (sorry!), but I got a chance to make some more progress. Finished attaching the cross braces. Swapped out some of the lag screws for bolts. Put a coat of shellac on the base. (Had the shellac out for something else and decided to brush a quick coat on the base.)

Today I laminated the plywood for the top. Glued two pieces of 8'x2'x3/4" ACX ply together, clamped and weighted it. Then, about an hour later, removed the clamps and weight and added the third layer. 2 1/4" thick plywood top - it's got some weight to it now!

Trying to decide on how long to finish the top at. I was planning to cut it down to 7', as it would fit the space better. However, seeing it at 8' long has me thinking about leaving it full length and doing some rearranging to see if I can't fit it in the space full length. What say y'all?

Next steps:

Edge the top with hardwood
Install the vise
Attach the top
Drill dog holes
Put a finish on it (probably a single coat of danish oil)
Start using it!

Eventually I would also like to add a vise in for a tail vise, but that will have to wait until I can either afford to buy one or stumble over one for an absolute steal of a deal. Also plan to get a couple holdfasts when I can afford it. Considering that Katy's letting me buy a planer next month, I'm sure the vise and holdfasts will not be had anytime soon.

When I've finished some projects I promised Katy I'd do, I plan to build drawers to fit in under the bench - could use the storage and the extra weight will be good too.
 
  • Thread Starter Thread Starter
  • #15
Well, after two months of neglecting my bench build, yesterday and today I *finally* made some more progress. I had previously posted that I had glued up the three layers of 3/4" plywood for the top. Once I had the top sitting there, it was real easy to fall into using the bench instead of working on it. I've determined that now is the time to finish my bench and then arrange the shop how I want it.

I decided to keep it 8' length, instead of cutting it down to 7' as I had originally planned. In the last two months I've come to like the full 8' length, plus the new layout that I'll be implementing in the shop will work with an 8' bench. The layout I had previously planned for would only work with a 7' bench.

Last night I trimmed and cleaned up the edges. Today I trimmed out the top with some 3/4" poplar. Top is currently bottom side up so I can attach the vise - which is the next step. After the vise is installed, then I'll put the top down on some blocks on the floor, flip the base over to attach the top, then right the bench and put it to work!

Picture proof:

IMG_20140920_203935_890.webp
 
Back
Top