Best way to cut miters for boxes

DLJeffs

Member
Full Member
Messages
4,438
Reaction score
10,373
Location
central Oregon
First name
Doug
  • Thread Starter Thread Starter
  • #41
Finished my lid, except for drilling the holes for the pins and gluing on the little handle thing. Not 100% happy with it. For some reason I didn't get my spline kerfs exactly centered. I made a jig but with the thin lid, I had to make a spacer to get the lid where the saw blade cut through the jig. I suspect I didn't get that spacer exactly right. But if you don't tell anyone, I won't. Splines are black ebony left from reel seat blanks.
lid finished with splines.jpg
 

Ray D

Member
Full Member
Messages
1,832
Reaction score
2,306
Location
Lutz, Florida
First name
Ray
Looks great. I’m sure it goes without saying but cut some scrap and take your time setting up your drill press for the pin holes. A cheap digital caliper is very helpful.
Beautiful piece of lumber on that top.
 

DLJeffs

Member
Full Member
Messages
4,438
Reaction score
10,373
Location
central Oregon
First name
Doug
  • Thread Starter Thread Starter
  • #43
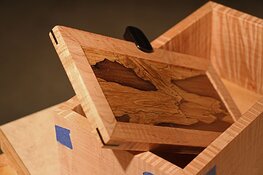
Did all the final fit up today, put a 1/4" round on the back of the lid so it opens smooth, final touch up sanding to equal up all the reveals, etc,. had to tickle one miter a little, cut the notch for the handle, and the final dry fit looks good. I used my strap clamp on the base for my second lamp so I won't be able to glue it until tomorrow. Then I'll cut the splines and do the final sanding / finishing. Of course once this one's done I need to make another one for my daughter (or wife, which ever one chooses the first one). I made one little change to Ray's design - I put a tiny nylon washer on the pin to help ensure the lid doesn't wander to one side or the other.

dry fit box.jpg

dry fit lid open.jpg

pin detail with nylon washer.jpg
 

Ray D

Member
Full Member
Messages
1,832
Reaction score
2,306
Location
Lutz, Florida
First name
Ray
That’s going to be a really nice box. Can’t wait to see it complete with a finish on it... that lid is going to be spectacular.
Ray
 

DLJeffs

Member
Full Member
Messages
4,438
Reaction score
10,373
Location
central Oregon
First name
Doug
  • Thread Starter Thread Starter
  • #46
Is that pin spring loaded?
Mornin' Barry.
No, the pin is just a piece of 1/8" brass rod, about 3/4" long. I'm using the method Ray told me about. Once your lid is more or less finished (dimensionally anyway), you drill a hole in the frame of your lid, centered in your lid, one each side. Then you figure out where the matching hole needs to go in each side of the box itself. I had a section of the "frame" I used for my lid, found the center (both top/bottom and from one end) and drilled a 1/8" diameter hole. I used that as a drill guide by clamping it to my lid (which centered the hole) and drilled it to depth. Then I could use the same drill guide on the box sides by aligning it with the top edge (which gets the hole to the right spot vertically). I started with the end of the guide right at the inside miter of the box sides, then I pulled it away from the miter edge a distance equal to the rest of the spacing between the lid and the box. This is important otherwise your lid will sit closer or farther from the back or front of your box. Once you have the drill guide in place I drilled a 1/8" hole in each side of the box. When I put the box together I'll slide the pins in as I raise each side of the box. Once it's glued, the lid and pins are fixed in place. That's why Ray recommends finishing the inside of the box and the lid before gluing it all up.

I thought about the spring loaded type of pins and a slightly different design in which you drill a hole that is the total length of your pin. You also drill a tiny hole perpendicular at about the halfway point. To assemble the lid, you slip it into place, then use a knife edge to wiggle the pin across the opening and into the box side. Once you have the pin at the appropriate depth, you insert a tiny wood dowel into the perpendicular hole to prevent the pin from sliding back. Both seemed like more trouble to me so I went with the simple design.
 

Ray D

Member
Full Member
Messages
1,832
Reaction score
2,306
Location
Lutz, Florida
First name
Ray
Hey Ray,
Do you glue the dividers in or do they just sit in there?
This particular group of tea boxes were given away as gifts. Being that I wasn’t sure if the recipients were into tea or not I made them removable.
 

DLJeffs

Member
Full Member
Messages
4,438
Reaction score
10,373
Location
central Oregon
First name
Doug
  • Thread Starter Thread Starter
  • #50
Splines cut and installed. Lesson: if you have a handle that extends outside the outer edge of the box, don't glue it on until after you do your splines. Mine got in the way and I had to cut extra spacers for my sled, yadda yadda. Didn't get them exact either. But they look okay. I thought the box looked a little unfinished so I also made these little corner decorations out of left over walnut. Sanded and all ready for final finish work now.

splines and corners install.jpg
 

Ray D

Member
Full Member
Messages
1,832
Reaction score
2,306
Location
Lutz, Florida
First name
Ray
Doug, what did you use to cut your splines ? I’ll get a picture of my spline cutting jig?
 

DLJeffs

Member
Full Member
Messages
4,438
Reaction score
10,373
Location
central Oregon
First name
Doug
  • Thread Starter Thread Starter
  • #52
Ray - I'll take a photo of the spline jig I made next time I get the camera out. It's pretty basic, rides along the table saw fence. It worked fine except for when my little handle got in the way. I used a fine tooth, narrow kerf blade by De Walt, it says for "extra fine finish" work. In a way it's too narrow. I cut the actual splines from a reel seat insert blank made of black ebony. It had two big cracks so couldn't use it for a reel seat. Just made real narrow cuts on my table saw.
 

DLJeffs

Member
Full Member
Messages
4,438
Reaction score
10,373
Location
central Oregon
First name
Doug
  • Thread Starter Thread Starter
  • #58
I think he installed the handle before cutting the splines and the handle was the problem

That's exactly what I did wrong. Two sides worked perfectly, the other two the handle was in the way. So I stuck a couple small blocks of wood onto the jig to make room for the handle and I didn't get the set up right afterwards. So the spline cuts aren't the same length.

I suppose I could have kept the lid outward, away from the fence and then partially opened it so the handle wouldn't hit the jig. In other words, keep the bottom of the box against the fence side of the jig when cutting all 8 spline kerfs. Then just reposition the fence/jig so the splines would be cut in the right place. I guess I was trying to avoid cutting up my jig.

Lesson learned for the next box. Got a lid glued up so will be cutting the box miters today hopefully.
 
Last edited:
Top