Bocote Guitar Build

  • Thread Starter Thread Starter
  • #41
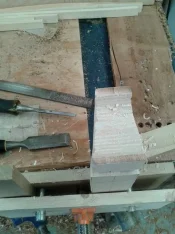
Didn't get much done today. Baby called and I was up to bat. I had intended to get the braces cut and ready in addition to finishing out the neck. I got some braces roughed out (you can see them in the background of the second picture) and I did get to work on the neck. I cut the rebate out to accept the top when it gets glued and I finished up the shape of the inside heelblock. I didn't have a chance to get a picture of the finished heelblock. I also finished up the outside shape of the headstock, but didn't yet get a picture. :headscratch:
I used the two chisels and rasp in the second picture for the shaping.

Jacob
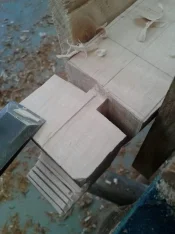
image.webp

image.webp
 
  • Thread Starter Thread Starter
  • #43
Okay. I still have a little clean up on the heelblock, but it's getting close. Also, a picture of the headstock. I can't go any further with the headstock until I get the tuners. (I need them to accurately drill the holes.) I started to rip the fretboard off of its block, but duty called before I could finish. Here's a picture taken shortly before I had to call it a day.

Jacob

image.webp

image.webp

image.webp
 
  • Thread Starter Thread Starter
  • #44
I teach English at a local high school and we are now back in session, so my shop time has been greatly reduced. I did get in the shop today and finished up ripping the fretboard. I also cut out the pieces for the rosette inlay. I originally thought I'd just make it out of Bocote, but the more I thought about it, it needed something else. So I cut up a little African blackwood to mix in with it. The semi-colon was a request from Woodintyuu. I like it. I should mention that when you cut shell, you need to wear a mask. Not that the shell will cause cancer, but that the little pieces of the shell are very sharp and if you breathe them in, they can cause problems.

Jacob

image.webp

image.webp

image.webp
 
Good job! Nice toes! LOL. All kidding aside, I'm still digging this build!
 
Nice work so far.....looks sweeeeet!

Toes in pic is an unwritten rule of posting pix. ;)
 
  • Thread Starter Thread Starter
  • #49
Continued work on the rosette today. I sanded the wood down to a better thickness for inlaying into the top. This also got it closer to the thickness of the shell, which is about .5mm. First I used a little CA glue to hold the shell to the wood. Then I traced the edge with a razor blade. After that, I popped the shell off by gently wedging the razor under one edge. Keep one finger on the shell. You don't want to be looking all over the shop if you drop it. Then use a little chalk to see the lines you scribed.
image.webp

image.webp

image.webp
 
  • Thread Starter Thread Starter
  • #50
Here's a photo of one piece at thickness held against another of the thickness I started with. In the second photo, I'm cutting out the space for the shell. First, drill a small hole to thread the blade through. Then, cut just inside of the line, almost like you are trying to cut it in half. You need to practice this a few times for sure! I still don't always get it perfect and find myself lightly sanding a little of the inlay to fit. Once it's right, glue it with CA. I put the whole thing on some wax paper and add glue where necessary. Just need to clean it up a bit.

Jacob

image.webp

image.webp

image.webp
 
  • Thread Starter Thread Starter
  • #51
Okay, here's a bit more. Between family and work, it's been tough getting out to the shop. I started by smoothing the spruce for the top. Note, I'm not thicknessing or really worried about flat, just smooth enough for me to inlay the rosette. This material is currently about 4 - 4.5mm thick. Then I cut the rosette channel with a homemade circle cutter. The blade is beveled on one side in a spear point so I can go both directions with it. I forgot to get a picture using a chisel to remove the waste. And there's nothing like a good circle to show you how far off you were... :banghead:

Jacob

image.webp

image.webp

image.webp
 
Last edited:
  • Thread Starter Thread Starter
  • #52
So, the fix... I made a new rosette. I saved what I could and made some new and here's where I am now. I had a Walnut ring left over from a previous build that happened to fit. So I cut and glued up some spalted who-knows-what to make a smaller ring to fit inside. I've got some more perfling material that should arrive this week and I'll cut some decorative rings to fill the gaps. I had a piece of scrap perfling that I stuck in on the right in the picture so I could see what it would look like.

Jacob

image.webp
 
Remember, they are not mistakes, they are design changes!
 
Okay. I still have a little clean up on the heelblock, but it's getting close. Also, a picture of the headstock. I can't go any further with the headstock until I get the tuners. (I need them to accurately drill the holes.) I started to rip the fretboard off of its block, but duty called before I could finish. Here's a picture taken shortly before I had to call it a day.

Jacob

View attachment 38726

View attachment 38727

View attachment 38728

How do you manage to keep the cut dead straight? Excelent build thread!
 
  • Thread Starter Thread Starter
  • #55
Ron, do you mean the sides of the headstock or the ripping of the fretboard? The short answer for both is to cut as straight as you can and then plane the offending side flat.

The long answer... with the headstock, I cut just to the waste side of the line, being careful not to cross it, then plane to the line with a block plane.
With the fretboard... I plane three sides relatively straight, but not necessarily perfect, then mark a line all the way around referencing one side ( in this case, the flat side in the picture...on dark woods, use a silver sharpie). I angle the work piece away from me and start a cut on my line with a mitre saw(small rip-cut saw). I do this on all four corners. Then I take my rip-cut handsaw (thank you Woodlove!) and cut from each corner, turning and flipping the piece regularly so the saw is always following in the cut.

I hope that helps. I don't think I'll have any other opportunities for to show that on this build, but I'll try to remember in the future...

Jacob
 
  • Thread Starter Thread Starter
  • #56
Got a box in the mail today. Tuners, nut/saddle, fret wire, and some dyed fiber material for purfling and inlay. I cut thin strips off to make white/black lines. :good:

Jacob

image.webp
 
Hey fret how close are you to wrapping up this build? I have dedicated my Saturday this weekend to digging thru my many thousands of BF for material for the next build. It may run into next weekend but if I need to speed it up I can prolly put in some time on Sunday also. Looking good btw.
 
Ron, do you mean the sides of the headstock or the ripping of the fretboard? The short answer for both is to cut as straight as you can and then plane the offending side flat.

The long answer... with the headstock, I cut just to the waste side of the line, being careful not to cross it, then plane to the line with a block plane.
With the fretboard... I plane three sides relatively straight, but not necessarily perfect, then mark a line all the way around referencing one side ( in this case, the flat side in the picture...on dark woods, use a silver sharpie). I angle the work piece away from me and start a cut on my line with a mitre saw(small rip-cut saw). I do this on all four corners. Then I take my rip-cut handsaw (thank you Woodlove!) and cut from each corner, turning and flipping the piece regularly so the saw is always following in the cut.

I hope that helps. I don't think I'll have any other opportunities for to show that on this build, but I'll try to remember in the future...

Jacob

Ahhhhh... starting the cuts with the miter saw...excellent! Keep the cut the the waste side & plane flat after. Got it!
Thank you!
You instrument makers never stop amazing me. Great build :)
 
Okay. I still have a little clean up on the heelblock, but it's getting close. Also, a picture of the headstock. I can't go any further with the headstock until I get the tuners. (I need them to accurately drill the holes.) I started to rip the fretboard off of its block, but duty called before I could finish. Here's a picture taken shortly before I had to call it a day.

Jacob

View attachment 38726

View attachment 38727

View attachment 38728

Have to respect that! resawing wood that hard, with a hand-saw! When "everyone" is using bandsaws... You are cool Jacob!
 
Back
Top