
A few cholla calls





Would there be time to put the cast part into a vacuum first and then transfer to the pressure pot? Not that I'd necessarily do that, just wondering about any "gel" issue during the open time.Clear slow is what I use. It’s made for turning and has a longer open time. Gives you time to mix and pour and get it in your pressure tank before starting to cure. Clear slow gives you a 12 minute open time. Just be sure any wood material
You are casting is completely dry or you will get bubbles where resin contacts the wood.
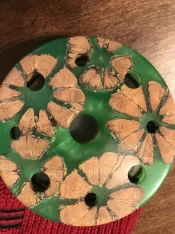
Cast Cholla showed up today. I'll get it turned and take some pics along the way. Thank you Eric


In theory, it would make more sense to pull a vacuum on the wood/ mold cavity and have some type of apparatus to introduce epoxy back into the wood/mold while venting, not allowing air to enter, but just the resin until you reach atmospheric pressure. Then switch over to pressure.
 ... or experience)
Except up where you live it's more like 13.9psiThere is no reason not to just immerse your wood into resin so that the resin level is above the top surface of the wood and the wood is secured so that it doesn't float. Resin level must stay above the top of the wood during this part, so any mold must accommodate that need.
- Close the chamber and apply the vacuum. The air inside the wood (under resin) will expand and the bubbles will rise to the surface of the resin.
- Leave vacuum on for several minutes (use slow curing resin) or until there are no more bubbles coming to the surface. (You may need X-ray eyes for this ... or a clear lid
- Note: the air pressure under this full vacuum is nominally 0 psi.
- Then, slowly release the vacuum, i.e., allow outside air to re-enter the chamber.
- As the air returns to the chamber, you are essentially applying 14.7psi (atmospheric pressure) to the resin immersed wood.
- Now, apply additional pressure via your air compressor.
- Proceed as normal.
There is no reason to try to add the resin after pulling the vacuum. No needed complications.
The switch from vacuum to venting to applying external air pressure might require an extra valve; or not; if you use matched Quick Disconnects for the vacuum and air lines. Just swap from one to the other.
What's really happening: After immersing your wood in resin and placing it into the chamber you are then pulling a vacuum on everything in the chamber.
- Under full vacuum, any air in the resin expands into bubbles and will float upward to the surface of the resin and pop.
- Any air in the wood voids will expand into bubbles and float upward to the surface of the resin and pop.
- Eventually, all the air is pulled out of the resin and out of the wood. No more bubbles.
- Any remaining voids in the wood will be full of … nothing … the voids will be under full vacuum (0 psi).
- Now, when you fully release the vacuum (do it slowly) returning air to the chamber, you are then applying 14.7psi to the resin surrounding the wood, forcing it into all the voids.
- Since the air was sucked out of the voids, they are at 0 psi and will draw in the resin being pushed at 14.7psi from the outside to fully fill the voids.
- Adding external pressure after that will further compress any residual air per the usual process.

does the resin not behave differently for cure time and or hardness upon curing under these circumstances? some of the compnants will evaporate and be separated by this process, i would think. i have heard of plenty of totally foamed up resins cured in a frothy mass. but i could be mistakenThere is no reason not to just immerse your wood into resin so that the resin level is above the top surface of the wood and the wood is secured so that it doesn't float. Resin level must stay above the top of the wood during this part, so any mold must accommodate that need.
- Close the chamber and apply the vacuum. The air inside the wood (under resin) will expand and the bubbles will rise to the surface of the resin.
- Leave vacuum on for several minutes (use slow curing resin) or until there are no more bubbles coming to the surface. (You may need X-ray eyes for this ... or a clear lid
- Note: the air pressure under this full vacuum is nominally 0 psi.
- Then, slowly release the vacuum, i.e., allow outside air to re-enter the chamber.
- As the air returns to the chamber, you are essentially applying 14.7psi (atmospheric pressure) to the resin immersed wood.
- Now, apply additional pressure via your air compressor.
- Proceed as normal.
There is no reason to try to add the resin after pulling the vacuum. No needed complications.
The switch from vacuum to venting to applying external air pressure might require an extra valve; or not; if you use matched Quick Disconnects for the vacuum and air lines. Just swap from one to the other.
What's really happening: After immersing your wood in resin and placing it into the chamber you are then pulling a vacuum on everything in the chamber.
- Under full vacuum, any air in the resin expands into bubbles and will float upward to the surface of the resin and pop.
- Any air in the wood voids will expand into bubbles and float upward to the surface of the resin and pop.
- Eventually, all the air is pulled out of the resin and out of the wood. No more bubbles.
- Any remaining voids in the wood will be full of … nothing … the voids will be under full vacuum (0 psi).
- Now, when you fully release the vacuum (do it slowly) returning air to the chamber, you are then applying 14.7psi to the resin surrounding the wood, forcing it into all the voids.
- Since the air was sucked out of the voids, they are at 0 psi and will draw in the resin being pushed at 14.7psi from the outside to fully fill the voids.
- Adding external pressure after that will further compress any residual air per the usual process.
might work best with long cure time resin? longer than 12 minute?There is no reason not to just immerse your wood into resin so that the resin level is above the top surface of the wood and the wood is secured so that it doesn't float. Resin level must stay above the top of the wood during this part, so any mold must accommodate that need.
- Close the chamber and apply the vacuum. The air inside the wood (under resin) will expand and the bubbles will rise to the surface of the resin.
- Leave vacuum on for several minutes (use slow curing resin) or until there are no more bubbles coming to the surface. (You may need X-ray eyes for this ... or a clear lid
- Note: the air pressure under this full vacuum is nominally 0 psi.
- Then, slowly release the vacuum, i.e., allow outside air to re-enter the chamber.
- As the air returns to the chamber, you are essentially applying 14.7psi (atmospheric pressure) to the resin immersed wood.
- Now, apply additional pressure via your air compressor.
- Proceed as normal.
There is no reason to try to add the resin after pulling the vacuum. No needed complications.
The switch from vacuum to venting to applying external air pressure might require an extra valve; or not; if you use matched Quick Disconnects for the vacuum and air lines. Just swap from one to the other.
What's really happening: After immersing your wood in resin and placing it into the chamber you are then pulling a vacuum on everything in the chamber.
- Under full vacuum, any air in the resin expands into bubbles and will float upward to the surface of the resin and pop.
- Any air in the wood voids will expand into bubbles and float upward to the surface of the resin and pop.
- Eventually, all the air is pulled out of the resin and out of the wood. No more bubbles.
- Any remaining voids in the wood will be full of … nothing … the voids will be under full vacuum (0 psi).
- Now, when you fully release the vacuum (do it slowly) returning air to the chamber, you are then applying 14.7psi to the resin surrounding the wood, forcing it into all the voids.
- Since the air was sucked out of the voids, they are at 0 psi and will draw in the resin being pushed at 14.7psi from the outside to fully fill the voids.
- Adding external pressure after that will further compress any residual air per the usual process.
Once mixed, the two components will not separate again as the chemical reaction has already been initiated and the combined parts become a single component. The only difference between using both vacuum and then pressure as opposed to just pressure is only some minutes under vacuum. With a relatively high viscosity material like the resin, and the minimal time under vacuum, any evaporation would be vanishingly small.does the resin not behave differently for cure time and or hardness upon curing under these circumstances? some of the compnants will evaporate and be separated by this process, i would think. i have heard of plenty of totally foamed up resins cured in a frothy mass. but i could be mistaken
hence the reasoning behind stabilizing, then casting as a second separate step?
 Part of my time there included building carbon/fiberglass/Kevlar/spectra impregnated composite components for missiles, aircraft pods, etc. Our biggest autoclave was 8-ft diameter x 20-ft long to accommodate some of the parts we built. Whenever we mixed any adhesive/resins/silicone/etc., we would use vacuum to degas it before going into the pressure/heat cycles. Again, that has been my experience and it could certainly not be applicable to casting as we are discussing here.
Cure time is probably one of the most critical aspects of casting, but you'd have to ask the guys who have actually put time into. I'm new to it.might work best with long cure time resin? longer than 12 minute?
I’ve had wood under vacuum for hours stabilizing and air bubbles never stop. For Alumilite you have about 10 minutes. It will be a frothy cured mess.There is no reason not to just immerse your wood into resin so that the resin level is above the top surface of the wood and the wood is secured so that it doesn't float. Resin level must stay above the top of the wood during this part, so any mold must accommodate that need.
- Close the chamber and apply the vacuum. The air inside the wood (under resin) will expand and the bubbles will rise to the surface of the resin.
- Leave vacuum on for several minutes (use slow curing resin) or until there are no more bubbles coming to the surface. (You may need X-ray eyes for this ... or a clear lid
- Note: the air pressure under this full vacuum is nominally 0 psi.
- Then, slowly release the vacuum, i.e., allow outside air to re-enter the chamber.
- As the air returns to the chamber, you are essentially applying 14.7psi (atmospheric pressure) to the resin immersed wood.
- Now, apply additional pressure via your air compressor.
- Proceed as normal.
There is no reason to try to add the resin after pulling the vacuum. No needed complications.
The switch from vacuum to venting to applying external air pressure might require an extra valve; or not; if you use matched Quick Disconnects for the vacuum and air lines. Just swap from one to the other.
What's really happening: After immersing your wood in resin and placing it into the chamber you are then pulling a vacuum on everything in the chamber.
- Under full vacuum, any air in the resin expands into bubbles and will float upward to the surface of the resin and pop.
- Any air in the wood voids will expand into bubbles and float upward to the surface of the resin and pop.
- Eventually, all the air is pulled out of the resin and out of the wood. No more bubbles.
- Any remaining voids in the wood will be full of … nothing … the voids will be under full vacuum (0 psi).
- Now, when you fully release the vacuum (do it slowly) returning air to the chamber, you are then applying 14.7psi to the resin surrounding the wood, forcing it into all the voids.
- Since the air was sucked out of the voids, they are at 0 psi and will draw in the resin being pushed at 14.7psi from the outside to fully fill the voids.
- Adding external pressure after that will further compress any residual air per the usual process.
i'm glad i wasn't actually too far off base. i thought i had heard such beforeI’ve had wood under vacuum for hours stabilizing and air bubbles never stop. For Alumilite you have about 10 minutes. It will be a frothy cured mess.

