
Jewelry Box

  • Thread Starter Thread Starter
  • #21
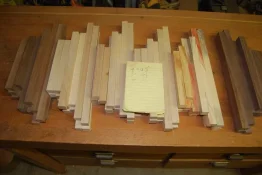
I am back- Cut all frame pieces to size. I used tablesaw- my miter gauge has a great stop setup so that is what I use. Barely had enough of the maple for the three- sure am happy I measured or I would have back to the beginning.
Next will be the mortises in the frames. I will mark where they all go otherwise I surely will end up with holes in wrong spots.:dash2::dash2::scare3::scare3::fit::fit: It the 4 corner pots there is a total of 20 holes- it is very nice when they all are where they belong. Picture and sizes of cut pieces. all :wacko1::wacko1: 84' of them. still do not believe it and I measured them..........

[attachment=13762]

About 3 1/2 hours in first session and 1 1/2 in this one for total 5
DSC_0002s.webp
 
Mike1950 said:
DKMD said:
You know you've got it bad when you run your firewood through the planer before burning it... Just in case! That's nice looking stuff!

I Know- I am wonderin how I am going to stay warm in the winter-Half my pile is birch. :dash2::dash2::dash2::dash2::dash2::dash2:

Easy! You cut peppermill blanks out if those babies, send them to me and others, and use the green stuff to pay the gas/electric!:drinks:
 
  • Thread Starter Thread Starter
  • #23
Mortises this morning-132 of them-1/4x1/4 then cleaned them up with chisel. :wacko1::wacko1: Ya got to be CRAZY to make 6 at a time but at least I am qualified. :yipee::yipee: I pre marked where all go but really only used the marks to make sure I got holes where holes are supposed to be. Even then I ended up with a couple extra holes-I put marks where they were not supposed to be. :dash2::dash2: I use stops to keep all holes consistent. Also you can see the vacuum behind chisel-keeps most of the chips picked up. Accuracy in these small pieces is important and a few chips in the wrong spot creates errors. Errors add up fast in small projects. I set up and made a few tennons- enough to mock up one frame work so everyone could see how this goes together. Still need to taper legs and make groove for inset panels. That will have to wait for Friday and weekend- I think I have kitchen and grandkid duty. :yipee:

[attachment=13787]

[attachment=13788]

[attachment=13789]

8.5 hrs

DSC_0004.webp

DSC_0005s.webp

DSC_0006.webp
 
Holy mortices batman! :scare3: That's a lot of pulling the arm on the one arm bandit!
 
  • Thread Starter Thread Starter
  • #25
Yes Greg lots of pulls-but those pulls equate into about twice as many trips through the saw making tennons. It would be 4 times but I do 2 of these small ones at a time-works better with my clamp. I get the fit close and then tune up the hole for a tight fit. Did these early Thanksgiving morning and this morning. Goes faster then it seems once you get in the groove.

[attachment=13844]

[attachment=13845]

Now to making the side panel insets -machine grooves for same and rabbets for top tray bottom and cabinet bottom-then sand and assembly.

12.5 hrs

DSC_0024s.webp

DSC_0026s.webp
 
  • Thread Starter Thread Starter
  • #26
Lots of rest -visiting and munching on leftovers- at 62-not as much spring in the ol bounceback mechanism!!! :negative::negative::greeting:
Spent some more time in shop this afternoon. Got the side panels resawn and sanded to thickness 1/4"- 2 sets walnut,2 sets of FBE, 1 set maple and one set redwood burl???- I thought?? but when I put finish on it-it sure gets dark??
Also marked all pieces for where inset grooves go and made a simple jig to create angle on leg. Thus keeping my fingers out of harms way and keeps them consistent.
Any thoughts or input on the "redwood burl" would be appreciated. Very lightweight.

[attachment=13855]

[attachment=13856]

[attachment=13857]

[attachment=13858]

16.5

DSC_0032s.webp

DSC_0036.webp

DSC_0034s.webp

DSC_0037s.webp
 
Mike1950 said:
Lots of rest -visiting and munching on leftovers- at 62-not as much spring in the ol bounceback mechanism!!! :negative::negative::greeting:
Spent some more time in shop this afternoon. Got the side panels resawn and sanded to thickness 1/4"- 2 sets walnut,2 sets of FBE, 1 set maple and one set redwood burl???- I thought?? but when I put finish on it-it sure gets dark??
Also marked all pieces for where inset grooves go and made a simple jig to create angle on leg. Thus keeping my fingers out of harms way and keeps them consistent.
Any thoughts or input on the "redwood burl" would be appreciated. Very lightweight.


You might have redwood root burl. I had some that turned dark with danish oil. Robert


16.5
 
  • Thread Starter Thread Starter
  • #29
rtriplett said:
Mike1950 said:
Lots of rest -visiting and munching on leftovers- at 62-not as much spring in the ol bounceback mechanism!!! :negative::negative::greeting:
Spent some more time in shop this afternoon. Got the side panels resawn and sanded to thickness 1/4"- 2 sets walnut,2 sets of FBE, 1 set maple and one set redwood burl???- I thought?? but when I put finish on it-it sure gets dark??
Also marked all pieces for where inset grooves go and made a simple jig to create angle on leg. Thus keeping my fingers out of harms way and keeps them consistent.
Any thoughts or input on the "redwood burl" would be appreciated. Very lightweight.


You might have redwood root burl. I had some that turned dark with danish oil. Robert


16.5

Thanks Robert-good thought, I bet you are right. I polished it with 0000 steel wool and it is beautiful. That is the good part- the bad part is Kathie saw it and confiscated it for future project. :dash2::dash2::dash2: I will post pics of it polished but it is a goner!!!!!
 
Mike, ask RockB. He is the one I got my Root burl from. It is pretty, but too dark compared with regular Redwood burl.
 
Looking good. I'm digging it.
 
  • Thread Starter Thread Starter
  • #32
Almost the whole day in the shop-been a long time. Since Kathie confiscated the redwood- I started resawing the new side panel and also the door insets. I will sand tomorrow while glue is drying. Spent the day machining, sand, test assembly, fine tune and gluing 3 sets of side panels. WOW there is a lot of work in some of these pieces. I like the inset side panel look but in no way is it a time saver!!! This is a fun stage-you start to see your wood choices come together. I mark every piece and keep them separate-If I didn't :scare3::scare3::help: I would spent most of my time cussing- there are a lot of pieces in one box.

[attachment=13883]

[attachment=13884]

[attachment=13885]

23.5 hrs

DSC_0006s.webp

DSC_0011s.webp

DSC_0012s.webp
 
That figure in that walnut is really gonna pop with an oil finish! What kind of finish are you planning to use on the fbe?
 
  • Thread Starter Thread Starter
  • #34
Had not even thought of finish. Never played with the FBE before. Any thoughts??
 
Whenever I am not sure of a finish to use I make a story board with a piece of scrap from the same board. I wrap masking tape around it leaving spaces between the tape for the different finishes. when the tape is peeled off and the natural unfinished wood is between the test finished pieces it clearly defines the differences.
On fbe I like water based poly as it dries clear and doesn't alter the red color. But it may also look nice with a light amber oil poly like minwax brand or general finishes brand. Spar poly will have uv inhibitors in them to help preserve the red from uv fading but they are usually a darker amber color. The only thing the darker amber polys will do is alter the red to more of an orange but the streaking will still be pronounced.
Sorry about the long winded thoughts. :sarcastic:
 
  • Thread Starter Thread Starter
  • #36
Joe Rebuild said:
I don't know how I missed this one. Mike those are sweet and that walnut :treehugger:.

Thanks- There are 2 walnuts- one a light brown and this dark one. These boxes take little pieces of wood- side panels at 6 5/8x 8 5/8 are the largest ones needed. Makes it to where you have a good selection of pieces to bookmatch. I think- 60 pieces give or take in each one. :wacko1::wacko1:
 
  • Thread Starter Thread Starter
  • #37
woodtickgreg said:
Whenever I am not sure of a finish to use I make a story board with a piece of scrap from the same board. I wrap masking tape around it leaving spaces between the tape for the different finishes. when the tape is peeled off and the natural unfinished wood is between the test finished pieces it clearly defines the differences.
On fbe I like water based poly as it dries clear and doesn't alter the red color. But it may also look nice with a light amber oil poly like minwax brand or general finishes brand. Spar poly will have uv inhibitors in them to help preserve the red from uv fading but they are usually a darker amber color. The only thing the darker amber polys will do is alter the red to more of an orange but the streaking will still be pronounced.
Sorry about the long winded thoughts. :sarcastic:

No reason to be sorry. I appreciate the input. Normally I use my no brainer-wipe on general-poly /oil combo. It is what is on the maple prototypes. Does a good job of popping the figure. I will test on red.
 
Mike1950 said:
woodtickgreg said:
Whenever I am not sure of a finish to use I make a story board with a piece of scrap from the same board. I wrap masking tape around it leaving spaces between the tape for the different finishes. when the tape is peeled off and the natural unfinished wood is between the test finished pieces it clearly defines the differences.
On fbe I like water based poly as it dries clear and doesn't alter the red color. But it may also look nice with a light amber oil poly like minwax brand or general finishes brand. Spar poly will have uv inhibitors in them to help preserve the red from uv fading but they are usually a darker amber color. The only thing the darker amber polys will do is alter the red to more of an orange but the streaking will still be pronounced.
Sorry about the long winded thoughts. :sarcastic:

No reason to be sorry. I appreciate the input. Normally I use my no brainer-wipe on general-poly /oil combo. It is what is on the maple prototypes. Does a good job of popping the figure. I will test on red.
I use wipe on poly for just about everything, or my own blend of a wiping finish. I like the warmth and depth it gives. I have been using water based poly more for a few reasons. No odor when applying indoors in the winter, not flammable, dries very quickly which means more coats per day, and it's nearly crystal clear. It is even available in a floor finish which tells me it is durable. The other thing that's kinda cool about it is that it looks like skim milk when you apply it, when it's clear it's dry enough for the next coat. You should give it a try sometime and play with it a little.
 
  • Thread Starter Thread Starter
  • #39
woodtickgreg said:
Mike1950 said:
woodtickgreg said:
Whenever I am not sure of a finish to use I make a story board with a piece of scrap from the same board. I wrap masking tape around it leaving spaces between the tape for the different finishes. when the tape is peeled off and the natural unfinished wood is between the test finished pieces it clearly defines the differences.
On fbe I like water based poly as it dries clear and doesn't alter the red color. But it may also look nice with a light amber oil poly like minwax brand or general finishes brand. Spar poly will have uv inhibitors in them to help preserve the red from uv fading but they are usually a darker amber color. The only thing the darker amber polys will do is alter the red to more of an orange but the streaking will still be pronounced.
Sorry about the long winded thoughts. :sarcastic:

No reason to be sorry. I appreciate the input. Normally I use my no brainer-wipe on general-poly /oil combo. It is what is on the maple prototypes. Does a good job of popping the figure. I will test on red.
I use wipe on poly for just about everything, or my own blend of a wiping finish. I like the warmth and depth it gives. I have been using water based poly more for a few reasons. No odor when applying indoors in the winter, not flammable, dries very quickly which means more coats per day, and it's nearly crystal clear. It is even available in a floor finish which tells me it is durable. The other thing that's kinda cool about it is that it looks like skim milk when you apply it, when it's clear it's dry enough for the next coat. You should give it a try sometime and play with it a little.

I used it on our kitchen cabinets. Kathie wanted them to stay the color she wanted and they have. :yipee::yipee::yipee:
 
For the FBE, if you invest the time it takes to justify a high gloss lacquer finish, it'll take your breath away. You just can't stop at 400 or even 800 grit. Which is why I rarely use a high gloss lacquer on FBE. Just don't have the patience. High gloss needs perfect prepping.

For a warm lazy man's finish shellac (with no blo or panther piss home mixes) on top of a sealer is hard to beat IMO. Light sanding between another 2 coats will make it pop. Buffing makes it jump out but is not an option for that type of piece obviously.
 
Back
Top