
Palo Verde Table

  • Thread Starter Thread Starter
  • #21
Another post, this time a partial about my chamber build. It's going to be a 4" schedule 40 PVC tubular pipe with a cap on one end and a fitting that has the threaded female cap on it. My plan was to cut a 2" wide piece, then super glue it on a 4 1/2" square. That worked out great as after cutting it in half at 2 3/16" x 4 1/2" pieces. My next step would be to heat each piece only across the highest point, then apply downward pressure with the pipe to get the legs to conform to the OD of the pipe. HUGE failure as the whole piece heated heated to where it looked like a thick slice of bologna in my hand. It was still hot and I did everything I could think of to get to to look good, but the first leg won the battle.
I went to the second one, and heated it a little differently, but still had bologna issues. I got it looking better than the first one and decided I was going to use both, so get my sander ready to sand the PVC before applying the primes. No go with the small Ryobi as the plug was missing one of the blades on the plug. So grabbed one of my trustworthy Rockwell 505's, and did the sanding.
Got both legs attached with the glue, and will be 3-4 hours before I pick it up and install the 2 end caps. Then it's attaching the air supply. I haven't really decided where I want the connector to go. I also must figure out how to attach a diffuser so the air doesn't blast out the resin in the boxes when I'm pressurizing the chamber.

This shows the leg. I'm only going to use the cut on the right for the two legs, and the piece on the left was going to be used to bend the legs to conform to the body of the chamber.
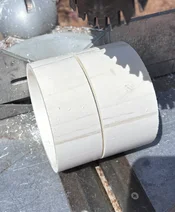
IMG_7328.webp
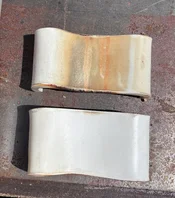
This shows the legs after being heated and bent. Pretty bad job on my part. IMG_7334.webp
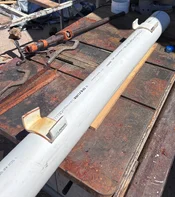
I set the legs up on it to mark the area for sanding. IMG_7335.webp
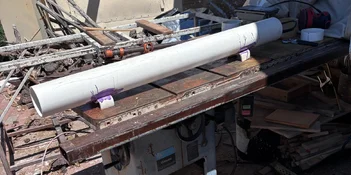
Got the chamber and legs primed and glued. I used a couple lead castings, about 15 pounds each inside the chamber that I normally use to hold down my tarp on the saw. I positioned them just above the legs to get the pressure I need.
IMG_7337.webp

I almost had a problem with my cursor, but as you can see, it worked today. More posts coming as I progress.
Later today I might get the ends secured. Not sure about that just yet. I might wait 24 hours before I mess with anything more. ................. Nubs
 
Last edited:
  • Thread Starter Thread Starter
  • #22
Another post, this time a partial about my chamber build. It's going to be a 4" schedule 40 PVC tubular pipe with a cap on one end and a fitting that has the threaded female cap on it. My plan was to cut a 2" wide piece, then super glue it on a 4 1/2" square. That worked out great as after cutting it in half at 2 3/16" x 4 1/2" pieces. My next step would be to heat each piece only across the highest point, then apply downward pressure with the pipe to get the legs to conform to the OD of the pipe. HUGE failure as the whole piece heated heated to where it looked like a thick slice of bologna in my hand. It was still hot and I did everything I could think of to get to to look good, but the first leg won the battle.
I went to the second one, and heated it a little differently, but still had bologna issues. I got it looking better than the first one and decided I was going to use both, so get my sander ready to sand the PVC before applying the primes. No go with the small Ryobi as the plug was missing one of the blades on the plug. So grabbed one of my trustworthy Rockwell 505's, and did the sanding.
Got both legs attached with the glue, and will be 3-4 hours before I pick it up and install the 2 end caps. Then it's attaching the air supply. I haven't really decided where I want the connector to go. I also must figure out how to attach a diffuser so the air doesn't blast out the resin in the boxes when I'm pressurizing the chamber.

This shows the leg. I'm only going to use the cut on the right for the two legs, and the piece on the left was going to be used to bend the legs to conform to the body of the chamber.
View attachment 292127
This shows the legs after being heated and bent. Pretty bad job on my part. View attachment 292128
I set the legs up on it to mark the area for sanding.View attachment 292129

Got the chamber and legs primed and glued. I used a couple lead castings, about 15 pounds each inside the chamber that I normally use to hold down my tarp on the saw. I positioned them just above the legs to get the pressure I need.
View attachment 292130

I almost had a problem with my cursor, but as you can see, it worked today. More posts coming as I progress.
Later today I might get the ends secured. Not sure about that just yet. I might wait 24 hours before I mess with anything more. ................. Nubs
I didn't mention the disgusting look of my saw table. I blame it on the weather report that stated no rain for the next 10 days. About 15 minutes later, we had a pretty good sprinkle. ................ Nubs
 
  • Thread Starter Thread Starter
  • #23
Today I completed the pressure chamber build. Got the regulator, gauge and shutoff valve installed.

This is a 1/2-14 NPS tap for the bushing I'm using for reducing from 1/2 to 1/4" fittings for getting air pressure inside the chamber. It tapped easier than I though and was a whole lot cleaner than I expected. When I screwed it on, I expected that to be the location of air leaks if I was gonna have any. Nope, not there.
IMG_7338.webp


Here is my set up. Valve, pressure gauge and regulator. IMG_7348.webp


This picture is a pair of legs in the box full of resin ready to be sealed and put under pressure.
IMG_7340.webp


Well, I put it under pressure and noticed a small leak coming from the threads of the chamber closure at about the 3 o'clock position, but it was a small leak. I don't think the compressor came on more than once in 3 hours to top off the line pressure. IMG_7341.webp


After 3 plus hours, I released the pressure, opened the chamber, and was pretty disappointed at what I saw. The resin was still tacky, and most of the resin was gone. Fortunately, it did not leak out of the box. It found all kinds of places to fill that I suppose I didn't know were there. Anyway, I set the box of legs on a table in the sun and let it sit for another couple hours. It set up like it's supposed to. When I mixed the resin, I did approximately 21 ounces. & hardener, and 14 ounces of resin. I should have waited at least 5 more minutes before sealing the chamber in order to see if there was plenty of resin used. The container to the left has about 8-9 ounces left in it and I used it in the other box of legs, but when moving away from the area, my tape measure caught the second box and pulled it off the table. I lost most of the resin, but it didn't hurt the box of loosen the legs.
IMG_7349.webp


This picture shows the absence of resin, even though I filled the box to the rim. Anyway, tomorrow will get that pair of legs done, and will cast the second pair, then cast to apron parts. The resin is being used only to solidify all the wood because there are a lot of cracks that I want to fill. I don't think they would be a problem using putty, but I'm gonna use resin.
I had no problems inserting pictures until this last one. ............. Nubs
IMG_7350.webp
 
Today I completed the pressure chamber build. Got the regulator, gauge and shutoff valve installed.

This is a 1/2-14 NPS tap for the bushing I'm using for reducing from 1/2 to 1/4" fittings for getting air pressure inside the chamber. It tapped easier than I though and was a whole lot cleaner than I expected. When I screwed it on, I expected that to be the location of air leaks if I was gonna have any. Nope, not there.
View attachment 292200


Here is my set up. Valve, pressure gauge and regulator. View attachment 292201


This picture is a pair of legs in the box full of resin ready to be sealed and put under pressure.
View attachment 292203


Well, I put it under pressure and noticed a small leak coming from the threads of the chamber closure at about the 3 o'clock position, but it was a small leak. I don't think the compressor came on more than once in 3 hours to top off the line pressure. View attachment 292204


After 3 plus hours, I released the pressure, opened the chamber, and was pretty disappointed at what I saw. The resin was still tacky, and most of the resin was gone. Fortunately, it did not leak out of the box. It found all kinds of places to fill that I suppose I didn't know were there. Anyway, I set the box of legs on a table in the sun and let it sit for another couple hours. It set up like it's supposed to. When I mixed the resin, I did approximately 21 ounces. & hardener, and 14 ounces of resin. I should have waited at least 5 more minutes before sealing the chamber in order to see if there was plenty of resin used. The container to the left has about 8-9 ounces left in it and I used it in the other box of legs, but when moving away from the area, my tape measure caught the second box and pulled it off the table. I lost most of the resin, but it didn't hurt the box of loosen the legs.
View attachment 292205


This picture shows the absence of resin, even though I filled the box to the rim. Anyway, tomorrow will get that pair of legs done, and will cast the second pair, then cast to apron parts. The resin is being used only to solidify all the wood because there are a lot of cracks that I want to fill. I don't think they would be a problem using putty, but I'm gonna use resin.
I had no problems inserting pictures until this last one. ............. Nubs
View attachment 292206
Step by step…
 
Cool setup. I've been following along and thinking how I'd do it if ever necessary. Wouldn't have thought PVC took threads that well that they wouldn't leak. My thought was drilling through one of the caps, using a NPT to SAE thread adapter and using rubber washers on both sides to seal. Your method is much cleaner of an install. Curious how much pressure you used?
 
  • Thread Starter Thread Starter
  • #26
Cool setup. I've been following along and thinking how I'd do it if ever necessary. Wouldn't have thought PVC took threads that well that they wouldn't leak. My thought was drilling through one of the caps, using a NPT to SAE thread adapter and using rubber washers on both sides to seal. Your method is much cleaner of an install. Curious how much pressure you used?
I put in 50+ pounds. I asked when purchasing the parts what maximum pressure would this take.The supplier called his supplier, and was told 200 pounds. When I got home, I went online and found a million different answers. I did an average and concluded it would handle about 150 pounds.
The way the chamber is built, totally round, I couldn't really get that end cap screwed tight. The whole chamber wants to rotate when trying to tighten it as I really can't get a good solid grip. Today I'm going to set something up where I can actually screw it tight so the screw cap doesn't leak. I did wrap the threads with a lot of Teflon tape because when I glued that end on, I accidentally spilled some glue on the threads. I cleaned it, but there were marks left. The tape was put on to make it hopefully screw on better, not to seal it like it's purpose is. ............... Nubs
 
  • Thread Starter Thread Starter
  • #27
Ok, I just set the chamber temporarily stationary. I put a clamp on the back end cap and clamped it to the table. It put some pressure on it as I saw that it squeezed down a little. I hope it doesn't cause the joint to fail. I've got a plan for making a clamp that goes around the pipe and either screws to the table or has a long arm on it. In other words, a 6" piece of Hickory that has a center hole at 4 1/2" ID, then split it. I'll use my Pony clamps to tighten the two pieces where it won't turn when I'm tightening it.
Filled the leg box full of epoxy again, inserted it, tightened the screw, and then filled it with air. There was a leak at the screw that was less than before, about half or more. I let it sit for about 3-5 minutes, released the pressure and took the box out to see if there was any epoxy left. Surprisingly, it was at the same level when I first filled it today, so that looks like a success for me. When I reinserted it, I gave the screw about another 3-4 turn and the leak almost vanished.
I'm using only 50 pounds of air as according to all the stats I've read as this schedule 40 pvc will only withstand just over 150 pounds at 80 degrees. Well, this is August in Arizona so I've decided I don't need over 50 pounds as I would like this chamber to last for other castings. If it makes it past them, I'll probably keep this and do other long stuff. Anyway, I'll take pictures of my results later today..

Here is something that surprised me. I'm using Total Boat Clear Casting Epoxy. It's mix is 3-1. I filled my mixing container with 12 ounces of resin. I set my drug scale at 120 grams for the hardener. I poured it into a 5oz plastic throw away bathroom cup. Before I got out of the house, 3 seconds later, I saw a drop form and hit the floor. I thought I accidentally tipped the cup while carrying it, but by the time I reached the resin, it was almost pouring drops of hardener. I poured it into the mixing bottle, and added a little more hardener. The cup was put in a safe place as I want to see where it was leaking from.
Cup mystery solved. The cups are about 5 years old, have been sitting near the south facing windows of my house near the gram scale. The windows have blinds so the cups never got any sunshine, but the heat generated off the windows have deteriorated the cups to the point of a little tiny squeeze will cause a crack. Four oz's and that cup had 5 cracks by the time I made it outside the house, maybe 30-40 feet. ................ Nubs
 
Good call on the pressure limitation Jerry. Pressure ratings for Sched 40 PVC pipe unfortunately aren't as standardized as steel or iron pipe of the same class. 50 psi should be well below any max pressure rating for PVC. BUT... everyone should know that pneumatic pressure is one of the more hazardous things commonly found in many shops etc. When we hydrotested pipe repairs we always made sure to remove all the air from the system before starting to pressurize the system. We'd even tap in high point bleeder valves that weren't needed for the process, just for the express purpose of bleeding air out of the system so we could hydrotest it. Air, being compressible, builds up a massive amount of potential energy and if the container fail, the results are usually catastrophic. I've seen and investigated hydrotest failures and the system doesn't just crack or burst, it literally blows apart into fragments.

That said I'm impressed with your ingenuity and am watching your build with interest. That first set of legs soaked up a lot of resin. Hope it goes well from here on out.
 
Last edited:
Back
Top