Southbend metal lathe find

woodtickgreg said:
I got to work on the lathe again today and made some good progress with the assembly. Here you can see all the painted parts that I worked on after work, now they are all ready to be assembled with the completed apron assy.


This is what the dials looked like before I restored them, I disassembled them and cleaned everything thoroughly. Then I wire wheeled the handles and sanded lightly with 220 and then hit the buffer.

This is the saddle with the new felt bed wipers installed, the clamp is on but hidden in the back underneath. All bare metal parts are now coated with oil.

This is what the dials look like after I finished working on them, everything is oiled up and ready to install.

Here's the completed saddle with the cross slide and compound installed, the gibs are adjusted and I had to make some brass gib screw clamps to go under the lock screws as they were missing.

Now to do the final install of the apron, lead screw, and gear case.

Man - Thats nice! Its art! Don't forget the before and after pics... and even a picture of what it originally looked like. I bet it didn't look that good new. Amazing work Greg - Amazing.
Scott
 
Kevin said:
Greg, this is why I said I want you to do the machine work for me. You show extreme pride of ownership. The men that made the machines, that made your machine, would be proud of you. I'll just go ahead and tell you what my project is. It's not going to be simple but at least you can advise me along the way of the process.

I want to get the carriage of my 1947 Oliver 270D running like new again. It won't be cheap but I am willing to pay. That's why I told you I had a long term plan. I see what you are doing to your gorgeous lathe and with the pride and skill you have, I know you are the man for this job.

Can't wait to see a video of this restored AIR.
How about a pic?
 
Mike1950 said:
GREG!!!! GREG!!!!!!---It is going to be way too pretty to use................
No way, when it's done I intend to fill all the oil caps and get it dirty! It'll fling oil all over and be covered in metal chips, it's gonna be a user!
 
woodtickgreg said:
No way, when it's done I intend to fill all the oil caps and get it dirty! It'll fling oil all over and be covered in metal chips, it's gonna be a user!

As it was designed to be. But she sure does look nice all cleaned up and painted.
 
carriage-assembly-006.webp carriage-assembly-007.webp carriage-assembly-008.webp carriage-assembly-009.webp carriage-assembly-010.webp A few more pics! A better pic of how the dials and handles came out, pretty good I think considering how bad they where. Not perfect but nice, and they work very smoothly.

[attachment=12424]

[attachment=12425]

[attachment=12426]
Here's a couple of pics of the saddle, apron, lead screw, and gear box all assembled. Everything works by turning by hand. I also got the switch pedestal mounted.
[attachment=12427]

[attachment=12428]
 
Last edited:
carriage-assembly-011.webp carriage-assembly-012.webp Today I finally pulled the caps for the spindle on the headstock. This is the used one that I purchased on ebay to replace the one that was damaged by the previous owner. What a relief to find that everything is as it should be, the bearings and adjusters are intact and the spindle is very smooth with no grooves or galling. Whew, what a relief, now I am confident that I can move forward with this. Now I will show it a little love and clean it up and paint it, this is the most important part of the lathe and will require a great deal of attention.

[attachment=12429]
If you notice the bearings in this are one piece with dovetail adjusters, this is what was missing on the original, and the bearings where cut in half and screw to the casting, that was not right. This is the correct set up to run on a film of oil!
[attachment=12430]
 
Last edited:
Joe Rebuild said:
That is so pretty! When does the oil start flying? What is you first project?
When? dunno. :dunno: First project will be to chuck up a long round bar and make a light slow cut to see if it will hold a tolerance and to make necessary adjustments. When she is running right I will resume making lathe chisels, after a break, I need to work some wood first!
 
woodtickgreg said:
Joe Rebuild said:
That is so pretty! When does the oil start flying? What is you first project?
When? dunno. :dunno: First project will be to chuck up a long round bar and make a light slow cut to see if it will hold a tolerance and to make necessary adjustments. When she is running right I will resume making lathe chisels, after a break, I need to work some wood first!

Looking forward to your chisels Greg. I plan on owning some :good2:
Scott
 
mounted-head-stock-001.webp mounted-head-stock-002.webp mounted-head-stock-003.webp mounted-head-stock-004.webp mounted-head-stock-005.webp I have made some progress but not alot, work is insane and the days are getting shorter. I have been working on the head stock a little everyday after work. One day I degreased and washed it in the parts washer, next day I wire wheeled it to remove the paint and sprayed it down with brake clean to remove any residual oil. Then 4 days to paint it, 2 coats on the bottom, 1 each day, and 2 coats on the top.
This pic shows the head stock bolted down to the lathe bed, I think it will be easier to install the rest of the parts without it moving around on me, plus it has to be bolted down to do the test for bearing clearance.

[attachment=12841]
This was all painted by brush and no masking tape.
[attachment=12842]
A pic with the bearing caps just sitting in place and not bolted down.
[attachment=12843]
End view where all the gears and reversing lever will go, mounting studs cleaned up well too.
[attachment=12844]
This is both spindles and cone pullys, the original is on the top.
[attachment=12853]
 
Last edited:
mounted-head-stock-006.webp mounted-head-stock-007.webp mounted-head-stock-008.webp mounted-head-stock-009.webp mounted-head-stock-010.webp So then I moved on to the spindle, cone pully, bull gear, and bearings. I have 2 sets of everything except the bearings for the spindle, so I can pick the best parts for final assembly and save the rest for ????? :dunno:
This is a pic of the big spindle bearing, it shows signs of being run with low oil or insuficiant bearing clearance. it is ok and will clean up, there is no galling and the spindle was smooth.
[attachment=12845]
This is a pic of both spindles, the one on the top is the original that came with the lathe and the one I will use as it is in better shape. I have not cleaned these up yet. I'll probably polish the bearing surfaces.
[attachment=12846]
This is the take up bearing for the spindle that was in the used head stock, I wonder where the missing ball went?
[attachment=12847]
This is the original bearing, it's in way better shape.
[attachment=12848]
This is the bearing/cone pully and brass or bronze gear that meshes with the back gear. Someone was inside of this to and half a$$ smoothed it out, I'll fix this too. The other side is steel or cast and looks good. I will be running a teflon grease in this instead of oil. early lathes like mine ran oil and south bend switched to the teflon grease in later years.
[attachment=12849]
Not a lot of progress but some. Right now I am trying to source some new shims for the head stock bearing caps, mine are pretty tore up. I might have to make them if I can't find any but I'm looking for the quick and easy way at this point. I will work on the spindle and related parts cleaning them up in the mean time.
 
Last edited:
I got a bad case of lathe envy over here :wacko1:
I cant even think of a good word to describe the work. Amazing doesnt quite say it all.
Awesome job for sure :good2:
 
You might be able to talk to the people at south bend lathe about parts. They subcontract grizzly for machining if they don't have the part. They even claim full oversight in the processing. Anyway just a thought. Looking good! Keep it up.
Ryan
 
Rorban1 said:
You might be able to talk to the people at south bend lathe about parts. They subcontract grizzly for machining if they don't have the part. They even claim full oversight in the processing. Anyway just a thought. Looking good! Keep it up.
Ryan
Grizzly is the distributor for south bend parts now, I will contact them to see if new shim packs are still available. I got a copy of the original build serial card from them. Some parts are resonably priced and some not so much. New spindle bearings are like $700 :scare3:
 
Wow. It's actually starting to look like a lathe again instead of a bunch of parts. What a beautiful machine. You are doing an incredible job on this.
 
woodtickgreg said:
Rorban1 said:
You might be able to talk to the people at south bend lathe about parts. They subcontract grizzly for machining if they don't have the part. They even claim full oversight in the processing. Anyway just a thought. Looking good! Keep it up.
Ryan
Grizzly is the distributor for south bend parts now, I will contact them to see if new shim packs are still available. I got a copy of the original build serial card from them. Some parts are resonably priced and some not so much. New spindle bearings are like $700 :scare3:

Yikes! Bearings that cost more than what you paid for the lathe! That's just crazy
 
cutting-shims-001.webp cutting-shims-002.webp cutting-shims-003.webp cutting-shims-004.webp I have gotten most of the spindle parts cleaned up, after a good parts washer bath I found the spindle bearings to have some scoring. I can feel it with my finger nail, so I used a cylinder hone by hand to level the bearings out, then finished up with a light polishing with 600 grit paper. My biggest stumbling block at this point is that my spindle shims are quite mangled and I would bet too tight due to the scoreing on the bearings. The shims are no longer available, and spindle clearance on this lathe is critical, set to between .0007"- .001", some say .001"- .002" is acceptable. I will set it with a dial indicator and also check it by turning by hand. So now what? Where do I get the shims? I came up with an idea to try, brass is soft so why not use a wood working tool, my scroll saw! I tried a few different blades and have found a couple that worked pretty good, found out that teeth angled down is a must! I used 12 different sizes of shims and just stack cut them. Eureka! It worked!:yipee::yipee:

[attachment=13151]
Here you can see the index card paper templates I cut out and taped to the shim stock.
[attachment=13152]
Here you can see one shim pack all cut out but still taped together.
[attachment=13153]
A little clean up with a file and debur the edges with a file and voila, problem solved.
[attachment=13154]
So I got the 2 big end shim packs cut out and just have to do the small ones yet, I can do that during the week after work. I used 12 different thicknesses of shim stock from .001" to .015 and a .0015" for a half a thousandth shim. This gives me enough for any possible combination needed. I'm so relieved! :yipee::yipee:
 
Last edited:
It just amazes the hell out of me you even remember or know how to put it all back together - much less manufacture parts... I would have a big ol' pile o' parts...
 
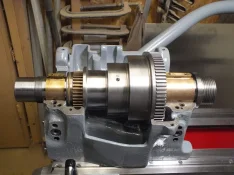
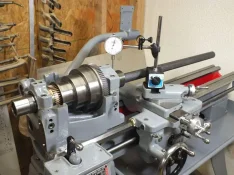
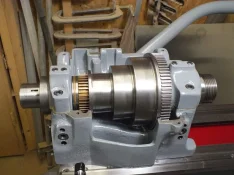
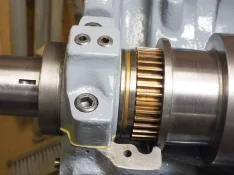
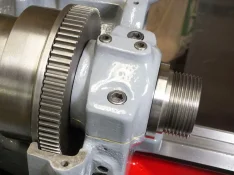
spindle-install-001.webp spindle-install-002.webp spindle-install-003.webp spindle-install-005.webp spindle-install-006.webp spindle-install-007.webp spindle-install-008.webp Well after cleaning the bearings The scoring in them was a little more than I felt comfortable with, I could feel them with my finger nail. Sorry I forgot to take pics of them, once I started working on them I just got consumed and hyper focused. So I mounted them in the head stock and just put the bolts in finger tight to hold the bearings shape round and square to the head stock. Then I ran a cylinder hone through them by hand just untill most of the ridges where gone. I then polished them with some 600 grit paper just untill the scratches where gone. Once this was all done I buffed the bearing surfaces on the spindle and assembled everything in the head stock with new capillary oil wicks. Then I installed .0225" of the shims I made at the four contact points of the bearing caps. I installed the caps and the dovetail adjuster screws. Tightened everything down and tested the bearing clearance, very important for proper oiling of the bearings and spindle.

This is what the spindle was supposed to look like when I first took it apart, see the little bronze dove tail adjusters on top of the bearings, they are very important!
[attachment=13310]
This is the set up for testing for bearing clearance, mag base with a .001 dial indicator and a 1 1/4" solid bar to lift up with.
[attachment=13311]
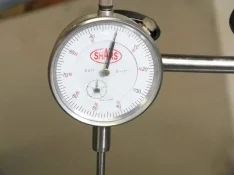
Indicator set to zero.
[attachment=13312]
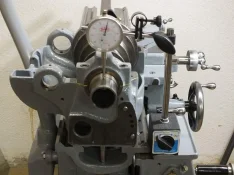
And the set up for the other end, being sure to have the indicator tip on a smooth surface of the spindle and not the threads.
[attachment=13313]
Hear you can see the take up nut and hardened washer installed, It is set to .001" of play
[attachment=13314]
Here you can see the take up bearing next to the bronze gear and the shims sticking out from under the bearing caps, I would rather have them too big than too small. It was important to not have them stick out on the sides though so they would not rub on the take up bearing or lock nut ring.
[attachment=13315]
A pic of the bull gear and spindle nose.
[attachment=13316]
I ended up testing the clearance three times and finaly ended up with .0185" of shims for a perfect setting of .001" of clearance. the spindle turnes very easy by hand and has less than .0005" of run out. :yipee::yipee::yipee:
This was the most important part of the rebuild and I paid the most attention to it. I am glad it is done and can now get on with the rest of the restore. :biggrin:
 
Last edited:
This is very exciting. It's finally coming together and I can't wait to see it all. This is just awesome.
:yipee:
 
backgear,-thread-dial,-micr.webp backgear,--004.webp backgear,--005.webp backgear,micrometer-stop-00.webp micrometer-stop-006.webp backgear,-thread-dial,--003.webp thread-dial,--007.webp backgear,-008.webp A few more things I got done and installed, here's some more pics of the progress.

Some more parts painted and cleaned up ready for install.
[attachment=13492]
The back gear assembly installed on the head stock. The lever that engages it was broken off when I got the lathe, this is a used one I found on ebay.
[attachment=13493]
One tooth on the back gear was a little mushed, so I spent some time with a needle file and a dremel to reshape it. It works perfectly now.
[attachment=13494]
This is the micrometer saddle stop all cleaned up, It was very rusty when I got the lathe.
[attachment=13495]
Here it is back at home on the lathe. it can be mounted on either side of the saddle for a right or left cut.
[attachment=13496]
This is the threading dial all reworked.
[attachment=13497]
And mounted to the saddle, it can be swung out of the way when not being used, it is driven off the lead screw.
[attachment=13498]
And a pick of all the working parts all clustered together. Notice the size of the spindle bore 1 3/8" that's big for a 10" lathe.
[attachment=13499]
I am working on the gears that mount on the side of the head stock to drive the gear box.
 
Last edited:
Back
Top
