What did you do in your shop today?

What setting do you use for that? Bake? And what temp?

Since this wood was all already at EMC - some air dried, some dried in my lightbulb kiln - the goal was to get it down to as close to 0% moisture as possible before stabilizing. Especially since it has been humid in my shop. Ideally you're looking to have it at 220F for at least 24 hours. However, ovens do vary and the temperature you set on the oven isn't necessarily the temp in the oven. On our oven I've found I need to set it at 240 or 245 to get it to at least 220 - confirmed with both an oven thermometer and a temperature probe. You wouldn't have to use it, but since our oven has a convection feature, I used it to keep the air moving around inside the oven and distribute the air more evenly.
 
Decorated Snowmens!! Damn sight more fun to turn them than it is to paint them! Although painting went much quicker than any of the rest of it.

NCM_0031_W.webp
 
I cut down the metal shelf I made last weekend, cut about a foot off of it, it was just too tall after looking at it for awhile. I just bolted the top shelf back on rather than taking it to work just to weld one shelf on. Maybe this week I can get it painted so I can get it set in place and loaded up.
I also did some drilling of 4" angle iron that I'm going to use to move the mill base.
 
Hi Scott,
So, interested in learning-
Is that technically a dovetailed lap joint in the third photo down and a scarf joint where the bolster meets the scales on each side? Are you belt sanding all the joints?

Thanks -

Mark

f212.jpg


Dovetailed lap joint
 
Last edited:
You have a very keen eye! Not really, Yes and Yes.
If you rotate the two pieces in your drawing above to where the thicker parts meet, they create a recess that the blade rests in. The thicker parts are at the bottom and are what the guard is carved out of.
Yes its a scarf joint where the bolsters meet the scales, and yes I am belt grinding at this point. The inside corners on the bolsters are cleaned up with a file.
It will then be disassembled and the blade ground, Heat treated and the final fit and finish of the bolsters will be hand sanded to fine tune.
 
I worked on stuff I'd been meaning to get to.made a replacement striker handle for a customer that lost theirs, made a few sets of burnishers, completed a pen, then worked on waxing some tables. Wax on, wax of Daniel-San.
 
Drilled some more holes in steel angle iron and worked on a sketch for the moped rack.
 
Got 4 cribbage boards finished up and on the floor at the shop, also finished a table I don't like but I think I already have a buyer for it...Something didn't resonate with me, left the parts I'd cut on a shelf for almost a year, finally put it together as the parts didn't lend themselves to recutting for anything else and I didn't want to just burn it.... Also got all the lumber up against the wall to free up the floor space. had to push the dropped ceiling up though for the longer stock.

2016-12-07 12.32.06.webp
 
Playing with a few pens yesterday (and cleaning but don't tell Greg)... Busy Bee ribbon and Silmar 41. First run of blanks on this project, and I did have a few issues, but pretty sure I got it figured out. Wrapping these on 10" 7 mm tubes to save aggravation. Get 2 sets of blanks and a 1" - 1 1/4" short left over to make key chain or other trinket out of. Mini-Clothes Pins is da bomb for wrapping the ribbon on the pen tube. Works much sweeter than trying to wrap rubber bands. Using Mod-Podge to glue ribbon to the tube, let dry thoroughly, cast in Silmar 41. Colin's postage stamp recipe but used on ribbon instead.

First batch went reasonably well. Has a few bubbles that didn't work out, but I was in a hurry and poured my resin straight out of the fridge. It was plenty thick and was a little cool in the shop, humidity was a little high as well. Think I'd have been much better off warming to room temperature before pouring.

All in all, pretty impressed for a first run! Little work to do on it yet, but have a pretty good clue where the issues came from and easy to fix.

Was 4, sent one home with Sister-In-Law, 2 left to turn. These are wrapped around a Trimline. 1 gold - 2 gunmetal. Terrible pictures, was barely awake when I took them.

NCM_0032.webp
Purchased on Amazon CHEAP! Want to say it was like $30 for a 100 yards or something.

NCM_0034.webp
 
Last edited:
Well after a few of those Shop pictures I saw over yonder in that Show Me Your Shop thread early this morning... :unknown: I went and cleaned mine fer awhile!

Then I encountered that Flat Rate Box Dilemma. Not to the extent of some guys who shall remain nameless, :sarcastic:but yeah I got a few sitting around that I don't have shelf space for. So I was trying to sort out where I was going to put them while putting other goodies away, and I kept running over this pile of leftover 3/4" plywood flooring that has been in my way since the house got remodeled a couple years ago, and I was seriously thinking on building shelf space, but really couldn't figure out where I want to put it. Presently I'm doing my wood work in the middle shop bay, but I want to move the woodworking into the south bay, close it up, insulate, and air condition it. That will also allow me to lock it, while the remainder of the shop is accessible.

Went to put some spare tools in my little mobile work bench I built years ago, and low and behold there lays a set of 4 casters I bought ages ago to build another mobile work bench, and the little light bulb clicked on over my head and...

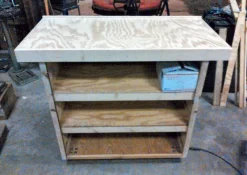
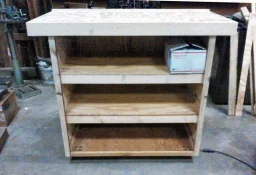
I built a nice little mobile Flat Rate Box Storage Shelf with work space on top. Little tall for counter top, but it'll be sweet for assembling pens! Or whatever; no bending over to do it at standard counter height!

41" to bench top - top is 48 3/4" x 22 1/2" with trim.
Cabinet is 40" wide x 21" deep - Shelves are 12" high inside the frame. About 10 inches clearance getting in there.
1 - MFRB for reference to available space, there's room for a row of them sideways behind that that.
NCM_0036_W.webp

NCM_0035_W.webp
 
Very cool and creative Rock.:cool:

I was searching for bee goodies to use for any sort of crafty ideas, that ribbon just screamed ink pen! Have a bunch of bee decals I need to try and sneak in under the resin on somethin. High end decals, they look pretty sharp.
 
I like the cart too! I learned a long time ago how useful carts can be. I have one in my metal shop that I use all the time. Come to think of it I could use another in the wood shop .
 
Why do you want to make some of us look bad like that @rocky1 ??? Heck, some of those boxes in my shop came from you!!!!!!!

Nice cart man! Tony
 
:lol::lol2::rofl:

My OCDism was already kicking before seeing that thread, y'all just sent it over the top. Cart will be handy, long overdue!
 
I moved a ton (literally) of walnut wood from one side of the barn to another. Had a big old sheet of tin whip up and off last week and opened up a skylight to the blue yonder. My wife and I hand trucked the walnut logs 20 feet or more from one side to the other.
Wasn't sure we could do it in one go, but it was a beautiful sunny Florida day, nice and cool for working but warm enough to get shed of some layers.
We just kept chugging along and by and by the logs were moved. Several in the pickup to bring to the studio, the rest piled horizontally and vertically.
Gonna be really sore tomorrow, the both of us. But, you gotta do what you gotta do. Rain coming down is bad news on wood.
Looked up and there's a gorgeous 12/4 board of Bird'seye maple that needs to move too. But it's way up there in the cross ties.

Can't find a roofing contractor that will go up on the old tobacco barns.
I have a friend who is a youtube celebrity who's going to talk about the barn and see if maybe we can beat the bushes for some roofing help.

Unfortunately a big old pile of burl got ruined as rain was coming in for a long time.

Not so easy come, easy go.

That's what I did "in the shop" today.

C'est La Vie!
 
You have a very keen eye! Not really, Yes and Yes.
If you rotate the two pieces in your drawing above to where the thicker parts meet, they create a recess that the blade rests in. The thicker parts are at the bottom and are what the guard is carved out of.
Yes its a scarf joint where the bolsters meet the scales, and yes I am belt grinding at this point. The inside corners on the bolsters are cleaned up with a file.
It will then be disassembled and the blade ground, Heat treated and the final fit and finish of the bolsters will be hand sanded to fine tune.


Very nice fine tuning!!! :good2:
 
Back
Top
