What did you do in your shop today?

Cool hat- I bet that gets a little tense as you turn the last little bit. One question- where is the picture of the chips- looks like one heullva chip makin endeavor!!!!!:scare3:
I didn't take any shots while turning this... I'll do so next time. Just know that no figured wood was harmed in the making of this hat... Plain jane sycamore. And yes, there were three large trash bags full of shavings!
 
Doc you're really expanding your already wide array of talents. I made a trade 8 years ago for a wooden hat . . . . I hope one day he'll eventually send it to me lol. That's a serious bend you have going there - isn't there some spring-back involved in the brim - and that severe fold is for that right?
 
Well, this weekend I finished up several things.

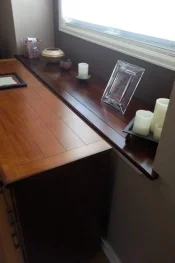
First, I finished the window ledge in the bedroom. It had been a piece of 3/4" plywood that was painted white.
IMG_20140504_123548.webp

I was only partially successful in my goals. It does have the same pattern as the top of the dresser and end tables, but I've not quite matched the colors. It was interesting - my initial testing came out pretty close, but during the processing of the boards I had an accident. I managed to drop a full bottle of thin CA out of the cupboard and it managed to break the lid off when it hit the counter. I had CA on my hand, up my arm, in my beard and hair. As it turns out, also splashes on the boards. I didn't discover that until I tried to put the next layer of color on - then I had multitudes of dots that didn't take the dye. So I sanded it all down and started over.

Since I bought the dye powdered and mixed it with water I didn't think that a freeze cycle would have any effect. Unfortunately when I put the brown dye over the yellow I ended up with a grey powder on top. I wiped off the powder but when I put the finish on it picked up the color and it ended up really dark. When I installed this I first took out the old plywood. I should have replaced it with a thin layer (1/4" or 3/8") before I put the wood down because, in spite of my shims, it doesn't lay as flat as I would have liked.

There is still some touchup paint on the wall and a 1/4 round to install, but this is a great upgrade from the white plywood.

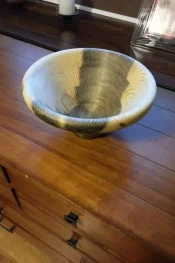
Secondly, I finished up a bespoke bowl commissioned by a guy I work with.
IMG_20140504_193637.webp

It's a stack laminated bowl from beetle kill pine. It started as an 8/4 board. After cutting the rings and stacking I put it on the lathe to finish it up. It has a hefty rim - normally I cut even the outer ring at an angle, but by cutting it straight I got a nice thickness that gives a little undercut to make it easy to hang on to. It's about 9 1/2" in diameter and about 8" high. I cheated on the bottom though - I parted it mostly off the glue block, got nervous about catching it if I parted it all the way off, so at about 3/4 of an inch remaining I took it off the lathe and split it. Then I used a ROS to finish off the bottom. Much easier than trying to reverse chuck it and get it straight :)

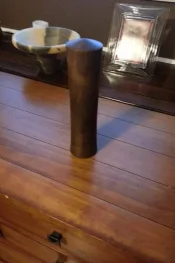
And the third thing that was almost finished was a replacement Christmas gift.
IMG_20140504_193840.webp

The first one I made (before Christmas) was a little heavy on the epoxy. It flowed more than I thought and I glued it all together. The second one I made worked just fine. Until it finished drying. Turns out that you shouldn't use 'green' walnut for pepper mills. They dry, and shrink, and are impossible to turn. *sigh*

I have to glue in the crush-grind mechanism to finish it off. I use PVC for tenons and this mill is in 3 pieces. I don't like the look of the through hole on top with some sort of lid on it, so my mills are in 3 pieces. The normal bottom that they'll all have, the center section for pepper corns, and a top section. Between the center and top I use another PVC tenon but I drill matching 1/4" holes in the sections and put walnut pegs in, gluing one side. This provides a snug fit and lets you use the top to turn the grinder but will still come off to refill it. By putting the pegs a little off center the top will only fit one way and that preserves the grain match when it's reassembled.

Well, that's what I did in my shop this weekend.

IMG_20140504_123548.webp

IMG_20140504_193637.webp

IMG_20140504_193840.webp
 
Doc you're really expanding your already wide array of talents. I made a trade 8 years ago for a wooden hat . . . . I hope one day he'll eventually send it to me lol. That's a serious bend you have going there - isn't there some spring-back involved in the brim - and that severe fold is for that right?

There's no spring back on this one... It looks just like that. I can't recall exactly, but I think this style is called a range rider(or something like that). I was basically following instructions on this one, but I probably won't put that much bend on the next one.

I'll definitely make more of these, and if I ever get decent at doing it, I'd be happy to have a go at making you one. I'm told that 1 in 3 cracks during the drying process, so I should be good for the next two.
 
That's a lot of work - I'm not sure I would have anything worth trading unless you come to a point where you want to turn some fbe hollow forms again. I could probably fix you up there. What would be cooler is to take a class from you on it once you get comfy doing it. :wink:
 
I got to work on this.
image.webp
Getting a tune up, repair rear tubes and fill with beet oil, and fix a power steering leak. No buzzers, check engine light, trouble codes. There's nothing to recalibrate, flash or configure. Happy me!

Then, finished putting in my new lights in my new shop.
image.webp
Now that I can see, time to organize and get set up. Double happy me!!
 
I got to work on this.
Getting a tune up, repair rear tubes and fill with beet oil, and fix a power steering leak. No buzzers, check engine light, trouble codes. There's nothing to recalibrate, flash or configure. Happy me!

Then, finished putting in my new lights in my new shop.
Now that I can see, time to organize and get set up. Double happy me!!
Reminds me of a ford jubilee. What's up with the new shop? Did you move?
 
Similar to a Jubilee, aka NAA. They were made in '53. This is a '62 4000.

And yes. A new place. We moved three weeks ago.
Better shop? Momma still happy? Everything good? A move is in my near future, blank sheet of paper for the shop, virgin basement and wide open and all mine!
 
We'll my glass artist friend is taking his spouse to France for vacation soon so decided I should make some lids for future turned bowls. Cut 13 lids of various sizes and got them in his kiln. His kiln is much larger than mine. This isn't the same run, but you get the idea. Minus the 4 coaster, and plus some more lids it looks like this. image.webp

image.webp
 
Did some calcium tire repairs.
image.webp

Made some air tank cradles for another one of my jobs.
image.webp

And spent some quality time with shopdog getting set up.
image.webp
 
That's a great looking dog Brink!
 
Processed some of the wood I got back from the stabilizer into call blanks. I even love the little slivers left behind!
20140515_174116.webp
 
Processed some of the wood I got back from the stabilizer into call blanks. I even love the little slivers left behind!
View attachment 51282

Them are some nice looking little slivers! I can only imagine that the whole blocks they came from are just as awesome!

Need to find a home for them? :sarcastic: :sofa: (I see a pile of beautiful pieces that just might work well for gluing to the fronts of little drawers on jewelry boxes, etc, lol!)
 
Haven't really been able to get out into the shop lately, save for a few minutes here and there.

My wife got me an awesome, early Father's Day gift and brought me a rolling tool chest! :yipee: Perfect timing because putting stuff away in the garage had come to a grinding halt due to a lack of any place to store tools.

I did have to run to town for work today and since I was driving right past, I stopped at Menards and got some plywood and assorted 4x4's and 2x4's so I can build myself a basic bench. Going on said bench will be this vise that my wife let me buy. As soon as I get some more time to get stuff put away, then I'll start building a workbench! It won't be anywhere near as nice as Mike's - especially since I had to pass on getting $1/BF oak - but it'll be mine - and it'll be my first solid bench! Unlike the other benches I've had, this one I'm planning out properly, instead of building with whatever I could scrounge up. Going to build it solidly so that it doesn't rack or move on me.
 
Matt, if you're serious about using them, I'll be glad to drop them in a sfrb to you... they're just headed to the circular file. If you really want them, just pm me your addy.

Them are some nice looking little slivers! I can only imagine that the whole blocks they came from are just as awesome!

Need to find a home for them? :sarcastic: :sofa: (I see a pile of beautiful pieces that just might work well for gluing to the fronts of little drawers on jewelry boxes, etc, lol!)
 
I finished sizing the Texas Ebony staves. Will glue up today or tonight and have 3 more shells to make round. They are all going to be very pretty IMO.
 
Matt, if you're serious about using them, I'll be glad to drop them in a sfrb to you... they're just headed to the circular file. If you really want them, just pm me your addy.

Yeah, I would use them, especially if they're simply headed to the circular file. One of the projects that I plan to make once I'm caught up with the list of projects I've told my wife I'd accomplish for her in the coming months is to build her a jewelry box. I envision thin slices like that as providing nice pieces to glue on to the drawers as beautiful false fronts. I'll send you a PM! (I'd be happy to at least pay for shipping.)
 
Haven't really been able to get out into the shop lately, save for a few minutes here and there.

My wife got me an awesome, early Father's Day gift and brought me a rolling tool chest! :yipee: Perfect timing because putting stuff away in the garage had come to a grinding halt due to a lack of any place to store tools.

I did have to run to town for work today and since I was driving right past, I stopped at Menards and got some plywood and assorted 4x4's and 2x4's so I can build myself a basic bench. Going on said bench will be this vise that my wife let me buy. As soon as I get some more time to get stuff put away, then I'll start building a workbench! It won't be anywhere near as nice as Mike's - especially since I had to pass on getting $1/BF oak - but it'll be mine - and it'll be my first solid bench! Unlike the other benches I've had, this one I'm planning out properly, instead of building with whatever I could scrounge up. Going to build it solidly so that it doesn't rack or move on me.


Solid and a good vise is what you need. Fancy is only for the fun of building it.
 
Back
Top