What did you do in your shop today?

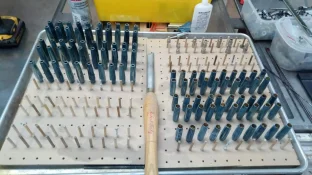
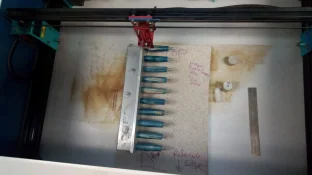
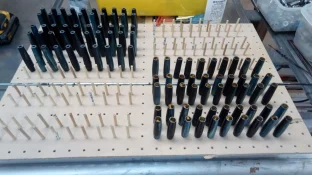
My regular Thursday show got cancelled due to weather today so I decided to get a few things done for a customer that put off reordering until they were almost out. Got 50 letter openers and 50 Mesa style pens drilled, tubed and turned today and then engraved them and got the black sprayed in. Saturday or Sunday will probably be finish and assembly day on those as tomorrow I need to start on a rush order for something that needs a couple days dry time.

2017-08-03 17.21.37.webp 2017-08-03 18.36.13.webp 2017-08-03 19.07.27.webp
 
I put one of those on my little burke metal mill, i really like it. I want to put one on my bandsaw as well.
 
Is that for the visually impaired :lol2:


Well... I do have an 86 year old :old: mostly blind guy come to my studio several days a week!!

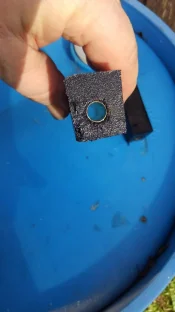
The old switch was hard to turn off. We had to very firmly push the off button.
New one is just a quick :punish:and its off!!
 
Last edited:
I got tired of some of my tools walking off when I turn at the vet's garage so I decided to start refinishing the handles so I could easily identify MY tools.

P8060088.jpg
 
Well it's been nice enough to work in the shop last couple days, so I've been busy. Tried finishing up Karl's presentation case for the Pen Swap, to no avail! I am now sanding it back to bare wood the second time, or third time, dependent upon how you look at it. Had a can of Minwax Spar Urethane that gave me grief on a project awhile back, but... when it was warmer, during daylight hours, it seemed to work OK. Figured it was Temperature related malfunction, so I tried it. Not Good!! I've seen cows on fresh green grass spray better patterns! Those of you that grew up on the farm understand, for the rest of you suffice to say the it didn't spray worth a damn!

Attempts to cover it then result in build up of varnish, which turns milky, and dries that way if you leave it. Ask me how I know this!! Wiped it down with foam brush and mineral spirits. At any rate, it sucked, I sanded it back to bare wood, drove 22 miles to Lowes, picked up another $10 can of Minwax Spar Urethane (2 of them actually), came home and tried it again and got the same damn thing!

Contemplated, not shaken enough, shook the can until I thought my arm was going to fall off. Contemplated I was too close, moved back. Contemplated the adjustable spray nozzle was turned the wrong way, turned it the other way. I did everything I could think of, and it still made a mess, no matter what I did. So today I started sanding it all back to bare wood again.

Have no clue what the problem is with Spar Varnish, but I'm not even a little impressed as you can probably imagine!
--------------

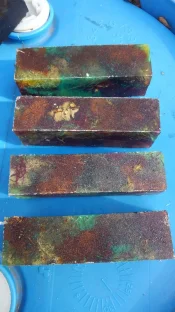
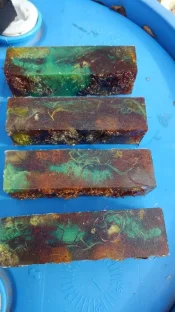
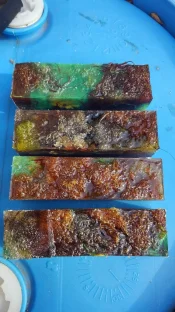
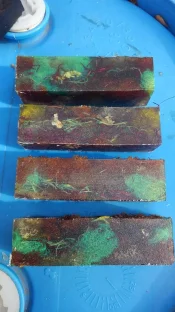
In between sanding however, I worked on casting a few goodies. Stan wanted a few more moss mellow blanks, so I poured those.
4 blanks/4 sides below...
Have a few turkey pot calls in the juice for stabilizing before casting them too.
KIMG0308.webp

KIMG0309.webp

KIMG0310.webp

KIMG0311.webp


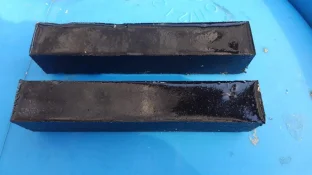
Likewise poured @ripjack13 's coal fired pen blanks! First two out of the mold, these were with the fine coal dust. Stuff works like a dream if anyone else was contemplating it. Grind your coal up fine, pour your resin in the mixing cup. I was at 125 ml for 2 blanks, added equal amount of coal dust, mixed gently to a slurry. Allowed it to stand a few minutes to degas. Soon as the bubbles quit rising, added my catalyst per 125 ml of resin, and gently mixed. Did not pressurize these, really didn't see any need. Contemplated vibration, but decided against that since it might cause the coal to actually settle out of the resin. Simply sat them on the bench and let them cure.
KIMG0312.webp

Tube is a little off center... had intended not pouring the mold quite so full, but I got it where it needed to be, had a little resin left, and wasn't sure how much it might shrink, so I filled the mold. And, it didn't shrink! Oh well!!
KIMG0313.webp

Tubes on these are I believe 10.5 mm. Ordered a half dozen of the 10" tubes, was going to pour full length, but when I got ready to pour them, I looked at my 6" molds and elected to simply make new end pieces for those, rather than build new molds!" So they are cast 6" in length. Marc had sent tubes for an American Patriot Rollerball, combined length of the 2 pieces leaves a piece about 2 1/2" on these blanks, which is just long enough for a 10.5 mm single tube pen. Measured the tube on a Gatsby and they're just under 2 1/4", so all is good!

Tossed the bigger little chunks of coal in the molds today, same method, have two of those blanks on the way. Should be a different chunky look about those, resin remained mostly transparent on the stir stick throughout, so chunks should be evident in those hopefully. Then we should have enough dust left for two more of these from the looks of things.

Don't hesitate to try this one guys, it's so easy it was fun! Coal dust is a little messy to deal with, but otherwise it works really sweet!

 
Last edited:
Omg.... I cant wait to try these out!!! WOOOOOO
 
The end of that blank isn't as loose as it may appear, there was just a thin film lifted on it when I demolded it. They're both nice and solid! I think they're going to be really sweet.. Can't wait to see the others, tried not to stir them too much, because I didn't want to break the coal down and cloud the resin up. Stir stick was showing just a hint of gray color when I last pulled it out of the molds, but for the most part, resin is still clear on those. Could be interesting!
 
Last edited:
Got into the shop for the first time in a couple weeks. Did a little more organizing. Can't wait until I'm finally done with the organizing and getting the shop set back up...
 
I'm contemplating the fact that @rocky1 likes to use the word 'contemplating' :blush:

Rocky, I've had the same problem not only with minwax but with bullseye sanding sealer where I went back and exchanged cans and had the same results. I then went to a different Lowe's and did the exchange and had better results. I suspect it was a bad batch and going to a different store got me a can from a different lot. Could be too that its too hot or humid. I know here in the winter I can't use lacquer or poly as it will cloud over because the temperature is too cold. Thus I use either danish or tung oil in temps that are too hot or too cold....

Nice looking blanks by the way. You should buy at ticket to Spokane and show me how you do your casting and stabilizing.
 
I'm contemplating the fact that @rocky1 likes to use the word 'contemplating' :blush:

Rocky, I've had the same problem not only with minwax but with bullseye sanding sealer where I went back and exchanged cans and had the same results. I then went to a different Lowe's and did the exchange and had better results. I suspect it was a bad batch and going to a different store got me a can from a different lot. Could be too that its too hot or humid. I know here in the winter I can't use lacquer or poly as it will cloud over because the temperature is too cold. Thus I use either danish or tung oil in temps that are too hot or too cold....

Nice looking blanks by the way. You should buy at ticket to Spokane and show me how you do your casting and stabilizing.

It just sounds much more refined than, "I stood there once again with a blank look on my face wondering WTF just happened here!? Before cussing profusely and attempting corrective action to try and reduce the countless more hours to fix this manufacturer's ScrewUp!" :ok:

I'd give it to bad batch, but last can I bought back in January, maybe February, don't recall when it was for sure, but it was cool out at night, maybe 50 degrees. Previous can was working flawlessly up to that point, I was 4 coats deep and had to strip it back to bare wood as it screwed up the previous layers.

Then when it warmed up to mid-70s, during the day, that can worked OK. Now I'm trying to apply mid-70s, and I get the same crap out of 2 cans, bought 6 or more months apart. Suppose I could look on the can for a batch number but I'm pretty sure they're not the same batch, and raise hell with Minwax, because this is getting old. Lowes may refund my money, on the last purchase, but certainly not the other since the can is over half used, and that leaves me out countless hours of sanding Sugar, Honey, Ice Tea back to bare wood. Wasn't sure what caused it the first time on the vase I was working on, so I sanded it all down and tried it again. Had warmed up that day and it worked ok. Next coat I put on it in the evening it screwed up again. So I assumed temperature. Now I'm at a loss again... was 76 degrees the other night when I sprayed the box, humidity was a little high, but not bad. Vase was however a little easier to sand on the lathe, than this box with lid, I have 5 finished sides per piece, 2 pieces to sand down, because not only did it not spray worth a damn, it didn't flow worth a damn when thinned and spread with a foam brush. I'm not impressed!!


Lessons on casting... Read directions on resin, don't be afraid to throw anything in the pot that ain't nailed down! :good::wink:

Wish I understood it better honestly. Have a few small voids in the bottom of the moss blanks. I typically fill from one spot in the mold, allow the resin to run out and fill up the mold, rather than pour over the material being cast, and forcing air down in the mold. But either way, how can you trap air in moss? These molds were set on a running saw, as they were being poured, they were allowed to sit there vibrating 15 - 20 minutes. I prodded around in all of them with my stir stick trying to work air out, more than once. Put them in the pressure pot and ran that up to 80 PSI. Resin found and penetrated every minute crack, crevice, and loose piece of tape in the mold, but it didn't fill a void in a piece of moss right next to said crack along the edge of the mold? Somehow it defies reason at times!!
 
Thanks Matt. I actually turned another one after that one that I sent to Rocky and it turned out even better. Forgot to take a finished picture of it though. :blush:

IMG_4644.webp
 
Well I started making a cross cut sled so the shelf parts I cut will be more accurate. The outfeed table is in place, the extension runners are installed as well but I haven't yet laid in the filler panels for the top. In the process of cutting the dados in the sled I discovered that I got lucky the first time when I cut the shelf dados (either that or I remembered to tighten down the knob on the height adjustment) as the dados I cut vary from 1/4" to 1/8" - luckily I just need to recut them to get it correct.

No pictures yet as I need to find a red lighter. I know that for fine model building a blue lighter is the standard but fine models isn't what I do. And with the majority of my military time having been spent in the artillery red is a more suitable color :)
 
Well I started making a cross cut sled so the shelf parts I cut will be more accurate. The outfeed table is in place, the extension runners are installed as well but I haven't yet laid in the filler panels for the top. In the process of cutting the dados in the sled I discovered that I got lucky the first time when I cut the shelf dados (either that or I remembered to tighten down the knob on the height adjustment) as the dados I cut vary from 1/4" to 1/8" - luckily I just need to recut them to get it correct.

No pictures yet as I need to find a red lighter. I know that for fine model building a blue lighter is the standard but fine models isn't what I do. And with the majority of my military time having been spent in the artillery red is a more suitable color :)
I need to make one. I have everything I need to do it.
 
Back
Top