What did you do in your shop today?

Ken, I edit all my pics (size, rotate, etc.) with photo shop and save them to my desktop before uploading them to my post.
 
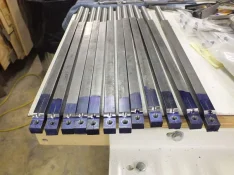
After cleaning out the freezers and the rooms we camped out in the last few days, I headed outside to clean... but the ground is so saturated and mucky I decided a little shop time would be better. I used it to machine my first parts on my mill-drill. They're very simple... faced to size, one end machined a little thinner than the other, then drilled and tapped for a 10-32 set screw. These are actually small pieces that I'll attach to the mill to assist in tramming it (getting it perfectly perpendicular to the table). I still need to drill the other end where it will attach to the head of the mill, but need to decide on size and pick up a couple bolts and nuts. It's almost as much fun making metal shavings as it is wood shavings... but the shavings are a bit sharper!
20140215_171001.webp
 
Aint it cool to be able to make your own machine parts!
 
Hadn't thought of it, but it kind of does look like a planet!
 
Worked in the shop on my bench drawers- have not touched it in over a month- Nice to be on it again- pics tomorrow.
 
I packed up more tools... And also packed up a bunch of other stuff in the basement.
 
Got some time in the shop today and finished up another batch of turning chisels. All sanded and ready for black oxide, tick stamped em too. I'll drop them off tomorrow.
moisture-meter-003.webp
 
I wasn't in the shop much today, Sunday is family day, I'm here with an hour to kill while my son is as Scouts so I cut/drilled/glued these rollerball pens up, the local rockler clearanced 'em waaaay back when so I scooped 'em up while they were on one of those "Extra gazillion % off of clearance sales" they do once in a while, the kits are the same as one they still carry, they just changes the part number :) I think I bought about 40 at 2.35 each. Orginally a 10.00+ kit. I only do a few of these at a time and with nice expensive timber on them I don't gives them away :) this batch is Maple Burl, Elm Burl, Cherry Burl, Box Elder Burl, and a piece of Brazilian Rosewood that was harvested pre-ban.

Yes, I know the blanks vary a ton in length but the cutoffs would have been really short and gone firewood anyway so I'll just cut them down when I square them up.

2014-02-16 19.44.59.webp
 
I spent all day Saturday in my shop. I spent all day Sunday in my shop. Today is a holiday here so I have the day off and guess what I'm doing? Yup!!!! I'm spending all day in my shop.
:yipee:
 
Been doing some metal machining the last couple of evenings. Working on some turning chisels, what else, LOL. I'm trying to get caught up making them, I have 2 more styles to make and then I will post them for sale after the auction is done. The goal is to have 5 styles done all at once.
 
Yesterday when I was working with my Burke mill I noticed that the vertical attachment was getting very warm. I was using it again tonight and it got freaking hot and seized up. There are ball bearings on the spindle and bronze bushings on the arbor shaft. I think it's these bushings that are causing the problem. The previous owner rebushed it and he did a great job but I think the clearance is to tight. I am going to have to tear it down and see if I can hone the bushings for some more clearance. I think a brake cylinder hone will work. Was to hot to touch tonight, I'll let it cool overnight.
But the chisels are coming out real nice, I was on the last step of the machining process when the mill stopped.
 
Ouch, Greg! It's nice you can tear the thing down and take care of it yourself. You're a talented man.
Thanks Barb, it kinda stinks that I have to work on it rather than with it, but these things happen. I learned how to fix things as a kid growing up out of necessity.
 
I got the mill repaired tonight! Pulled it apart and used a brake cylinder hone to smooth out the new bushings that the previous owner made. I think they needed just a little more clearance. Polished the arbor shaft, repacked it with grease, and gave her a test run. All is well again.
 
This is really a what I did the last few days. Started milling new tools, seized the mill, fixed the mill, resumed milling. I then finished the milling on the new tools. Here's some pics, ok a bunch of pics, lol.
These are going to be 1/2" full size roughing tools. I am redesigning the cutter pocket on this batch. I have been making changes and improvements to my tools. This is the start of the milling process, pocket depth cut and center relief done.
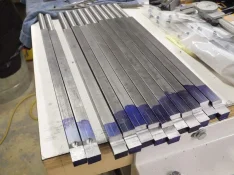
tool-making-001.webp

The center relief is so curved cutters will still lock down and not chip.
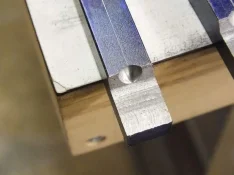
tool-making-002.webp

All centers cut.
tool-making-003.webp

Ends of tool marked where material will be removed and the ends beveled for cutter clearance.
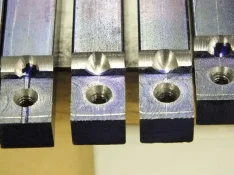
tool-making-004.webp

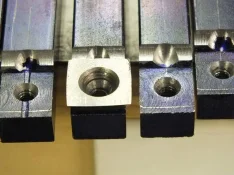
This is how the cutters will sit in the pocket. See the relief at the back so the cutting edge won't touch anything and won't get chipped. This is part of the new design.
tool-making-005.webp

I'm happy with this. Nothing will touch the cutting edge.
tool-making-006.webp

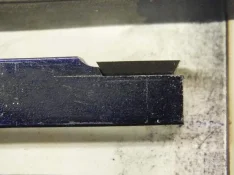
Top view before the end is clearanced and beveled. I hand fit each cutter.
tool-making-007.webp

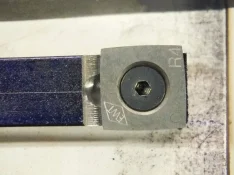
A new batch of full size roughers, sanded, tick stamped and ready to take to metal coat for black oxide.
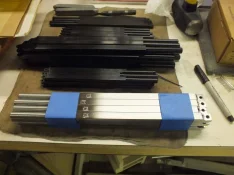
tool-making-008.webp
 
Last edited by a moderator:
Greg could you show a closeup of your tick logo? That looks swanky. :good:
 
So then I oiled up the south bend and went to work on some new blanks. The first step in my tool making is rounding the blanks so it is easy for the user to make a handle for the tool. I turn them just undersize for easy insertion. I got a new batch of raw material and got to work. It took all day to turn all these round.
Square ones are raw material for full size tools, rounded ones are 3/8" mid size tools.
tool-making-009.webp

Pile on the right will be mid size roughers.
tool-making-010.webp

This has been a lot of work the last few days. These tools take time to make. I'm tired and need some couch time now.
 
Last edited by a moderator:
Back
Top