
You are using an out of date browser. It may not display this or other websites correctly.
You should upgrade or use an alternative browser.
You should upgrade or use an alternative browser.
What did you do in your shop today?
- Thread starter woodtickgreg
- Start date

I would have loved to been a fly on the wall.

I would have loved to been a fly on the wall.
I free birds. I kill flies.

Well be sure I would buzz around your head and in your ear for awhile then! 
 Making progress. I have all the hardware for the top one, most for the middle and the bottom is the first lacquer finish I've done

View attachment 56343 Making progress. I have all the hardware for the top one, most for the middle and the bottom is the first lacquer finish I've done
Nice- what wood is the bottom one?
Blue Mahoe. I love working with it. I love working woods that smell good and this probably has the best smell ever! It was a really warped up slab but being I cut smallish pieces I was able to make cuts is such a way as. To have. Very little waste. It also had bug tunnels and knot voids hence the crushed shell inlay which ironically looks very much like Ludwig's old crushed oyster shell wrap.
Last edited:
Looks good Les. Last week I made a 8 x 5 stave shell (not for a drum) but get this . . . . only 3/16" thick. I have no idea how it stayed together on the lathe. It was vibrating all over the place.
I really like the Osage and P'heart together but you might consider having the staves stabilized next time because those colors are both going to darken and look nothing even close to how they do now.
I really like the Osage and P'heart together but you might consider having the staves stabilized next time because those colors are both going to darken and look nothing even close to how they do now.
Pretty cool Kevin. The TX Ebony shell I have down to about the thickness. I like my router jig better for turning drums than a lathe. Safer and I feel my accuracy is better.
You mentioned stabilizing for color once before. Would I be able to glue it up the same? I like the idea and had thought of it to harden up FBE as well. I have excepted the fact that the color is going to change. I let it set without working on it for over a month and really liked the burnt orange color although I realize it will darken further. Thanks for the. Suggestion. Now make yourself a snare dag nab it!
You mentioned stabilizing for color once before. Would I be able to glue it up the same? I like the idea and had thought of it to harden up FBE as well. I have excepted the fact that the color is going to change. I let it set without working on it for over a month and really liked the burnt orange color although I realize it will darken further. Thanks for the. Suggestion. Now make yourself a snare dag nab it!
You can't get a router in a shell this small - it has to be done on the lathe and buddy the inside was a challenge! Because I don't have the tools nor training to turn that deep in - but somehow I managed it.I like my router jig better for turning drums than a lathe.
Why not?You mentioned stabilizing for color once before. Would I be able to glue it up the same?
Les as you can see this shell is not of equal thickness. I would never use it for a drum but it will work fine for what I am going to use it for. You can see a nice chunk of meat missing on one edge of the shell because it had just started to want to explode so I stopped. Should have stopped before that at about 1/4" but I have this problem about seeing how far I can go.
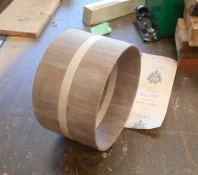
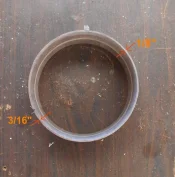
Now to figure out how to use it for the rest of the project . . . . .

Now to figure out how to use it for the rest of the project . . . . .
That is strange I almost don't see how you did that on a lathe. If you reall y want to even it out I use a piece of 5 or 6" pvc pipe as a sanding block for the insides with adhesive backed paper. Looks pretty cool I like the center band. Glue up must have been fun. I'm really curious o see what you use it for as part of a complete project.
Glue-up was simple Simon. Eight 3/4" staves ripped 22.5° and 2.74" wide (I.D.) for a rough turned O.D. of 7.875". But your miters must be perfect to turn such a thin shell on the lathe. Turning a shell on the lathe means it's going to spin a lot faster than your method, so you cannot do it with less-than-perfect miters or you'll have glue voids and it will decorate your shop walls, ceiling, and floors with your blood. I noticed in one of your pics in another thread you are still having a challenge in that area of perfect miters. If you want to get your shells to another level, you have to overcome that.
I did my first four shells on lathe. I do know what caused the gap at the ends of a couple staves, I will be more careful on my table saw technique for sure.
@Kevin, my issue has come up since I started processing my own wood and end up with individual stave sized pieces because of the size of the chunks I start with. In the past when I could rip a long board and then cut that down to staves this wasn't happening. I'm thinking if I make a sled that I clamp the staves into it may remedy this. Any suggestions are appreciated.
@Kevin, my issue has come up since I started processing my own wood and end up with individual stave sized pieces because of the size of the chunks I start with. In the past when I could rip a long board and then cut that down to staves this wasn't happening. I'm thinking if I make a sled that I clamp the staves into it may remedy this. Any suggestions are appreciated.
Actually the long mitered stave leaves more room for error IMO. I run mine through over- sized a bit - then cross cut and run back through to true them up. I use a magnifying glass and a test board or two to get my blade exactly where I want it. I made that scraggly shell from shop scraps all crosscut to near length then mitered, glued up, ripped the octagon in half on the bandsaw, glued the flat sawn maple board to them and then glued it all to a sacrificial wood chuck and spun it. Wish I had made a video of turning the inside. It was a hoot.
Actually the long mitered stave leaves more room for error IMO. I run mine through over- sized a bit - then cross cut and run back through to true them up. I made that one from shop scraps all crosscut to near length then mitered, glued up, ripped the octagon in half on the bandsaw, glued the flat sawn maple board to them and then glued it all to a sacrificial wood chuck and spun it. Wish I had made a video of turning the inside. It was a hoot.
Probably a good reason not to but what about the right router bit to get the angle?? PS- thanks you 2- Ya just gave me an Idea- brain is working really slow today- Damn back is out!!
Where the problem is happening is at the end of the cut the stave is twisting away as it comes of the blade. I use a push stick to push through. I think I just had the answer pop in my head. I need the right push stick and not just a stick to push through and another pushing the stave down.
Where the problem is happening is at the end of the cut the stave is twisting away as it comes of the blade. I use a push stick to push through. I think I just had the answer pop in my head. I need the right push stick and not just a stick to push through and another pushing the stave down.
Maybe, but I am pretty sure it's the blade twisting away - it's more likely you're using a thin kerf blade. Are you? Using a thin kerf blade for ripping hardwoods is one of the biggest loads of crap ever sold to the woodworking community. For ripping with 10" blades always use a nice thick kerf 30 tooth blade or less -preferably 24 tooth. I don't even use thin kerf blades for crosscutting because they flex in hardwoods also even when crosscutting no matter how narrow the board unless you push real slow and then of course you allow heat to build up - defeating the purpose of cutting slow and then they not only flex but get dull and carbonized (in a bad way) too.
For crosscutting on my 12" saw I use this blade - best bang for the buck IMO but of course I have several blades I like and many I do not . .
http://www.amazon.com/Hitachi-726101-90-Teeth-Tungsten-Carbide/dp/B0006HKB42
No regular thickness finish blade forget how many teeth but pretty sure more than 30. I could see the 1 or so inch of gap area at the end of the stave though.. I have a little delta jointer but I don't like it, the fence doesn't seem sturdy enough.