
What did you do in your shop today?

Spent a good part of the day working on my soon to be woodworking website, it's designed, it's on-line, just filling in the blanks before I show it to Google and the world. Eyes were about to bug out of my head; had to go get my sawdust fix for the day. Went and sawed a little firewood, therein determining that the last time I used my saw, I REALLY dulled the blade up! Gotta pick up a new chain and a sharpener.

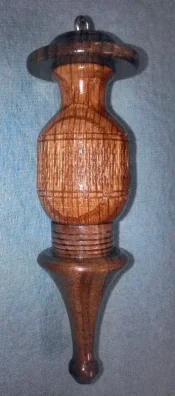
Stopped in the shop passing through, picked up a few sticks of Oak dowel at Lowes awhile back, actually picked up a pretty good assortment of oak dowel awhile back, big stuff all the way down through little bitty stuff, for turning ornaments, mini-birdhouses, and such. Couldn't stand it, had to play...

Roughly 1" in diameter at the body, overall length is about 3 1/2"

Terrible picture, texture just kind of vanishes in it, it's actually decently pronounced and stands out kinda nice in person. Gotta work on my design a little more, but it's a start? Cap was an after-thought, screw-eye was added to help hold it on.

How are you guys hanging these? I'm thinking I could cross drill a piece of small dowel, then drill the ornament and glue the small dowel into the top of it, and run a gold thread through the hole. Not impressed with the screw eye, and this one will likely get modified in that fashion.
NCM_0065_W.webp
 
Last edited:
In the shop for a couple hours this morning for a few last minute customers, decided to get something done while waiting so started on the cabochons for a bunch of bookmarks. Will turn the rest and assemble on Monday.

2016-12-24 10.56.57.webp
 
Those look delicious!......... oh there not for eating?........well they still look delicious!
 
Well I was feeling a little better today so I got out of bed and got some things done. Once the meds kicked in I was good to go. So here's some pics of today's progress.
I have been meaning to seal the seams on the harbor freight portable dust collector for awhile now, today is the day, I removed the Wynn pleated canister filter to do this.
20161224_075224_001.webp
The seam around the perimeter isn't seal and the filter doesn't cover it so fine dust can escape. I could actually see light coming through the seam! With the old bag filter it wouldn't have mattered because it would have been inside the bag. But the canister doesn't cover it.
20161224_075305_001.webp
Here you can see fine sawdust that has collected at the seams because of air leaks. I blew this out before sealing.
20161224_075612_001.webp
Silicone caulk on all the seams will take care of any leaks.
20161224_080710_001.webp
Next I bolted Castors to some angle iron that I drilled earlier. You'll see what they are for soon.
20161224_080744_007.webp
On Monday I scored some more plate steel scraps for the lathe weight box project. Was too damned sick to carry in. Today was the day for that too.
20161224_151618_001.webp
This is what I have total now, should be about 500 lbs or so.
20161224_151624_001.webp
 
Then I loaded up the truck and went to my work to get some things done. Stopped at harbor freight on the way. Picked up a new vice for the metal shop, $69 plus 20% offor of that with a coupon. Grabbed a box of disposable nitrile gloves while I was there too.

So the main reason I went my work shop was so I could spray paint in a warm area. Got the winch mount primed. Rust-oleum grey.
20161224_170420_002.webp
And while the primer was drying I Redrilled four holes in the angles to 5/8" so I could mount the angles and Castors to the knee mill base. Again, nice to have a crane for this kind of stuff.
20161224_184607_001.webp
It rolls around easy now and is super stable.
20161224_184723_001.webp
Then I bolted on some chains that the winch hook will go on. See where I am going with this?
20161224_190933_001.webp
I can still roll it around even with the chains on. This is the second time I have repurposed these Castors, lol.
20161224_191001_001.webp
2 coats of Rust-oleum gloss black on top of the primer.
20161224_194551_001.webp
Pretty nice winch mount if I do say so myself, lol. Can't wait to get the winch mounted to it.
20161224_194703_001.webp
So all of this fab work is so I can get the 1500lb mill into my basement by myself. I took the mill all apart and the heaviest part can now be handled very easy. I'll winch it down the stairs because the winch has a holding brake and that makes it very safe. Wait till you see what I came up with to get this thing in, lol, Kevin would be proud of me. He loved it when I did crap like this, lol.
 
Last edited:
:headscratch2:Goes shopping for a winch at Harbor Freight, spends just slightly more for a 12,000 lb. winch than I spent on a 2000 lb. ATV winch, and then says...

So all of this fab work is so I can get the 1500lb mill into my basement by myself. I took the mill all apart and the heaviest part can now be handled very easy. I'll winch it down the stairs because the winch has a holding brake and that makes it very safe.

:pray: :pray: :pray: :pray: :pray: :pray:

:shok: :sofa: :sofa: :shok:
 
:headscratch2:Goes shopping for a winch at Harbor Freight, spends just slightly more for a 12,000 lb. winch than I spent on a 2000 lb. ATV winch, and then says...


:pray:

:shok: :sofa: :sofa: :shok:
Oh yee of little faith.:nodice: Grasshopper watch and learn................:sarcastic:I have done this kind of crap before:ponder: and probably will again. :impatient:
 
Oh yee of little faith.:nodice: Grasshopper watch and learn................:sarcastic:I have done this kind of crap before:ponder: and probably will again. :impatient:


:lol2: :lol: :lol2: :lol: :lol2:

Had a buddy in ND put his machinist lathe and milling machine in the basement with an assortment of 2x6s and plywood, 4 drunks, and a come along. With only minor cosmetic damage to the garage wall! Which I honestly couldn't believe it stayed there, I sorta expected the wall around the door opening to give way, sending the lathe down the stairs at high speed, flattening the 2 brave drunks guiding the bottom end down the stairwell. BUT IT DIDN'T! So yeah I have faith already, I just found that "makes it very safe" comment funny, because there just ain't a whole lot safe about sending 1500 - 2000 lb. items down basement stairs, by any means, be it drunks or Harbor Freight Winches! :rofl:
 
Last edited:
:lol2: :lol: :lol2: :lol: :lol2:

Had a buddy in ND put his machinist lathe and milling machine in the basement with an assortment of 2x6s and plywood, 4 drunks, and a come along. With only minor cosmetic damage to the garage wall! Which I honestly couldn't believe it stayed there, I sorta expected the wall around the door opening to give way, sending the lathe down the stairs at high speed, flattening the 2 brave drunks guiding the bottom end down the stairwell. BUT IT DIDN'T! So yeah I have faith already, I just found that "makes it very safe" comment funny, because there just ain't a whole lot safe about sending 1500 - 2000 lb. items down basement stairs, by any means, be it drunks or Harbor Freight Winches! :rofl:
Trust me I wont be under it! The whole purpose of the winch was the holding brake. He did it with 4 people with fuzzy brains, I'll do it by myself and use my brains. At least that's the plan,lol. I have given this a lot of thought, there will be pics for proof, lol, of either success or failure for your veiwing pleasure.
 
Sounds like a plan to me Greg. May I suggest a heavy duty safety rope in addition, just as a back up in case, for any reason?
Not something us guys like to do, but a good climbing rope doubled up with a truckers hitch could be a life saver in certain circumstances.
Also, if I may make a suggestion, something you are probably planning to do already, put plywood on the stairs. Put some 2x4's on each side of the castors to keep them in the middle. Saves wear and tear on the stairs and that thing will glide down ever so lightly if you do.
But no doubt you've already thought of that? :good2:
 
Sounds like a plan to me Greg. May I suggest a heavy duty safety rope in addition, just as a back up in case, for any reason?
Not something us guys like to do, but a good climbing rope doubled up with a truckers hitch could be a life saver in certain circumstances.
Also, if I may make a suggestion, something you are probably planning to do already, put plywood on the stairs. Put some 2x4's on each side of the castors to keep them in the middle. Saves wear and tear on the stairs and that thing will glide down ever so lightly if you do.
But no doubt you've already thought of that? :good2:
Thanks brother I appreciate the tips and advice. I had not thought of a safety rope as a back up, only because I will be doing this by myself. It might be kinda hard to manage the winch control and a safety rope and guide it at the same time. But I am way ahead of you on the support for the steps etc. I think you'll dig what I came up with.
 
Thanks brother I appreciate the tips and advice. I had not thought of a safety rope as a back up, only because I will be doing this by myself. It might be kinda hard to manage the winch control and a safety rope and guide it at the same time. But I am way ahead of you on the support for the steps etc. I think you'll dig what I came up with.


:popcorn:
 
Had a commission to make a shoe horn out of wood, one that could probably survive a 4 year old and come apart into two pieces for travel. Have never made a shoehorn before, but I came up with something. There's some things I'd definitely do different next time, including charging more money than I did, but it was a learning experience and I was able to do it all from scraps/cutoffs and a few bits from the hardware bins. Shipping out in the morning to Ohio for a New Year's Eve Christmas gathering - ended up cutting this one close to the wire.

Hard Maple as the primary wood, Cherry Burl handle, Ebony accents at the handle and at the separation. Handle attachment is reinforced with a 1/4" bolt epoxied in place. Connection between the two pieces is done with a 1/4" bolt and a brass threaded insert. Hand sanded through 320, then buffed with all three wheels on my lathe buffing setup, so the finish is carnauba wax - should be easily enough for the eventual recipient of this gift to touch up with clear shoe polish as needed.

After making this one, I reaffirmed my dislike of hand sanding. However, I do plan to make one of these for myself at some point and do some things different in how I make it.

SH.webp
 
After I got done with assembling this.
20161226_133300.webp
I painted this.
20161226_183330_001.webp
Now once the paint cures I can finally get my metal stock organized better so I quit tripping over it and knocking it over.
 
I sorted and cleaned a little more, then I butchered another cutting board. This one my mother gave to me and told me to chop it up and make something out of. Former sister-in-law gave it to her before falling from grace. She's like way deep, kinda on the same plain as whaleshit and that's on the bottom of the ocean, so...

Anyhow, it was a laminated bamboo cutting board with horizontal strand orientation. So whacking a slice off the end of the board gave me one real nifty cross grain blank for a couple pens. Turned up interesting. Just as good she had me cut the board up, wasn't glued good in a lot of places, and I've found several joints that were starting to fail.

At any rate, it gives a real cool patchwork quilt effect when turned and finished in this fashion. First one is on a Trimline kit, second obviously on a Comfort Grip.

Yeah, I know there's a ding on the front of the first one... Loaded my blanks on the mandrel backwards, so the matching ends are on top and bottom, not in the middle!! Going in the wife's purse, or in the shop, or my pickup, or someplace. Refused to waste the time filling the ding and sanding it out and all that crap when I already screwed it up worse!

quilt_work_1.webp quilt_work_2.webp
 
Well... went out to plumb the pressure pot, to try and do a little casting. Didn't have all the fittings I needed, and before running to town after parts, I decided to twist a little ribbon around blanks and get them glued up and ready to cast. Doesn't do a lot of good to get the pot ready, if your stuff you want to cast isn't ready. So I set about twisting up tubes.

Apply a bit Mod Podge to the end of the tube, start wrapping diagonally, apply little clothespin to hold the first wrap in place, spread more glue, wrap, apply second clothespin to hold in place, spread more glue, wrap, move your clothespin in the middle down... You get the picture!

Once the glue sets, trim the ends of the ribbon, remove clothes pins, if an end comes loose, apply a little thick CA and in a few seconds it's stuck back down. Insert plugs in ends of tubes, slip them into the mold, and cast it. Saw to appropriate size on band saw.

NCM_0074_W.webp

Yes, gentlemen... It is about a pain in the ass! Was several tubes into it when I decided to see how long it was taking. Average time to twist one of these up, is about 12-14 minutes per tube!! (x9) However, I get 2 sets of pen blanks, and a keychain per 10" tube, so time really isn't so bad when spread out per project. It just gets to be a tad monotonous sitting there twisting ribbon round and round and round and round and... after about 2 hours.

Had to go refresh my memory as to why I go to all this aggravation. Had one keychain blank and a full tube left from the last cast on these that didn't go quite as perfectly as I would have liked for it to, so I grabbed the keychain blank tossed it on the lathe and spun it up quick. Had so much fun with that one, I cut the last full tube into little short pieces and turned a bunch of keychains!!!

NCM_0073_W.webp

Penn State cheap Satin finish keychain, comes with a 2 1/8" tube, pulled those and added them to the collection, these are all turned at about 1 1/2". For those of you up there in the deep freeze, these would make nice zipper pulls for your coat. Not obnoxiously large, but big enough to get hold of with gloved hands. If you're doing any winter shows, you might want to spin a few up and display them as such.

If anyone needs a few 7mm tubes yell before ordering any, I'll have at least 45 extras out of the 9 tubes twisted up above, (if I turn all keychains I gain an extra tube or two, per stick), I had 17 out of the last batch of 3 tubes.

Turning them that short momentarily presented problems on the pen press, adapted and moved on. Mine only came with 3 spacers, needs 4; cutting board pen blanks with routed grooves on the ends worked nicely in a crunch!

NCM_0075.webp
 
Last edited:
Today after work I decided to work on the metal working side of the shop in preparation for the machine base move on the weekend.

So I started with getting the material rack that I painted last weekend set in place and leveled it with some aluminum plate for shims.
20161229_171836_001.webp

I started loading it, all the material that is against the wall will go on it.
20161229_174927.webp

Wow, it all fit.
20161229_182220.webp
Much better organized now.
20161229_182301.webp
The material shelf cleaned it up nice. The view lookin down the narrow side of the shop. Lathe and workbench with tool.box is on this side. It's coming along.
20161229_182410.webp

This is looking the other way, the mill will go where the grey cart is. That cart was full of material, now it's all on the shelf. I put the rotary table on the cart so I can clean it up.
20161229_182452.webp
It's getting there.
20161229_182519.webp
Then I installed a new vice. I like this style of vice in my metal shop because I can clamp just about anything in it and it will rotate to just about any position I need.
20161229_190020.webp
I had another one of the same style where this one is. But it was to big for the small bench area, so I replaced it with this one.
20161229_190109.webp
 
Last edited:
Back
Top