What did you do in your shop today?

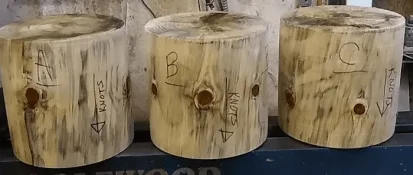
My brother had a walnut tree come down in his yard a while back, and they brought me a few chunks when they came to visit for Christmas. I roughed turned a couple of blanks from a crotch section. First photo is a platter blank, and the second photo shows what will be an ogee shaped bowl. It's been a while since I've gotten much green wood, and I'd sort of forgotten how much I love turning wet wood!

IMG_0883.webp
IMG_0884.webp
 
My brother had a walnut tree come down in his yard a while back, and they brought me a few chunks when they came to visit for Christmas. I roughed turned a couple of blanks from a crotch section. First photo is a platter blank, and the second photo shows what will be an ogee shaped bowl. It's been a while since I've gotten much green wood, and I'd sort of forgotten how much I love turning wet wood!

View attachment 119697
View attachment 119698

That is some awesome coloring Doc! Can't wait to see the finished product! Tony
 
That is some awesome coloring Doc! Can't wait to see the finished product! Tony

I wish walnut kept those greens and purples, but it won't. You'll have to wait at least a year for the finished products(longer if I forget about the blanks). They're waxed and resting in my high tech Polish kiln(cardboard box), so it'll be while before they're dry enough to re-turn.

If my wood eating dog finds them, I may never get to re-turn them:scare3:
IMG_0779.webp
 
Last edited:
I hope that's not walnut that he's chewing on. Great looking figure in those, they will be nice even after they dry.
 
Have been jonesing for more than 15 minutes of time in the shop for well over a month to work on something that wasn't an order, but rather something I wanted to work on.

Continued working on my first coffee mug. (Well, second if you count the one that I had almost done and then realized I turned way too thin in one part - thin enough to see light through.) I had rough turned and started to hollow this blank (and a second one, in case I blew this one up) this past summer. Then it went into my lightbulb kiln to dry. Finish turned it this afternoon - first the inside to fit the insert, then the outside to final shape.

Indian Rosewood w/ Sap, courtesy of @barry richardson , who this will be going to when it's finished. First pic is of it turned to shape, right before sanding. Second pic is right after I brushed the first coat of finish on it. Man this wood sure is nice looking with the finish on it...

Mug1.webp

Mug2.webp
 
Matt, are you using a stainless cup insert for this? Or just sippin coffee out of the wood? And what kind of finish are you using?
 
Matt, are you using a stainless cup insert for this? Or just sippin coffee out of the wood? And what kind of finish are you using?

Yup, it'll have a stainless steel insert in it when it's done. Finish is a brush on lacquer - don't ask me what kind beyond that, the label's now missing, lol.
 
Aha...cool. I've been wanting to make one for a while now, haven't got around to it yet. I have an insert from an old coffee mug that broke. So I saved the inside and the bottom cap and the plastic top....
 
Aha...cool. I've been wanting to make one for a while now, haven't got around to it yet. I have an insert from an old coffee mug that broke. So I saved the inside and the bottom cap and the plastic top....


I did the same & as soon as my ex saw it she said thanks & I never saw it again!!
 
Finally got this off the lathe. 22" across. Had been sitting for a year before turning. It will be awhile before I can put some finish on it. Not dry. Crossing my fingers that it cooperates. Usually rough turn and let them sit but was eager to try color and carve/texture and my patience lost out. BTW... Black walnut root ball wall hanging. IMG_0794.webp
 
Finally got this off the lathe. 22" across. Had been sitting for a year before turning. It will be awhile before I can put some finish on it. Not dry. Crossing my fingers that it cooperates. Usually rough turn and let them sit but was eager to try color and carve/texture and my patience lost out. BTW... Black walnut root ball wall hanging.View attachment 119805

That is stunning John!! Tony
 
Today I corrected the mistake I made yesterday in my shop! And, took pictures of the last 2 days work! And, changed the blade on my chainsaw so I could go saw firewood before the big freeze gets this far south. And, conducted numerous wood working science experiments with assorted woodly worker type chemicals!

FEI (For Everyone's Information!) - Silmar 41 does not set up without catalyst! (Colin is still settin up there in the snowbank laughin at me I'm sure. But he was certain enough in his reply to my message questioning that, that I believe he mighta done it before too!) And, for the record, it's kind of a pain in the ass to pour Silmar resin out of a 5 pocket mold through 1/8" honeycomb. (Yeah, go ahead and laugh Lou!!) But after adding catalyst and putting it back in the pressure pot, it did set up, although there was a pretty good layer of gooey stuff around all the edges when I pulled them out of the mold. But, that seems to be curing now that it's removed from the mold.

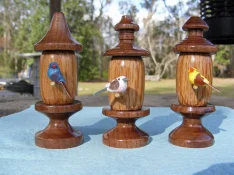
So backing up a day or two... Turned birdhouses the other day. Using KISS method... (Keep It Simple Stupid! Or, in this case, Keep It Stupid Simple!) Oak Dowel purchased at Lowes, and plain old walnut. Bored center of dowel 1/2" in the drill press, turned ends of walnut to fit bore, and glued. No Lee, I did not thread the roof, if the bird can't figure out how to get in the little bitty hole, he can go apply for government housing. Turned house, and finished, drilled 1/4" hole for bird to crawl in, drilled 1/8" hole for perch, glued 1/8" dowel in for perch, glued bird to perch.

Was going to do a polyurethane finish on these, but one of my pieces of walnut had an unseen check in it that caused a little concern, so I stabilized with CA while turning, and rather than risk that showing through the poly decided to just do a CA finish and be done with it. There was 4, sister-in-law got one for Christmas, and hauled it off before I got pictures!
DSCF4090.webp

No the fit isn't really that bad on the bottom and the base, cleaning the base up I ran the tip of my skew up under the edge. It's all filled with CA, can barely see it with the eye. It's that "camera adds 25 lbs." thing going on; it looks like a big gap, but it's really not.


Tried casting some blanks with Alumalite the other night also... That one didn't work well either! Think I might have caused that problem though. Pressure pot has a slow leak, running to 90 - 95 psi, and it slowly bleeds off to about 70, then very slowly bleeds down to about 50 and holds. I was adding air trying to keep the pressure up on it while the resin set. In hindsight, slowly losing pressure is probably a good thing, higher pressure pushes air out of the outside of the wood fairly quick, as the pressure slowly drops it should reduce the amount of air being removed from the blank, so it doesn't cause this problem. Leaving it alone would likely be a good thing. SO... more experiments with leaving it alone to come.

Blanks pictured here had been stabilized, soaked for a couple weeks in fact, didn't soak up much resin however, and when cooked out, seemed to spit most of what they had soaked up out. Blank on the other side of the mold, hadn't been stabilized, I got lots of little bitty bubbles out of it.

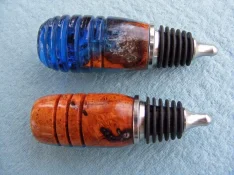
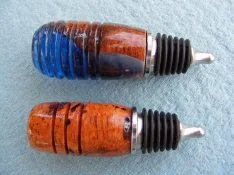
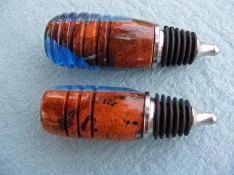
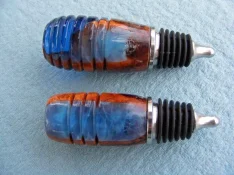
Cool blanks regardless, just have a lot of bubbles where there were any rough edges, which is an interesting effect in itself, so I turned them anyhow. We'll keep them for the house, but yes there were issues. Bottom one I got a hair off center when I drilled my hole, trying to turn flat side off, it got a hair overturned but I wasn't wasting it. Top one, down there in the third picture, my resin broke away at the bottom, and I had to build it back up with CA. Got a lot glue between the mandrel and the bottom of the stopper and had to sand it back, hence the ill fit to the stopper.

Is anyone else experiencing problems with the PSI stopper threads? I keep running into problems with stoppers not wanting to screw into the inserts? Thought it was the inserts, but I can run a bolt in those with very minimal resistance, however when I try and run a nut down on the threads on the stoppers, it's tight to REALLY tight. Contemplating getting out my dies and chasing threads on them from here on out honestly.
DSCF4095_W.webp
DSCF4096_W.webp
DSCF4097_W.webp
DSCF4098_W.webp

Otherwise my day started Tuesday, welding up stakes for the brother-in-law's coon traps. While I had the welder goodies out, I pulled the muffler off the mule and patched it where the brackets had pushed through the bottom. e.g. Remove, patch, reinstall, mark for location of brackets, remove again, weld brackets up, reinstall. Was plenty dirty time I was done, so I went ahead and serviced it, new filters all around, oil change, made a few other minor repairs. Cleaned another corner in the shop up. Loaded a batch of shorts for stabilizing, turned top stopper, and then screwed up my Silmar.
 
Last edited:
Rocky, I started out with some PSI stoppers, they were not made well at all. The tolerances weren't good, just sloppy overall. I switched to Ruth Niles and don't regret it. They cost more, but IMO it's worth it. Tony
 
I been working on pot calls. Didn't get a chance to turn yesterday, the restaurant I work at had the fan motor in their exhaust hood go to hell yesterday morning. almost 6 hours of chipping out grease, finding the bolts, disassembling the thing, running to town for a new motor, and reassembling and rewiring it (Lucky they didn't end up with a fire, bunch of melted wire before the breaker tripped and the motor was full of soot) all of course outside on a day when the high was -1 according to the bank clock in town.

Today I got in the shop and started pounding away at them- Birdseye maple, reclaimed chestnut, cocobolo, elm burl, coffee tree, eucalyptus, narra from @Tony , some others. got a good chunk turned today and hope to finish the rest tomorrow so I can got onto sanding and finishing and get the strikers made. Hit a few with some DNA to show what I'm finding, can't wait to get an actual finish on them.

2017-01-05 16.52.19.webp 2017-01-05 16.52.23.webp 2017-01-05 16.52.27.webp 2017-01-05 16.52.33.webp
 
Back
Top