What did you do in your shop today?

Got a text yesterday from a furniture builder about making 4 legs fer a vanity, cabinet or sompthin. Was sent this pict that they were kinda modeling it after. I don't know if just the corner legs are goin on sompthin else or a similar item.
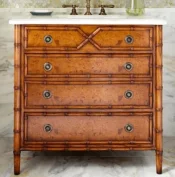
legs.webp

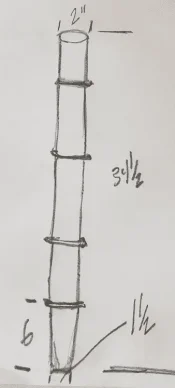
I asked fer plans so I could quote a price & this set of blueprints using the latest computer technology showed up!!:ponder:
legs1.webp

I was told the 2" diameter, the length & the bottom bead needs to be accurate. The other 3 beads were my call. From 6 double beads down to 4 single beads!! My kind of job!!!!:good:
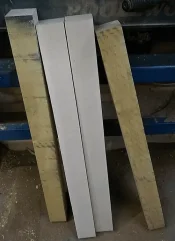
I called around fer wood & ended up with 4 maple blanks from Constantine's Woodworks (3/4 mile away) at a reasonable cost of only $149.63 !!
Blanks were 3" x 3" x 36".
Glue up popular wood would have cost only $85 plus an extra $30 fer me to do the glue up. I hates doing glue ups!!
They said do what ever is easiest. And they even paid in full in advance!!$$:thanx2:
legs2.webp

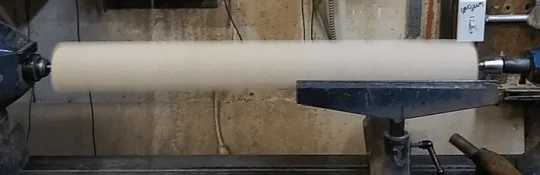
Got first one spinnin on lathe!!
legs3.webp

Final shape. Done free hand!! I evenly spaced the remaining beads. Beads were done with 3/8" spindle gouge. Straits were done using spindle roughing gouge & parting tool. Still needs sanding. legs4.webp
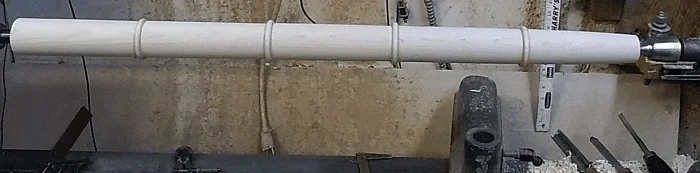
I quoted $48 each. The first one took exactly 48 min!! ( plus another 8 min sanding tomorrow)
Next 3 will be quicker.
legs5.webp
 
Last edited:
Last night I got a couple more rings glued on the segmented bowl I have going and used the bandsaw to split the other rings down close to the finished size and then used the drum sander to work them down to the final thickness.

Discovered one thing that is mildly annoying about my new bandsaw. The plastic throat plate sits *just* below the surface of the table. Normally this would not be a bad thing - in fact, it's probably a good thing. But when the piece you're cutting fits down into that depression it puts a hitch in your giddyup trying to split the ring. The overall piece I'm trying to cut is obviously far larger than that but the length of most of the segments just fit down in there.

I 'solved' it by turning off the saw and flipping the ring around and cut from the other side. This is not the optimal solution as the cuts don't necessarily line up directly. This has to do with my push stick, I'm sure. For the push stick I cut a piece of 3/4" ply about 8" square and then glued another piece of 3/4" ply to one side. My thought was that I could push the ring through the blade and keep pressure against the fence the whole way through. The problem is that after you flip the ring around you have a kerf and it's more difficult (at least without more practice) to keep pressure in the correct place and the front of the ring slightly leaves the fence.

Luckily I have great confidence in my abilities to be extremely accurate so I had plenty of room to sand down to the final thickness. :lol2: (I really need a sarcasm smiley here)

Maybe try some Scotch tape on the underside of your insert? Tony
 
First one would be the fastest for me... and I'd need about 4 more blanks in hopes of actually end up with 4 that looked somewhat similar.
 
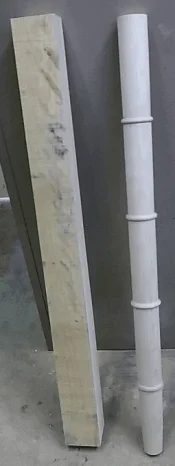
Here's a pict of the final product from post #2861. 4 blanks = 4 legs!!
All done free hand using a spindle roughing gouge, 1/8" parting tool, 3/8" spindle gouge & calipers.
Perfectly done!...
Well... Uhh... I did get a couple run outs across the 2nd to last bead on the very last leg because I didn't take 2 minutes to resharpen my spindle gouge.:blush:
So after I fixed it (made it smaller) I got to remount & make ALL the other beads smaller too!! :good2:
Only sanded lightly with 220 grit!! :cool:

legs6.webp
 
Last edited:
I cut blanks for 2 slimline pen and pencil sets in satin silver color, 1 cushion grip pen and pencil set in Rhodium and 2 cushion grip pens in Rhodium. Then I turned the first slimline set which the blanks were blue dyed BEB courtesy of @norman vandyke . The other slimline set will also be in the blue dyed BEB while the cushion grip pen and pencil set will be a combination of antler and orange dyed ROB and the two single cushion grip pens will be antler and desert mesquite.
IMG_2041.webp IMG_2042.webp
 
Last edited:
I cut blanks for 2 slimline pen and pencil sets in satin silver color, 1 cushion grip pen and pencil set in Rhodium and 2 cushion grip pens in Rhodium. Then I turned the first slimline set which the blanks were blue dyed ROB courtesy of @norman vandyke . The other slimline set will also be in the blue dyed ROB while the cushion grip pen and pencil set will be a combination of antler and orange dyed ROB and the two single cushion grip pens will be antler and desert mesquite.
View attachment 126168 View attachment 126169
Fyi, that is box elder burl. Lol
 
I fealt the need to do something in the shop today after work. So I started cleaning and going through boxes of tools that where in various lots from the auctions. Here's some pics of what I started with.

Started with these 2 pliers. The needle nose took a couple days actually to get freed up to even open, wd40 and just kept working them until they would move easy. The other is actual channel lock brand slip pliers. I think of them as free tools that just came in boxes of other stuff.
20170413_205319.webp
The mighty wire wheel cleaned up the needle nose pliers real nice.
20170413_211157.webp
Then I did the channel locks. And a quick buff with some Emory compound on the needle nose.
20170413_211840.webp
Dipped the handles of the channel locks in some plastic dip.
20170413_213700.webp
Hard to get a good pic in the shop with the cell phone sometimes.
20170413_213808.webp
I don't know what brand the needle nose are, but I discovered that they where made in West Germany. I'm thinking these are pretty old. The pitting is not as bad as the camera makes it look.
20170413_214056.webp
Very ornate handles on the needle nose, also tells me they are old. The only other thing it says on them on the inside of the handles is drop forged. I'm not going to dip these handles. The needle nose have nice jaws still, will make nice users.
20170413_214107.webp
Then I came across a couple of calipers, gave one of them the wire wheel treatment too. Then I sprayed it down with wd40 after I wheeled it. Might try a bees wax and mineral oil coating on them. They will be nice for the wood lathe.
20170413_220121.webp
 
Last edited:
I fealt the need to do something in the shop today after work. So I started cleaning and going through boxes of tools that where in various lots from the auctions. Here's some pics of what I started with.

Started with these 2 pliers. The needle nose took a couple days actually to get freed up to even open, wd40 and just kept working them until they would move easy. The other is actual channel lock brand slip pliers. I think of them as free tools that just came in boxes of other stuff.
View attachment 126173
The mighty wire wheel cleaned up the needle nose pliers real nice.
View attachment 126174
Then I did the channel locks. And a quick buff with some Emory compound on the needle nose.
View attachment 126175
Dipped the handles of the channel locks in some plastic dip.
View attachment 126176
Hard to get a good pic in the shop with the cell phone sometimes.
View attachment 126177
I don't know what brand the needle nose are, but I discovered that they where made in West Germany. I'm thinking these are pretty old. The pitting is not as bad as the camera makes it look.
View attachment 126178
Very ornate handles on the needle nose, also tells me they are old. The only other thing it says on them on the inside of the handles is drop forged. I'm not going to dip these handles. The needle nose have nice jaws still, will make nice users.
View attachment 126179
Then I came across a couple of calipers, gave one of them the wire wheel treatment too. Then I sprayed it down with wd40 after I wheeled it. Might try a bees wax and mineral oil coating on them. They will be nice for the wood lathe.
View attachment 126180

That is too cool. I love finding old tools that can be refurbished and reused. Most are of better quality than can be bought today. I have several old hand saws that I reset the teeth on and sharpened several years ago. They've been sitting in storage boxes and have taken on a little rust again so I will take them out one day and clean them up again. Nice find and great job with the cleanup!!!
 
That is too cool. I love finding old tools that can be refurbished and reused. Most are of better quality than can be bought today. I have several old hand saws that I reset the teeth on and sharpened several years ago. They've been sitting in storage boxes and have taken on a little rust again so I will take them out one day and clean them up again. Nice find and great job with the cleanup!!!
I have a couple saws to do as well, I scored another tooth setter that I want to try, and I found a nice saw vice at a flea market dirt cheap. But before that I have a few more tools to do this to. I'm like you, I see the value of the quality of the older tools. The rust can be cleaned of and they can be given new life. I really have a thing for antiques, old tools included, but not just to look at but to use. I recently found some older Courier and Ives dinner plates that I replaced my newer dishes with, I like them much better.
 
I spent numerous hours working on another Bottle Brush Burl Bowl, that's going to sell for a damn site more than I quoted the lady on the last two. And, tomorrow I get to refinish the inside of it. Sanded the bottom of it down considerably, this was one Lee butchered for some reason, had been through the bandsaw about 3-4 different directions, looked like a challenge!! Had one divot in the bottom edge that been bandsawed left, and since I had plenty of depth in the bottom to make it disappear, decided to sand it away after parting. Got a little warm sanding, and apparently there were some hot gases worked back up through the crevices as my immaculate finish went to hell around several of them. And, it's not topical, it is deep; deep deep!

Was going along pretty good, then found the void in the middle, most of which goes through to the outside somewhere, hence all of the live edge being finished to some extent. Had it all polished up beautifully, learned from my mistakes last trip and did not part this sucker until it was finished to perfection.

At any rate, she's gonna be a looker. Had intended shooting the live edge with lacquer or leave it raw again, but attempts to try and stabilize all the voids to some extent left a lot of CA floating around inside and when I cranked it back up on the lathe, about half of it got coated, and attempting to finish the outside of it, got a good bit more. It's all cool! Don't look half bad regardless.


KIMG0125.webp

KIMG0120.webp


More to come when I get it straightened out!
 
Last edited:
I spent numerous hours working on another Bottle Brush Burl Bowl, that's going to sell for a damn site more than I quoted the lady on the last two. And, tomorrow I get to refinish the inside of it. Sanded the bottom of it down considerably, this was one Lee butchered for some reason, had been through the bandsaw about 3-4 different directions, looked like a challenge!! Had one divot in the bottom edge that been badsawed left, and since I had plenty of depth in the bottom to make it disappear, decided to sand it away after parting. Got a little warm sanding, and apparently there were some hot gases worked back up through crevices as my immaculate finish went to hell around several of them. And, it's not topical, it is deep; deep deep!

Was going along pretty good, then found the void in the middle, most of which goes through to the outside somewhere, hence all of the live edge being finished to some extent. Had it all polished up beautifully, learned from my mistakes last trip and did not part this sucker until it was finished to perfection.

At any rate, she's gonna be a looker. Had intended shooting the live edge raw with lacquer or leave it raw again , but attempts to try and stabilize all the voids to some extent left a lot of CA floating around inside and when I cranked it back up on the lathe, about half of it got coated, and attempting to finish the outside of it, got a good bit more. It's all cool! Don't look half bad regardless.


View attachment 126188

View attachment 126187


More to come when I get it straightened out!

Again Rocky, you have created a masterpiece. But, excuse my ignorance once again when I ask, "What is a bottle brush bowl?"
 
That right there is b e a u tiful !!!

It'd be more beautiful if I was done with it!

Again Rocky, you have created a masterpiece. But, excuse my ignorance once again when I ask, "What is a bottle brush bowl?"


Bottle Brush Burl Bowl - You left a B out!

Bowl made from burl derived from the Bottle Brush tree... http://davesgarden.com/guides/pf/go/2331/ - Grows out there in your neck of the woods too. According to Lee however, they burl frequently in his neighborhood. I need to find an out of worker farm laborer and put him to work digging for these.
 
It'd be more beautiful if I was done with it!


Bottle Brush Burl Bowl - You left a B out!

Bowl made from burl derived from the Bottle Brush tree... http://davesgarden.com/guides/pf/go/2331/ - Grows out there in your neck of the woods too. According to Lee however, they burl frequently in his neighborhood. I need to find an out of worker farm laborer and put him to work digging for these.
I guess I've not been paying attention as I don't recall ever seeing one. I'll have to look to see what I can find. Sure made a pretty bowl.
 
Back
Top