What did you do in your shop today?

Had new student over for an urn making class. First woodturning experience for her! We made a beautiful urn for her son using Bottle Brush Burl with Turquoise, Amboyna Burl top & black Gorgonian coral finial.
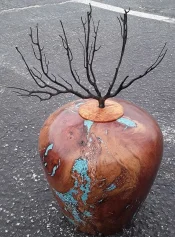
Darla urn.webp
 
I oiled up the southbend metal lathe and made Tony some tiny Tommy bars for his tiny chuck.
Awful lot of names there.:sarcastic:
20200129_173136.webp 20200129_175554.webp 20200129_175818.webp 20200129_182741.webp
 
Getting tired of turning so much Apple, so had a little time this afternoon and dropped a black locust.

Picture0129201721_1.webp

Even had enough time to rough a couple of bowls.

IMG_2849-1382x1037.webp
 
I've been wanting to add these for awhile in the shop... I heat it with wood, and insurance doesn't cover it, so any help I can get in case of a fire I'll take!

I also ordered another one with a different brand name to try out but that isn't here yet. Excited to finally be able to leave the house without wondering if my shop is burning down... 20200130_163308.webp
 
Cody, are those for emergency use(out of control, or chimney fires) or just to put out a fire at the end of the day?
Cody not seen this before. Will have research it. Peaks my interest.

All of the above. They can even be rolled into a fire, or just left hanging, or sitting, until so.etjing happens.

I plan to hang one by wood stove, and one on opposite end of shop at fuse panel. These are the 2 highest probabilities of a fire for me, and it's nice it happens to be opposite corners, so it covers well.

The ones I got are the smaller ones and are 30 bucks a piece. The big boys are around 100 to 120.

Here's a video of the one I got.
 
Those are beautiful, I have a roughed out ambrosia maple turning I need to finish up as well.
Greg, thanks. The turning club shared several really nice ambrosia logs almost 2 years ago. They came down as a new road went in. Progress I guess. The bowl blanks that came from them were large enough to core. These were the last 2 I had roughed out and I’ve been tripping over them long enough. Still have a couple logs I need to rough. Wish I had done them when they were slinging water wet. Ain’t nothin better than wet maple on the lathe.

PS, these had the least figure of the pieces I ended up with. The bugs really did their magic on the others.
 
Last edited:
So I finally got out into the shop last night for a bit. I put together a couple of molds for casting those twice dyed maple burl cutoffs. First time I've tried mixing color and sparkles in epoxy.

No pictures yet because they're still out in the pressure pot. I'll post pictures later on after I've had a chance to take them out of the molds.

And speaking of molds, I need to search and see if I can find the person who has the cutting board cutoffs that I bought this lot of material off of as I'm almost out :)
 
So I finally got out into the shop last night for a bit. I put together a couple of molds for casting those twice dyed maple burl cutoffs. First time I've tried mixing color and sparkles in epoxy.

No pictures yet because they're still out in the pressure pot. I'll post pictures later on after I've had a chance to take them out of the molds.

And speaking of molds, I need to search and see if I can find the person who has the cutting board cutoffs that I bought this lot of material off of as I'm almost out :)

Check with @Tony on the HDPE cutoffs.
 
OK, so I have some odd results. One of the blocks floated up. I suspect that because of the hot glue I used to seal the inside of the mold the block didn't set down far enough for the hot glue I put on the bottom to actually take hold. The block was wedged in but floated up before the epoxy had a chance to cure.
20200131_101124.webp

The other one shows a bit of oddity in one end that I don't quite understand.

20200131_101146.webp

And here's the good one taken out of the mold.

20200131_104753.webp

20200131_104737.webp

Those big "swirls" at the bottom worry me because they look like they could be voids.

20200131_104806.webp

Turns out they are not. However, I am very disappointed in the very minimal uptake of color into the blank

20200131_122456.webp

Clearly I should not have relied on my memory to recall the process for double dying these.

I did set it in a pan of juice and it eventually sank to the bottom. It looked from the side like it had soaked most of the way through. In fact I was worried that there wasn't room for the other color at all.

So after having it set in the dyed juice overnight I baked it, then put it in juice dyed green the other way up. And I don't see any green in this at all.

I don't know if I didn't let it soak enough, if juice wicked into the wood but the dye didn't, not really sure what happened here.

On the good side it appears that using alcohol ink worked very well for coloring the epoxy and the mica flakes I found look pretty good as well. That last picture is just a quick 120 sand on a bandsaw cut with a bit of olive oil on the surface.
 
Last edited:
@kweinert - Ken, I can't speak to the resin questions, but on the dyeing while stabilizing, did you do any vacuum application? Because, from the way you described it, it sounds like you didn't? When doing double dye work, the last color of dyed resin has to do the normal full vacuum cycle until all the air is out and then soak and cure. For full penetration of the stabilizing resin (or dyed stabilizing resin), it will require a full vacuum cycle. You will, however, do partial soaks, shortened vacuum cycles, etc - whatever techniques you want to try - for the initial colors. But you're not going to get it close to anywhere near all the way through without a proper full vacuum cycle.
 
Matt, thanks, as I have experimented a bit with double dying and your procedure is what I had tried with some success; I just need to play with it more.

Several folks on here, including Ken above, mentioned the "bake" process before second dye. Seems like that would totally defeat the effort, but never been sure. Just always though it would.

I just need to experiment more and dedicate the time, write down the steps, and change one thing at a time. You have hinted at your extensive efforts before and I believe this is what it takes. Patience...…..something I need training in.
 
Back
Top
