
What did you do in your shop today?

Well my weather was much more tolerable, in the 60s and windy. So off to the garage I went to finish clearing the garage for the repairs I have to do a week from now.
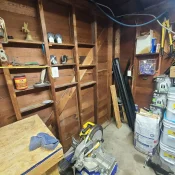
So one bench and the cabinet is now gone, this is where the entrance door will go.
20240527_152911.webp
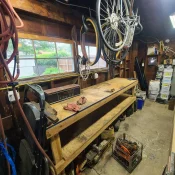
The work bench is now cleared so i can rip it out to get to the wall where the windows are.
20240527_152926.webp
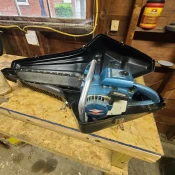
When I was pulling chainsaws out from under the bench I opened this case to ad.ire this old vintage homelite I have, she's a strong runner, all metal. Manual oiling only for the bar, no oil pump. But it's so cool.
20240527_153424.webp
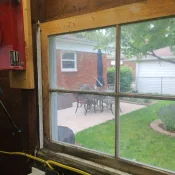
And now i can get to the windows to remove the. And reframe the opening for the new windows.
20240527_163739.webp
So it was a good day working in the garage shop.
 
Made lots of sawdust today. I owe a couple people for favors so started making a couple more of those Khun Phan puzzle games. Lots of pieces to cut out. 5 pieces for each box plus 10 blocks each, plus the miters and the dados for the box bottom, so a total of 60 pieces of wood to make. But when you're doing stuff like this, it's almost easier to make several because the set up time is a major component of the work. So I set out to make 4 games. Used my previous game as a template but for some reason my new ones are slightly too wide (the blocks have too much room). So I need to trim the box size next time I get my saw out.

I also glued one side of the transition on that lighthouse. It looks like it's going to fit nicely without a lot of tweaking.

set of four in progress.jpg

transition.jpg
 
Last edited:
Well my weather was much more tolerable, in the 60s and windy. So off to the garage I went to finish clearing the garage for the repairs I have to do a week from now.
So one bench and the cabinet is now gone, this is where the entrance door will go.
View attachment 257444
The work bench is now cleared so i can rip it out to get to the wall where the windows are.
View attachment 257445
When I was pulling chainsaws out from under the bench I opened this case to ad.ire this old vintage homelite I have, she's a strong runner, all metal. Manual oiling only for the bar, no oil pump. But it's so cool.
View attachment 257446
And now i can get to the windows to remove the. And reframe the opening for the new windows.
View attachment 257447
So it was a good day working in the garage shop.
Looks like good progress made! I’m interested to see what the next steps are. Chuck
 
Well my weather was much more tolerable, in the 60s and windy. So off to the garage I went to finish clearing the garage for the repairs I have to do a week from now.
So one bench and the cabinet is now gone, this is where the entrance door will go.
View attachment 257444
The work bench is now cleared so i can rip it out to get to the wall where the windows are.
View attachment 257445
When I was pulling chainsaws out from under the bench I opened this case to ad.ire this old vintage homelite I have, she's a strong runner, all metal. Manual oiling only for the bar, no oil pump. But it's so cool.
View attachment 257446
And now i can get to the windows to remove the. And reframe the opening for the new windows.
View attachment 257447
So it was a good day working in the garage shop.
I didn't know those older saws had carry cases. What dairy name is on the metal milk crate with the hoist in it?
 
Well my weather was much more tolerable, in the 60s and windy. So off to the garage I went to finish clearing the garage for the repairs I have to do a week from now.
So one bench and the cabinet is now gone, this is where the entrance door will go.
View attachment 257444
The work bench is now cleared so i can rip it out to get to the wall where the windows are.
View attachment 257445
When I was pulling chainsaws out from under the bench I opened this case to ad.ire this old vintage homelite I have, she's a strong runner, all metal. Manual oiling only for the bar, no oil pump. But it's so cool.
View attachment 257446
And now i can get to the windows to remove the. And reframe the opening for the new windows.
View attachment 257447
So it was a good day working in the garage shop.
That saw looks like it's in mint condition. They'd like it over on a chainsaw forum I'm on. You use a lot of oil? 0W-20? Nice to get the shop cleaned up so you can use it. It's always a struggle.
 
I didn't know those older saws had carry cases. What dairy name is on the metal milk crate with the hoist in it?
I'm not sure, I'll have to look.
That saw looks like it's in mint condition. They'd like it over on a chainsaw forum I'm on. You use a lot of oil? 0W-20? Nice to get the shop cleaned up so you can use it. It's always a struggle.
Yes it is in really good shape. It could use a wipe down. It is an original homelite case. Has an external hard oil line.
I buy it when it's on sale at Sam's club, it's usually $10 of a case. 0w20 was for my tacoma but Betty's mazda uses the same so all is good. 5w20 is for the ford f250.
 
Got all the drywall up in my shop ceiling finished so next up was blowing in pink fiberglass insulation over my 2x4 trusses this last weekend. Some Home Depots provide AtticCat blower for free if you buy at least 10 bags of the loose fill insulation.

PXL_20240527_235253191.webp PXL_20240527_235302481.webp
 
Next up is installing 8' led lights. So glad to be done with florescent lights that took forever to warm up in the winter. Each 8' led lamp runs about $20 on Amazon after taxes when bought in quantity of ten.

Ceiling looks dark because my camera's auto exposure correction.
PXL_20240530_024732257.webp

Trying to decide if I want a 2'x2' or 4'x4' attic opening since I've decided not to use the attic for storing much due to lack of flooring and the engineered trusses getting in the way. Primary need at the moment is to run new electrical lines so I'm leaning toward 2'x2'.
PXL_20240530_024844234.webp
 
I've been struggling with Organization.... in the last year or so I've been on a kick to try to get it done... last weeks project involved getting a second file cabinet painted and mounted to 1" plywood on casters..... 442497778_10233151408672721_2997756339871859343_n.webp

Up next is 3 flip top carts:
A)Drill Press and bandsaw
B) Chop saw and Jointer
C) Scroll saw and Planer

Just need to finish getting the materials for them (mainly the plywood for the sides)
 
I've been struggling with Organization.... in the last year or so I've been on a kick to try to get it done... last weeks project involved getting a second file cabinet painted and mounted to 1" plywood on casters..... View attachment 257575

Up next is 3 flip top carts:
A)Drill Press and bandsaw
B) Chop saw and Jointer
C) Scroll saw and Planer

Just need to finish getting the materials for them (mainly the plywood for the sides)
I've got one of those punch card (I think) file cabinets and I love mine. Wish I had another.
 
I've got one of those punch card (I think) file cabinets and I love mine. Wish I had another.
if you notice the cabinet on the left... the top 2 drawers were the punch card size.... the other 3 are full size, and it's actually working nice.... I can toss in some of my "bagged tool kits" like the rivet gun and riv-nut tool (each in their own bag with the rivets/nuts in organizers) I jumped on that one on the right when someone posted it for free.... Hell yeah I'll drive 35 mins one way to get it!!! the one on the left was $20.... All the other cabinets that style are at least $100 and a 2-6 hour drive one way from me.
 
Sadly a neighbor up the road passed away a couple months ago and I've been trying to help his wife clear out his shop. His son and son-in-law took some stuff but she's struggling to decide what to keep and what to get rid of, etc. So yesterday I helped take down a bunch of the shelves and racks he had screwed into the walls, patched the holes and swept the floor for half the shop. So today, I needed to detour from the projects and find ways to store and put away some of the stuff she gave me. Made a second rack for clamps and put it one of the last two places I have for clamps. Took apart some jigs to salvage the T rack, knobs and stuff.

clamps.webp
 
I added a drain extension to my air compressor. Was going to just add a galvanized elbow & nipple, but ran across this https://www.amazon.com/dp/B08B5NFQH5?ref=ppx_yo2ov_dt_b_product_details&th=1 for about the same money (with no trip to the hardware store). 10 minutes and i was done--should have done it years ago. While i was at it, i ran an air line to near the lathe so i wouldn't have to snake the line from the reel over the top of the table saw and tool boxes.

With the drain extension i'll use the compressor a LOT more since i won't have to get on my knees when i'm done. Dropping an air hose by the lathe will be much better than using a straw to blow out forms. Compressor had 2 outlets, and i'd picked up a Gorilla hose several years ago to do that with--and had the fittings already--so easy-peasy!!
 
Washington is making more smokers and I’m in-charge of the painting. Promised to have this painted yesterday but remember my promise late last night. Got in the shop early today.

IMG_8517.webp
 
Back to projects today. Trimmed the Khun Phan game boxes to the desired size, made the rest of the needed blocks, and made the finger depressions in the blocks. Also got the tower glued to the keeper's house on my lighthouse / music box project. Next up is making the roof.
It was so windy outside today I hardly needed to vacuum any dust off the equipment before I put it away. Of course, that same wind probably blew part of that sawdust right into my garage so I'll still have to clean it up one way or the other. There's no free lunch.

four more almost ready.webp

buildings glued up.webp
 
Really like that game you make! How did you make the finger depressions in the blocks? Chuck
I think Greg ( @woodtickgreg ) and I had this discussion earlier. I use a 1/2" round over bit ( or is it a bull nose bit?) for my router but mount it in my drill press. Greg mentioned he's done that but got some burning or chip outs, can't remember. So far I haven't had any issues but this is a nearly new bit so pretty sharp. The depressions I make are maybe 5/16" - 3/8" diameter so I'm not digging in far, use light cuts, and I just touch and go with the drill press. I do find the bit starts to chatter a little at the deepest point so that's where I stop. Main thing is to get them centered and uniform. This time because I had so many to do I clamped a fence on my drill press table to center the hole lengthwise (all the blocks are 15/16" wide) and then clamped a second stop to center the hole in the little square blocks. For the longer blocks and the bigger square block, I just flip them around, squared into the fence and stop.

Edit: I thought about this a little while I was reading the comics in today's paper (the educational section). These little depressions are just to give one's fingers a better grip when sliding the blocks around. I don't see why you couldn't use a regular drill bit and just make a divot. Or even just make a couple saw kerf cuts across each block, or set up your router table with a very shallow bit and run the blocks across that. Anything that provides a little edge for your fingers to catch on while you're sliding the blocks around would work. Just make them uniform.
 
Last edited:
I added a drain extension to my air compressor. Was going to just add a galvanized elbow & nipple, but ran across this https://www.amazon.com/dp/B08B5NFQH5?ref=ppx_yo2ov_dt_b_product_details&th=1 for about the same money (with no trip to the hardware store). 10 minutes and i was done--should have done it years ago. While i was at it, i ran an air line to near the lathe so i wouldn't have to snake the line from the reel over the top of the table saw and tool boxes.

With the drain extension i'll use the compressor a LOT more since i won't have to get on my knees when i'm done. Dropping an air hose by the lathe will be much better than using a straw to blow out forms. Compressor had 2 outlets, and i'd picked up a Gorilla hose several years ago to do that with--and had the fittings already--so easy-peasy!!
I didn’t realize these were made! I’ll have to get one! Chuck
 
Back
Top