
What did you do in your shop today?

Gorgeous. I like how it goes from that golden brownish into the darker chocolatey feather and then into the reddish color. Quite the span of color and patterns in a single piece.

Only 94F today and was a little bored. So I decided to start a new project. Check it out! I changed the blade on my band saw, re-set up the blocks and stops, blade tension, etc. and re-sawed a block of myrtle that Gary Schuler sold me a couple years ago (the set closest to the blade; the others were already cut to shape and just needed a touch of sanding). And no blood was drawn. And the blank only required a little sanding to get a nice snug fit in my pattern jig! The blade was about an inch wide and 4 TPI so a fair bit of re-set up was needed. I AM A WOODWORKER NOW! Well, that's an over assessment but I'm stoked I used my bandsaw for what I hoped to use it for. Myrtle is pretty hard wood.
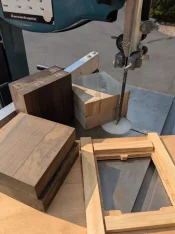
ebony and myrtle blanks ready to nill.jpg
 
Last edited:
Got the myrtle box roughed out. Tried a slightly different method this time. I cored out 90% of the inside of the box halves using a 1" Forstner bit in my drill press. That myrtle is hard wood and my drill press would bog down nearly every stroke of the wheel. Hope I didn't burn out the motor on my drill press. And then I used my router with a spiral downcut bit to clean up the rest. Made it easier on my router I guess. Two more to go = both are one ebony and one ziricote I got from John ( @TTP GC ) back in March, hopefully not quite as hard, although the ebony set is certainly a heavy set of blanks.

myrtle roughed out.jpg

Got one ebony one done after lunch. Too hard to use the Forstner bit so went with multiple passes with the router. Took 6 passes to route about an inch deep.
myrtle and ebony roughed out.jpg
 
Last edited:
Got the myrtle box roughed out. Tried a slightly different method this time. I cored out 90% of the inside of the box halves using a 1" Forstner bit in my drill press. That myrtle is hard wood and my drill press would bog down nearly every stroke of the wheel. Hope I didn't burn out the motor on my drill press. And then I used my router with a spiral downcut bit to clean up the rest. Made it easier on my router I guess. Two more to go = both are ebony and hopefully not quite as hard, although one is certainly a heavy set of blanks.

View attachment 278261

Got one ebony one done after lunch. Too hard to use the Forstner bit so went with multiple passes with the router. Took 6 passes to route about an inch deep.
View attachment 278263
Those are going to be strikingly gorgeous!
 
JD, glad to read your up and active. If you get bored, I can send you a few other bowls to sand😀
 
JD, glad to read your up and active. If you get bored, I can send you a few other bowls to sand😀
Thanks Pete - it's kind of surprising how many "little projects" I have to keep myself busy! I also "checked-out" (4) wood turning books at the last WCWT Mtg. for some extra reading material. Lacer, Raffan, Jewelry making and another...........Hope all is well out in AZ.
 
Got the myrtle box roughed out. Tried a slightly different method this time. I cored out 90% of the inside of the box halves using a 1" Forstner bit in my drill press. That myrtle is hard wood and my drill press would bog down nearly every stroke of the wheel. Hope I didn't burn out the motor on my drill press. And then I used my router with a spiral downcut bit to clean up the rest. Made it easier on my router I guess. Two more to go = both are one ebony and one ziricote I got from John ( @TTP GC ) back in March, hopefully not quite as hard, although the ebony set is certainly a heavy set of blanks.

View attachment 278261

Got one ebony one done after lunch. Too hard to use the Forstner bit so went with multiple passes with the router. Took 6 passes to route about an inch deep.
View attachment 278263
Very deserving of purdy flies!
 
Recovering from hernia surgery (last Tuesday) but feeling pretty good now and went back in the shop today (I know, no lifting 🙄)

Decided to sand a Walnut bowl that was dry. Also need to finish the foot later today.

The inside is sanded to 120/180 and will go more, but couldn’t resist wetting it up to see the figure and colors. I’m biased, but have been told that northern IL and NE Iowa have some of the best Black Walnut in the country. Has to do with soils and growing climate? Not sure…..and don’t mean to disparage any other growing regions, but is a general comment that’s been mentioned to me over the years.
Anyway - this one is 13” x 4” deep.

View attachment 278211View attachment 278212View attachment 278213
There is just something about walnut crotch that tingles my jingle!! - or is it jingles my tingle?

And that is a gorgeous plate/platter!!
 
Last edited:
Today I had to finally do a little work on my 4200 Bosh Sabre Saw I bought way back in about 1987-88. It for the last year would be cutting really good, and then lose power. The first time it did that, I I reached down the cord to make sure I didn't accidentally unplug it. It started back up, the plug was in solid, so I kept cutting. It happened again and I tweaked the cord. It kept going, so I finished the job continually tweaking the cord. Yesterday it quit and I finally decided to replace the cord. .

This morning, I took it apart. I was extremely surprised how precisely accurate the handle was mounted onto the rest of the saw. Anyway, I found a spot on the cord about 3-4 inches from the handle that flexed pretty easily. Cut the wire about 1" lower, and removed the cord insulation. I then looked at the wire, black and white and found the spot where they would bend at 90 degrees without a curve. I pulled on the white wire and it came apart.

The pics are pretty bad, but they show what I just described above.


IMG_6301.jpeg

I didn't pull on that one, but you can see the 90 degree bend.
IMG_6302.jpeg

Here is what the wire should look like when bending.
IMG_6303.jpeg

Now, when I pull on the trigger, the saw starts and stops when I release the trigger. Kinda like a machine gun. :sofa: Anyway, I indicated above about how precise the handle was made. I think if you were to put a piece of paper between the 2 handle parts, you could not get it back together. It's slight exaggeration, but it's that tight of a fit, and probably why this saw has lasted this long with thousands of hours using it. ............ Nubs
 
Last edited:
Apple box with cover, hackberry dish and two cigar holders. Plus cleaned up a bit and got rid of a few bags of sawdust. Pics in finished section.
 
I'm working on putting in a floor for a friend. It's one of those Home Depot floors that is mdf and snaps together. No nails, no glue or any of the good stuff to keep it down.
I did the bathroom several months ago and really struggled, especially when I got to the last row. I cut it about 3/8" narrower and shorter to get the pieces to be able to snap together. Well, now I needed molding to take care of the gap.
I made 9 pieces 3/4 x 1" x 12' long, and cut the face to a 45 degree angle. Then I had to sand the face. So I had to make a jig for that. I cut 2 pieces at 45 degrees, and then cut a strip from 3/4" ply I had lying around. I then cut them at 6" and spaced them on my table right side. I managed to support 9 feet of molding, then had to turn it around to get the last 3 feet of each piece. What is funny, is it took about 30 minutes to make this, but 8 minutes to sand the 9 pieces of molding.

Here are the pictures.


IMG_6341.webp

The back stop. My top is old beat up particle board, so I just nailed it down with a couple of 1" nails.
IMG_6342.webp

This shows the match up.
IMG_6343.webp

Anyway, now I have a few minutes of firewood when It gets cold. ................ Nubs
 
I bought some small hinges from a outfit called Hinge Outlet - creative name. But they're good solid hinges, 3/4" wide, each leaf is maybe 5/16". So today I got two of the fly boxes hinged up and ready to finish. Still waiting on the toucan discs - I'll decide after I compare both which I'll glue in. I'm going to leave the second ebony box (or maybe it's ziricote?) without any disc in the top. The wood's just too pretty to cover up.

Installing hinges is always a challenge. No matter how precise I try to be, I always end up doing some fine tuning alignment on the belt sander after. I think putting the screws in and the effect of grain in the wood pulls the hinge ever so slightly off kilter. That's my story and I'm sticking to it anyway. I used a 1/16" bit in my Dremel to route the mortises for the hinges this time. I think that helped. Still need to install magnets too.

myrtle and ebony hinged up.jpg
 
Last edited:
Got home from 2 weeks away midnight Thursday night, feeling like crud as I really caught something on the way home, but excited to get the last part onto the Cherokee’s rear spring fix. Saturday finally had the energy to climb under it and got the new rear shackles installed, springs hooked up, and axle bolted in. Great feeling and learning experience…..which I will either forget or never do again. That’s okay, not the first one time lessons, won’t be the last.

Oh, one more lesson. Either the springs i ordered have a lot more arch than advertised or some other factor. Stock shocks are 3 and a half inches short…
got my lift after all.
 
Still not much time in the shop, but have managed a few minutes here and there to work. Lathe work is done, but many hours to go before it is finished.

Going to be the largest illusion I've done, but needed the extra rows for the design. Cherry, finished at 11.5".

Got to give a shout out to Jerry @Nubsnstubs . This is how I finish bottoms of many things. TSS to finish cutting and sanding the bottom. It's just pushed up against a piece of MDF on a faceplate. Much more "civilized" than those I see on YouTube using a chisel to carve off the center nub and then grinding away with a sander.

PXL_20250917_212954421.webp

Mix of LED lights and natural lights resulted in weird shadow bands on this pic. Color is actually uniform across the piece.

PXL_20250917_213614339.webp
 
Back
Top