I got my garlic orders about a month ago and yesterday I opened them up to find a note inside "Remove from Packaging". Whoops. Don't think it hurt them though; they were kept cool/dry. My concern with the instructions is you need a bed 12" deep (one said 16"). I'm using a front tine tiller and am getting down about 6" - 8" with it. Tilling in lots of compost, too. Do you really need a bed that deep if the garlic is to be planted only 3" deep?

You are using an out of date browser. It may not display this or other websites correctly.
You should upgrade or use an alternative browser.
You should upgrade or use an alternative browser.
What's Growing in the Garden
- Thread starter trc65
- Start date

As a kid, I grew mine in 6 inches of soil under a chokecherry bush and did fine.I got my garlic orders about a month ago and yesterday I opened them up to find a note inside "Remove from Packaging". Whoops. Don't think it hurt them though; they were kept cool/dry. My concern with the instructions is you need a bed 12" deep (one said 16"). I'm using a front tine tiller and am getting down about 6" - 8" with it. Tilling in lots of compost, too. Do you really need a bed that deep if the garlic is to be planted only 3" deep?

- Thread Starter Thread Starter
- #2,723
You'll be fine. When they are talking beds, a lot of times, commercially they will create raised beds 18" wide or more. They really aren't raised much, they just have a furrow between them that makes them look raised.I got my garlic orders about a month ago and yesterday I opened them up to find a note inside "Remove from Packaging". Whoops. Don't think it hurt them though; they were kept cool/dry. My concern with the instructions is you need a bed 12" deep (one said 16"). I'm using a front tine tiller and am getting down about 6" - 8" with it. Tilling in lots of compost, too. Do you really need a bed that deep if the garlic is to be planted only 3" deep?
6-8" of tillage is fine, you really can't go much deeper with a walk behind tiller. That's all I do as well.
Actually, you can. On the other end of my depth stake I welded a cultivator tine (triangular type). I flip the depth stake around and let the front of the tiller set in one place and dig in. The tiller really angles down. I don't do it much because the tiller works harder, but it's great when working in the compost.You'll be fine. When they are talking beds, a lot of times, commercially they will create raised beds 18" wide or more. They really aren't raised much, they just have a furrow between them that makes them look raised.
6-8" of tillage is fine, you really can't go much deeper with a walk behind tiller. That's all I do as well.

My garlic order is arriving tomorrow……but I’m more giddy about these. The animals left me 24 this year. I did bag up most - maybe that helped. Since my wife is having a surgery tomorrow, she won’t be able to eat them quickly. Gotta find how to freeze the pulp-or recipes to make. Japanese Persommons. Much hardier than I thought.i think they let me have three not quite ripe figs, but no pears, blueberries, or apples.
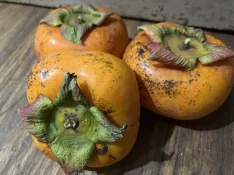

Nice looking Persimmons. Sad that the little varmints steal most of your fruit! Hope your wife’s surgery goes well. ChuckMy garlic order is arriving tomorrow……but I’m more giddy about these. The animals left me 24 this year. I did bag up most - maybe that helped. Since my wife is having a surgery tomorrow, she won’t be able to eat them quickly. Gotta find how to freeze the pulp-or recipes to make. Japanese Persommons. Much hardier than I thought.i think they let me have three not quite ripe figs, but no pears, blueberries, or apples.
View attachment 281013

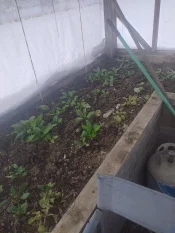
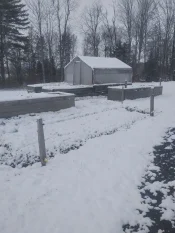
The garlic is in and mulched, I also mulched the everbearing strawberries. I thought the strawberries would never stop making blossoms, we harvested a few almost daily most of August though October. I also mulched a raised bed full of fall spinach, it's a variety that can over winter. I have a little more of it in the greenhouse, I'm not sure if I will try to harvest a small meal or just mulch it for the winter.
 pm
 pm
Its always fun when the hospital loses where a patient is in recovery! I'm holding my tongue and controlling my temper!My garlic order is arriving tomorrow……but I’m more giddy about these. The animals left me 24 this year. I did bag up most - maybe that helped. Since my wife is having a surgery tomorrow, she won’t be able to eat them quickly. Gotta find how to freeze the pulp-or recipes to make. Japanese Persommons. Much hardier than I thought.i think they let me have three not quite ripe figs, but no pears, blueberries, or apples.
View attachment 281013
- Thread Starter Thread Starter
- #2,729
Just now got my garlic planted. Was too dry, then too wet, then too cold. Today was just right!
Armenian, Carpathian and Chesnok Reds for sure. The fourth of variety was supposed to be Spanish roja, but definitely wasn't when I broke the cloves apart. It looked more like Armenian or Carpathian. I think what I did a year ago was drop the Spanish roja and plant more of the first two. Don't remember and didn't write it down. If that's the case really going to have a lot of the "porcelain" types.
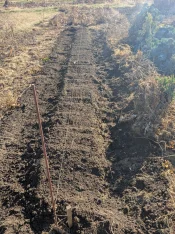
The bed ready for planting. I do a double row 6-8" apart and 4-5" in row spacing.
This is the variety that was labeled Spanish Roja. They are definitely not. Roja doesn't form those fat cloves, but rather are long and skinnier. Roja typically has 15-20 cloves, and these only had 6-8. Definitely a porcelain type, but don't know which one. Doesn't really matter, I like these big cloves.
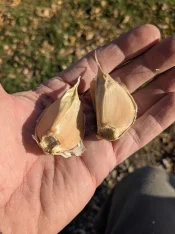
Armenian, Carpathian and Chesnok Reds for sure. The fourth of variety was supposed to be Spanish roja, but definitely wasn't when I broke the cloves apart. It looked more like Armenian or Carpathian. I think what I did a year ago was drop the Spanish roja and plant more of the first two. Don't remember and didn't write it down. If that's the case really going to have a lot of the "porcelain" types.
The bed ready for planting. I do a double row 6-8" apart and 4-5" in row spacing.
This is the variety that was labeled Spanish Roja. They are definitely not. Roja doesn't form those fat cloves, but rather are long and skinnier. Roja typically has 15-20 cloves, and these only had 6-8. Definitely a porcelain type, but don't know which one. Doesn't really matter, I like these big cloves.
Been busy last couple of days cleaning up the garden for next year. Dug up a pitiful yield of potatoes. I laid out a patch for my garlic and decided to amend the soil. Deep tilled the potato row and worked in compost there too (last row down hill). I worked in over 2 drums of compost in this area. Really nice loamy soil now (I hope). We'll see how good it is in the Spring.
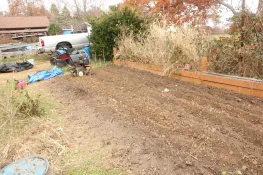
I ran out of steam today so planting will have to wait until tomorrow. I didn't realize how many cloves I had to plant so I worked up a bigger section than I needed. Originally, I was going to space the rows 16" apart so I could get my mini tiller in between. Decided to cut that in half. The extra room now will be used for onions or peppers.
Scattered showers tonight, so I covered up the area with tarps.
P.S. I read through Stark Bros. guide and they suggest fertilizing the row at a depth of 8" (below the cloves) with a high Nitrogen fertilizer at a rate of 1/2 cup per 10 lineal feet. Doesn't sound too heavy. I only have 12-12-12 on hand. Will that work?
I ran out of steam today so planting will have to wait until tomorrow. I didn't realize how many cloves I had to plant so I worked up a bigger section than I needed. Originally, I was going to space the rows 16" apart so I could get my mini tiller in between. Decided to cut that in half. The extra room now will be used for onions or peppers.
Scattered showers tonight, so I covered up the area with tarps.
P.S. I read through Stark Bros. guide and they suggest fertilizing the row at a depth of 8" (below the cloves) with a high Nitrogen fertilizer at a rate of 1/2 cup per 10 lineal feet. Doesn't sound too heavy. I only have 12-12-12 on hand. Will that work?
Last edited:
- Thread Starter Thread Starter
- #2,732
Yeah, I use 13-13-13 at planting and then side dress with urea (46% N) about a week after emergence and then again about 3 weeks later. I'll look up/calculate some rates for you with a couple of options, starting with the 12-12-12 you have.
- Thread Starter Thread Starter
- #2,733
Ok, here's the scoop on garlic. It likes a ready supply of nitrogen, particularly in the spring when it starts growing.
Many sites list 150-175# actual nitrogen for garlic. May seem high, but onions and garlic like having more N available that they will necessarily use.
What I do: I till in 13-13-13 at planting at a rate of 16 oz per 20 ft of row. That provides about 100# of actual N per acre. At about 6" height in the spring I then apply about 2 oz of urea (46%N) per 20 ft of row (40# actual N/acre). I repeat that about 3 weeks later. Urea needs to be either physically incorporated or watered in to prevent volatilization.
Your options: 1. apply all nitrogen during tillage pre plant. That would be 27 oz of 12-12-12 per 20 ft of row.
2. Split the fertility, apply half preplant, 14 oz 12-12-12.
Apply the second half at about 6" height in spring using urea at about 3.5oz/20 ft of row. Or use ammonium sulfate in spring at a rate of 8oz/20 ft of row. Urea needs to be watered or incorporated, ammonium sulfate does not.
3. Do it in thirds. 9 oz 12-12-12 /20 ft of row pre plant. In spring at 6" growth, 2.4 oz urea/20 ft row, repeat 3 weeks later. Or ammonium sulfate at 5 oz/20 ft of row, repeat 3 wks later.
Some notes. All rates are rounded, precision isn't critical. My rate comes out to about 180# actual N per acre, I used 150# for yours as you already have compost down.
I don't use 13-13-13 to side dress in the spring as part of the nitrogen is slow release and won't be immediately available. If you don't want to mess with side dressing in the spring, no big deal, till it all in before planting.
All the amounts are calculated per 20 ft of row. Just a nice easy number that can be calculated easily to your row length.
A note on weighing fertilizer. I used to weigh everything out, but that really is a waste of time. Most fertilizers are close enough that weight equals volume. In other words 8 oz weight is close enough to 8 oz volume that it's not going to matter for the garden. If you were fertilizing 100 acres it would be a little different. I use a quart jar and a one cup measure and estimate anything that isn't exact.
Final note:
urea = 46% N
Ammonium sulfate = 21% N
Ammonium nitrate = 34% N
Edit, just in case anybody is wondering, I calculate all my (these) rates on a 3 ft row spacing. That is about what I till for rows and the spacing I use between rows. The only exception is I use 30" row spacing for corn.
Many sites list 150-175# actual nitrogen for garlic. May seem high, but onions and garlic like having more N available that they will necessarily use.
What I do: I till in 13-13-13 at planting at a rate of 16 oz per 20 ft of row. That provides about 100# of actual N per acre. At about 6" height in the spring I then apply about 2 oz of urea (46%N) per 20 ft of row (40# actual N/acre). I repeat that about 3 weeks later. Urea needs to be either physically incorporated or watered in to prevent volatilization.
Your options: 1. apply all nitrogen during tillage pre plant. That would be 27 oz of 12-12-12 per 20 ft of row.
2. Split the fertility, apply half preplant, 14 oz 12-12-12.
Apply the second half at about 6" height in spring using urea at about 3.5oz/20 ft of row. Or use ammonium sulfate in spring at a rate of 8oz/20 ft of row. Urea needs to be watered or incorporated, ammonium sulfate does not.
3. Do it in thirds. 9 oz 12-12-12 /20 ft of row pre plant. In spring at 6" growth, 2.4 oz urea/20 ft row, repeat 3 weeks later. Or ammonium sulfate at 5 oz/20 ft of row, repeat 3 wks later.
Some notes. All rates are rounded, precision isn't critical. My rate comes out to about 180# actual N per acre, I used 150# for yours as you already have compost down.
I don't use 13-13-13 to side dress in the spring as part of the nitrogen is slow release and won't be immediately available. If you don't want to mess with side dressing in the spring, no big deal, till it all in before planting.
All the amounts are calculated per 20 ft of row. Just a nice easy number that can be calculated easily to your row length.
A note on weighing fertilizer. I used to weigh everything out, but that really is a waste of time. Most fertilizers are close enough that weight equals volume. In other words 8 oz weight is close enough to 8 oz volume that it's not going to matter for the garden. If you were fertilizing 100 acres it would be a little different. I use a quart jar and a one cup measure and estimate anything that isn't exact.
Final note:
urea = 46% N
Ammonium sulfate = 21% N
Ammonium nitrate = 34% N
Edit, just in case anybody is wondering, I calculate all my (these) rates on a 3 ft row spacing. That is about what I till for rows and the spacing I use between rows. The only exception is I use 30" row spacing for corn.
Last edited:
Amazing answer @trc65. I didn't mean for you to do all the research; I was just looking for a Yes or No. But thanks, very useful. Here's an excerpt from Start's fertilizing directions:
After you amend the soil and dig your trench/patch, evenly sprinkle 1/2 cup of balanced fertilizer that is slightly nitrogen-heavy for every 10 linear feet of soil. (Nitrogen is the first number on the fertilizer package. Choose a brand with a first number that’s higher than the other two, like 15-10-5 or 20-10-10.)
Add back enough soil to create the correct planting depth (as described in the How Deep To Plant section of the Planting article).
Once your soil is properly prepared, you are ready to plant!
Do you really need to dig deep, then fertilize, back fill and then plant? Or just work the fertilizer in, trench a 3" deep row, plant and back fill as you described? Easier method.
We got about 1/2" of rain last night. The tarps did their job for the most part. Supposed to be low 70s. With any luck I'll be planting later today after it dries out a little.
Can wood chip mulch be used or is straw preferred? No watering today, I'll let Mother Nature do the work tomorrow night (showers).
Thanks
Fertilizer First!
Garlic grows best when fertilizer is added into the planting hole before planting, vs. being sprinkled on top of the soil after planting.After you amend the soil and dig your trench/patch, evenly sprinkle 1/2 cup of balanced fertilizer that is slightly nitrogen-heavy for every 10 linear feet of soil. (Nitrogen is the first number on the fertilizer package. Choose a brand with a first number that’s higher than the other two, like 15-10-5 or 20-10-10.)
Add back enough soil to create the correct planting depth (as described in the How Deep To Plant section of the Planting article).
Once your soil is properly prepared, you are ready to plant!
Do you really need to dig deep, then fertilize, back fill and then plant? Or just work the fertilizer in, trench a 3" deep row, plant and back fill as you described? Easier method.
We got about 1/2" of rain last night. The tarps did their job for the most part. Supposed to be low 70s. With any luck I'll be planting later today after it dries out a little.
Can wood chip mulch be used or is straw preferred? No watering today, I'll let Mother Nature do the work tomorrow night (showers).
Thanks
Last edited:
Got my garlic in the ground this weekend. Forgot to take pics, but if I get home before dark I will take one. Might not have done right, but mixed in some compost about 2 years old, and dug in 10 10 10. Then planted bulbs and sprinkled some 13 13 13 on surface. From Keene - Elephant, Korean Red, Shandond, and Imperfect. Coulda bought all the garlic I need for 2 years for what I paid, but will be fun to grow and try out. I ordered late, and basically most of the varieties they had left. Let's just hope that the squirrels, voles, moles, mice, racoons, etc.... don't dig them up and want some garlic with their pasta!
Wife was feeling well enough yesterday to process the japanese persimmons. They were real soft and scooped out the pulp. Nuked it for a few minutes and then mixed it up. When cool it had set up and tastes real good. Then we put the peelings and pulp still on the peelings through a Ninja blender. Amazing how well it tastes! As these are Fuyu type, the skins are only slightly tannic. Persimmon bread on the menu for Thanksgiving Dinner!
Wife was feeling well enough yesterday to process the japanese persimmons. They were real soft and scooped out the pulp. Nuked it for a few minutes and then mixed it up. When cool it had set up and tastes real good. Then we put the peelings and pulp still on the peelings through a Ninja blender. Amazing how well it tastes! As these are Fuyu type, the skins are only slightly tannic. Persimmon bread on the menu for Thanksgiving Dinner!
Last edited:
Same here with the garlic. I bought from 2 sources and I too could have bought enough from the store to last me quite a while. But with all the talk here about garlic, I wanted to try it also.Got my garlic in the ground this weekend. Forgot to take pics, but if I get home before dark I will take one. Might not have done right, but mixed in some compost about 2 years old, and dug in 10 10 10. Then planted bulbs and sprinkled some 13 13 13 on surface. From Keene - Elephant, Korean Red, Shandond, and Imperfect. Coulda bought all the garlic I need for 2 years for what I paid, but will be fun to grow and try out. I ordered late, and basically most of the varieties they had left.
Wife was feeling well enough yesterday to process the japanese persimmons. They were real soft and scooped out the pulp. Nuked it for a few minutes and then mixed it up. When cool it had set up and tastes real good. Then we put the peelings and pulp still on the peelings through a Ninja blender. Amazing how well it tastes! As these are Fuyu type, the skins are only slightly tannic. Persimmon bread on the menu for Thanksgiving Dinner!
I was out a couple a days ago and ran across two small persimmon trees loaded with fruit. Out in the wild so I don't know what variety. Picked on and tried it. OOH mistake. I was wondering if you could pick a bunch, let them ripen and then make jam kind of like you described? Or would they just rot?
Those are likely the native persimmons. They are tasty when they are very ripe - meaning soft and squishy (like my stomach and love handles), after a frost, and probably best picking them up off the ground. Before that, they can be kinda tannic and puckery - an understatement! And yes I have had them ripen off the tree. Might be best to put them in a paper bag with and apple or banana (they release ethylene gas that helps ripening) for a week or three. After that yep, pulp them - but not much pulp per fruit - they are usually small and full of seeds. Might try the skins the same we did with the Jap persimmons, but never done them before. The pulp freezes well, and can also freeze the whole fruit I've heard.Same here with the garlic. I bought from 2 sources and I too could have bought enough from the store to last me quite a while. But with all the talk here about garlic, I wanted to try it also.
I was out a couple a days ago and ran across two small persimmon trees loaded with fruit. Out in the wild so I don't know what variety. Picked on and tried it. OOH mistake. I was wondering if you could pick a bunch, let them ripen and then make jam kind of like you described? Or would they just rot?
- Thread Starter Thread Starter
- #2,738
Starting with bare untilled soil, I sprinkle the fertilizer in a thin line down the center of the row. Till it in, rake it a little to bring the soil back to the center and remove clods and plant. To plant, I just use my fingers to make a hole and drop the clove in. Rake over the row to close holes.Amazing answer @trc65. I didn't mean for you to do all the research; I was just looking for a Yes or No. But thanks, very useful. Here's an excerpt from Start's fertilizing directions:
Fertilizer First!
Garlic grows best when fertilizer is added into the planting hole before planting, vs. being sprinkled on top of the soil after planting.
After you amend the soil and dig your trench/patch, evenly sprinkle 1/2 cup of balanced fertilizer that is slightly nitrogen-heavy for every 10 linear feet of soil. (Nitrogen is the first number on the fertilizer package. Choose a brand with a first number that’s higher than the other two, like 15-10-5 or 20-10-10.)
Add back enough soil to create the correct planting depth (as described in the How Deep To Plant section of the Planting article).
Once your soil is properly prepared, you are ready to plant!
Do you really need to dig deep, then fertilize, back fill and then plant? Or just work the fertilizer in, trench a 3" deep row, plant and back fill as you described? Easier method.
We got about 1/2" of rain last night. The tarps did their job for the most part. Supposed to be low 70s. With any luck I'll be planting later today after it dries out a little.
Can wood chip mulch be used or is straw preferred? No watering today, I'll let Mother Nature do the work tomorrow night (showers).
Thanks
I don't use mulch anymore, haven't seen any benefit. In the past I just used raked leaves.
You can mulch with just about anything, but if you are going to side dress N in the spring, think about your methodology. Too much mulch can tie up surface applied N, and you might need to rake some of it away before fertilizing in spring.
I'm going to buy some urea and side dress in the spring. So, I'll leave it bare. ThanksStarting with bare untilled soil, I sprinkle the fertilizer in a thin line down the center of the row. Till it in, rake it a little to bring the soil back to the center and remove clods and plant. To plant, I just use my fingers to make a hole and drop the clove in. Rake over the row to close holes.
I don't use mulch anymore, haven't seen any benefit. In the past I just used raked leaves.
You can mulch with just about anything, but if you are going to side dress N in the spring, think about your methodology. Too much mulch can tie up surface applied N, and you might need to rake some of it away before fertilizing in spring.
Gonna have to look for some urea. Never seen it in the stores - maybe a farm store. Until now, the only urea I know about is what you get when you unzip your wranglers!
Last edited: