42" Chainsaw mill Build

  • Thread Starter Thread Starter
  • #61
Made a little progress today. After spinning our wheels for most of the morning searching for a machine shop in our area capable of cutting a key way in the jack shaft we finally found one in Sequin, TX. So we drove the 35 miles to Seguin and paid 28 bucks and some change to have a 6" x 1/4" keyway cut. Dude busted a perfectly good HSS endmill trying to cut it the first time. So he swapped over to a carbide bit and even then it was a chore. Big bridgeport milling machine and my little 1" hardened steel jackshaft almost broke the second mill bit. Hmmm. Then we tried to cut it down to size with his big band saw. Didn't scratch it. He looked at me and asked, "What kind of steel is this?" To which I replied, "I dunno. Got it cheap off of Amazon. So I guess it's cheap steel." To which he just groaned. Couldn't cut it to length so I told him I'd just do it myself on the chopsaw.

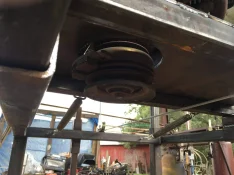
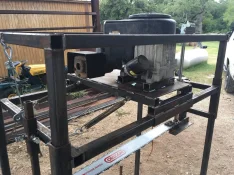
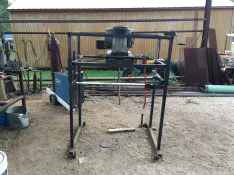
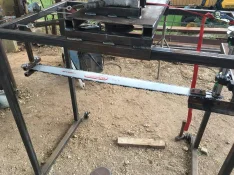
Anyway, got home, installed the shaft and bushings. Then I cut and spliced a 135 drive link rip chain and installed it on the bar and shaft. Then we cut a hole for the drive pulley to fit through on the engine mount. Then we found that with the electric clutch that the pulley sat too low in the carriage and had to add two more pieces of 1 1/2" square tubing to get the right height for the engine pulley. Mounted the engine and then leveled the blade and bar to within eyeball specs and called it a day. Tomorrow we will install the belt, fuel tank, oil tank, battery holder, ignition / instrument panel and hopefully fire this puppy up. Engine size is an 18 hp B&S Vanguard. I think it should do just fine driving the 42 inch bar and chain. All in all I am liking what I am seeing as this little build progresses. I am hopeful to mill some wood by the weekend.
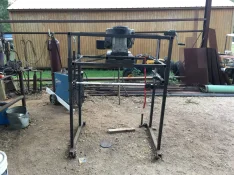
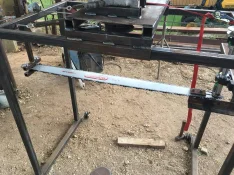
IMG_2527.webp IMG_2528.webp IMG_2529.webp IMG_2530.webp

IMG_2527.webp

IMG_2528.webp
 
Does the carriage go up and down better now with the weight of the engine on it?
 
  • Thread Starter Thread Starter
  • #64
It's the nitpickin details of getting this engine going that has me a little frazzled today. My buddy Don was unavailable so Mary helped me remove the wiring harness and various switches and controls from the donor riding mower. Then I pulled the electronic float solenoid from the carb bowl and got it ungummed and hopefully working today. I hate the way alcohol ruins everything it touches. Anyway, got the float solenoid put back on, carb re-installed, then welded the control panel on the back side of the carriage. The ignition solenoid was fried. So that's going to be replaced tomorrow and then we'll mount the gas tank, oil tank and associated lines and Lord willing have the engine running in the next day or so. I am not going to build the track system until I get the engine going. Sure as shooting I'd spend my time pushing it up and down the track making engine noises if I did. So I ain't. And that's that.
IMG_2531.webp
IMG_2533.webp IMG_2534.webp
 
This is an awesome thread Clay, thank you so much for sharing this with us.
 
  • Thread Starter Thread Starter
  • #66
This is an awesome thread Clay, thank you so much for sharing this with us.

Greg, it's an honor and a great privilege for me to be a part of this group. Anything I add to help falls well short of what I have learned here. Besides. We ain't cutting wood yet. It may end up being a massive failure. We'll see.
 
  • Thread Starter Thread Starter
  • #67
We quit a few minutes ago to come in and take a break. The time was around 2:30 pm. As I walked in the house I chanced a look at the thermometer mounted under the canopy by the door. 109 degrees. Folks, it's hot.

Got the belt installed today. Good tension with the two trampoline springs and about 2 1/2 inches of adjustment if it stretches any. Mounted the throttle control permanently with a couple of 1/4 -20 bolts. And I cut out for the clutch switch and mounted it in place. Then we cut, built and installed the fuel tank holder and the oil tank holder. The fuel tank came from the snapper lawn tractor that the engine was robbed from. The oil tank is a fuel tank from an old snapper rider. Once those were put in place I plumbed the fuel line and added a fuel shutoff valve in line. Then the wiring harness. I don't have the oil tank plumbed yet but I have the hose to do that with and shouldn't take more than half an hour or so to do that when we go back out later this afternoon to finish. The battery is on charge and will be installed when we go back out this evening. I got the wiring harness hooked up to the best of my ability and my recollection to where all the connectors got. Bought and installed a new starter solenoid. Everything is in place except for the battery. When we go back out I am going to focus on getting the beast started and running. Then, if it runs I will plumb the oil line and tomorrow we'll work on track. I don't figure the track should take more than four or five hours to build.

Until then, it's chill time in the A/C. Did I mention it's hot out there?

IMG_2535.webp
IMG_2536.webp IMG_2537.webp IMG_2538.webp IMG_2539.webp IMG_2540.webp IMG_2541.webp IMG_2542.webp IMG_2543.webp IMG_2544.webp
 
Last edited:
Made a little progress today. After spinning our wheels for most of the morning searching for a machine shop in our area capable of cutting a key way in the jack shaft we finally found one in Sequin, TX. So we drove the 35 miles to Seguin and paid 28 bucks and some change to have a 6" x 1/4" keyway cut.
View attachment 131270 View attachment 131271 View attachment 131268 View attachment 131269

View attachment 131266

View attachment 131267


So the home of the World's Largest Pecan came through for you. Way to go hometown!
 
  • Thread Starter Thread Starter
  • #70
OK. Now I got a question. Which one of you guys is the small engine specialist? I want to get rid of all the un-needed wiring junk on this engine. I installed the battery and turned the switch and nothing happened. OK. Not unexpected. But I was hoping. So I pulled the truck up and ran the jumper cables. Still a big fat nothing. So then I hit the solenoid with the positive jumper cable and the starter spun the engine over. At least the starter works. That's a plus. Now, I need a schematic of drawing of how to hook up the ignition module, the oil sensor (or not), to the switch and starter solenoid and also to put fire to the electric clutch. That's all I want. There are at least 4 maybe 5 safety switches that need to go ASAP. And a couple of loose wires with female spade connectors and one square connector with 4 wires that I have no clue where they go.

AND GO!
 
Two things you need to do, google the model number of the engine for the electrical break down, it will be by model, type, and code on a briggs. then you need to do the same thing for the tractor that it came out of, that will show you the main electrical schematic with all the switches. If the tractor is handy you can test the switches to see if they are normally open, or closed. I would use the oil sensor. You need to get the safety switch thing ironed out first. Switches should be brake, seat, clutch pedal and or gear position/neutral switch, and all of those will be before the clutch switch.
One other thing I noticed, you might want to move the control panel over a bit, opposite of the sawdust discharge side.You will be standing to the side when you are pushing it through the log, I would think you want access to the kill switch etc.
 
  • Thread Starter Thread Starter
  • #72
OK. Thanks Greg. Years ago I took a correspondence course on small engine repair. I was already repairing them on my own and took the course to be able to do a better job on my own equipment. (We had a lawn mowing service back in the 80s that was a side job for us.) Anyway, I can rebuild one in my sleep. It's all the safety switches and wiring that throws me a little. I will look up both numbers. What I intend to do is pretty much just build a new wiring harness that excludes all the switches except for the oil sensor and the clutch. As far as the kill switch, I am probably going to install a deadman switch on the handle that I will install on the right hand side. Just like that big red clutch / pto switch. Push it and the engine dies. The way the thing operates is that the saw dust will be discharged on the right hand side per the blade direction pulling into the drive shaft side. Kinda don't like the idea of the sawdust coming on the same side I"ll be pushing from but after looking at both sides it feels more natural to me to also be pushing from the right side. I dunno. LOL. Might put a handle and kill switch on both sides just for giggles and grins. I also need to put a small guard around the nose of the bar that sticks out of the left side of the bar nose support and allow room for the bar to move outward as the chain slack is removed.
 
  • Thread Starter Thread Starter
  • #73
Talk about a hair ball! I spent several hours last night and a couple this morning chasing down various leads and schematics until I found the right one. Thanks to @rocky1 and @woodtickgreg for the input. Both of you guys were a huge help in finding what I needed to find.

The wiring harness was something of a mess. As they usually are. So I cut all of the plastic coverings and tape and ties to expose all of the wiring. AS I looked at the wiring and the various plugs, switches and solenoids I noticed, after I finally found the right schematic for the mower that the only thing that was different on it was the wiring on the starter switch. There was not a single wire in the right place on the switch plug. Nary a one! That threw me off for a while. It all looked to be standard OEM stuff. I guess I was either wrong or someone had jacked around and pulled all the wires out and didn't get them back in the right spot. It took me all of about 3 minutes to put the right spade in the right hole in the switch plug to get it right. It took me an hour to figure out it was wrong to start with.

Needless to say, I cut all of the safety switches off. I reinstalled the oil sensor, the clutch switch, and new starter solenoid. The original solenoid had to spade tipped wires attached to it so that was the kind of solenoid purchased to replace the burned out one. After a little looking, figuring, and considering, I changed the new one over to a single wire solenoid and then hooked the jumper cables up to the truck (the battery that was supposed to be charged didn't have any life in it at all!). Turned the starter switch and was mildly surprised when the engine turned over. At that point I added gasoline to the tank, checked the oil, turned on the fuel valve, applied ether and fired it up. And it ran. Sorta. Carb will have to be rebuilt. I had hoped that I could just spray some choke cleaner in it and make it work. I was wrong. But the good thing is the durn thing runs!!!

I didn't do it in this video that the wife took, but after I ran it the first time (video) I fired it up again and hit the clutch engage switch and it too worked as advertised!

BOYS AND GIRLS, LADIES AND GENTLEMEN!!! WE HAVE A CHAIN SAW MILL!!!!

I was going to build the track today but I really need to work on my sermon for tomorrow and Bible Class materials!

( I was going to post a video to show the first startup and run. But alas.... I ain't figured out how to do that here. )

Thanks again for all the advice and help gentlemen!!!

- Clay
 
You'll have to post the video to You Tube, then link the You Tube video here Clay. Forum software won't allow the video to upload.

Congrats on getting her all hooked up and fired off!
 
That key switch thing is the typical crap I run into when someone tries to fix it first and really has no clue what they are doing. Then they say hey can you help me get this thing running? I really don't like working on things that someone else tried to fix first. Very cool that you figured out what someone else did, the average person might never have caught that. My experiences with carbs today is that you can clean and rebuild them but they o my work 50% of the time. Price a new one to see what the cost is before you spend money on a rebuild kit. Corrosion is the problem in the aluminum body carbs. At the mower shop I work at we put them in an ultra sonic tank and that helps but it is still 50/50.
 
  • Thread Starter Thread Starter
  • #76
That key switch thing is the typical crap I run into when someone tries to fix it first and really has no clue what they are doing. Then they say hey can you help me get this thing running? I really don't like working on things that someone else tried to fix first. Very cool that you figured out what someone else did, the average person might never have caught that. My experiences with carbs today is that you can clean and rebuild them but they o my work 50% of the time. Price a new one to see what the cost is before you spend money on a rebuild kit. Corrosion is the problem in the aluminum body carbs. At the mower shop I work at we put them in an ultra sonic tank and that helps but it is still 50/50.

Yes sir. Good advice. I will pull it and break it down. Alcohol induced corrosion is a killer on the aluminum. I'll price em and see what they run.
 
Oh yeah... tell me about it!! I'll buy the carb for your mill, if'you'll buy the gearbox for my mower deck!

I've been procrastinating, hoping a used one would show up for a reasonable price, but the only one I've found has the same issues, and he thinks you can fix it for $250. That's why he spent $2200 on a new deck, I'm sure!
 
  • Thread Starter Thread Starter
  • #80
It's Monday evening. In the log book anyway. Not sure what day of the build this is. At this point what I know is that we have a chainsaw mill... sorta. I still need to build the track and the frame on which the track will sit. No big deal there. I think. I've got all the metal for it anyways. The issue at hand now is the carb on this BS engine. No pun intended.... wait, who am I kidding. After considering all the ins and outs of what to do with the carb I decided first of all just to price a new one. That's a no brainer. At 260 dollars and some change for a new carb I think I'll pass. So that left option B. Parts kit and just rebuild it.

Someone tell me. Has everyone in the small engine parts business lost their ever lovin mind?

Get this: One repair kit for an 18 HP BS engine = 148.00 at three different places including the local small engine repair shop and he said he doubted he could even get the parts. Best to just buy the parts I need for the rebuild and not pay for the whole rebuild gasket kit.

So then I say to the guy, "So let's start with the needle and seat. Pretty sure that's gummed up and it's just better to replace it than try to jack with it.

One needle. No seat. Just the needle and keeper spring - 24.00

"I'll have three of whatever your smoking and pass me a couple pills while you're at it."

He laughed. I didn't.

I didn't even bother to ask prices on a new float or bowl gasket.

Got online again after we finished running errands and sure enough...

One needle. No seat. Just a needle with the keeper clip = 24.00

All that took me to about noon. So I had my usual peanut butter banana smoothie. Took a 30 minute power nap. I had a funeral to attend this afternoon at 4. It is about an hour's drive over and another hour back. Ate dinner with the family afterwards.

That leaves us with Plan C and a very Possible Plan D.

Plan C = If I get to feeling better than I do right now, tomorrow I am going to tear the carb down and clean it up, being very careful not to ruin any gaskets if at all possible. And if all is well and the carb looks decent and the parts can be de-gummed I will clean them all up and put it all back together.

Plan D is to find another used engine or good carb.

Plan E is to just go buy a 22 HP Predator Engine from HF for 600 bucks and tell BS where to get off the train.

Can you believe this mess? I just thought the world had gone nuts. I really had no idea just out of whack it was until today.
 
Back
Top