
Rainy day so finished the lathe work today, will oil it next time.





Looking good. If your back area has the concrete as well, you might want to rent or buy a rotary hammer drill. It has an active hammer like a jackhammer. Bores through the harder stuff much faster. I bought my first one after spending a full day melting bits on concrete/mortar in aWell, not so much woodworking in the shop— many nuisance project to do for the house we’re in at present. About 100 yrs old, steps are steep and narrow footings, so had to do something about that— discovered the hardest concrete I’ve ever drilled for the anchors. But Moms happy now!
Back steps are next— will be a larger project, she desires a landing too.
View attachment 273111
View attachment 273112
View attachment 273113
 . Had three times as many holes bored in 2 hours with my rented rotary hammer drill. Owned one the next week.
Good looking steps. The way you did it is fine but I always install the risers before the treads. This method is easier for me and this method allows you to nail or screw the risers into the back of the treads for stronger tighter stairs.Well, not so much woodworking in the shop— many nuisance project to do for the house we’re in at present. About 100 yrs old, steps are steep and narrow footings, so had to do something about that— discovered the hardest concrete I’ve ever drilled for the anchors. But Moms happy now!
Back steps are next— will be a larger project, she desires a landing too.
View attachment 273111
View attachment 273112
View attachment 273113

I DID use a hammer drill….Looking good. If your back area has the concrete as well, you might want to rent or buy a rotary hammer drill. It has an active hammer like a jackhammer. Bores through the harder stuff much faster. I bought my first one after spending a full day melting bits on concrete/mortar in a
Rotary hammer or hammer? That was the difference. The rotary has the active hammer while the drill labeled "hammer" uses your weight and the less pressure we can deliver with our body the slower it goes. So as we age, that darn concrete gets.even.harder.I DID use a hammer drill….

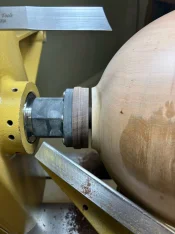
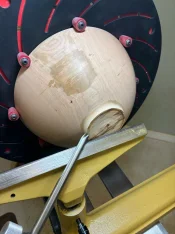
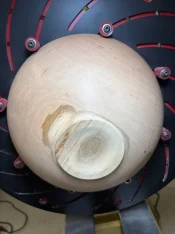
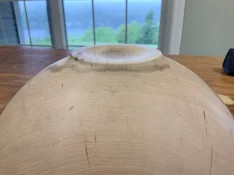
Nice to hear folks using shear scraping techniques. Truly valuable skill for taming some pieces. Looks like a nice bowl coming.Remounted, turned the outside to final shape and removed as much as can from the inside with the tailstock in place. Shear scraped and sanded to 400. Thats it for today.
View attachment 272924View attachment 272926View attachment 272927View attachment 272928
 Some curly grain, can’t wait to get a finish on it.


Excellent!Couple days ago I came across a nice crabapple blank gifted to me by @DKMD and dated 9/11, thank you David! It should be dry by now.
About 5” x 9” rough, shooting for about 7-1/2” tall when done, 7/8” opening.
First time turning crabapple which seems somewhat similar to apple I’ve turned.
Taking my time with this one. Got my carbide hook tools inside and turns nice.
Have some chores to get done now that I have a zero turn Ariens Ikon 52 picked up on sale at Lowe’s. Residential grade but has good features adequate for a couple acres.
View attachment 273116
View attachment 273117


Super kind gesture for you to help out your neighbor. Perhaps you can post a pic when the job is complete. I’m trying to figure out just what you remade. ChuckI've been helping a lady up the road whose husband passed away about two years ago. He installed a short 4x4 post in his front yard to hold the controls for his landscape lighting and stuff. Had a solar light mounted on top and a 14" square roof around it. It was falling apart so she asked me if I could do something with it. It was in such bad shape I had to completely rebuild it. That was a learning exercise in compound angles and all. Lots of "corrections" on the belt sander. Remade the roof section with 5/8"plywood and thin strips of cedar scrounged from the scrap pile when they rebuilt the decks on the condos up the way. Still need to make the ridge caps and I'll run a bead of caulking under those before I attach them. Ted's mounting method was to fix the roof and solar light to a short 6" section of 4x4 and then screw that to the top of the post installed in the yard (photo 2). I'll probably just repeat that. She bought new light to go on top but it mounts on the top of the 4x4 so that'll be the same as the old one also.
She wants it left natural wood but I'll protect it with coats of spar varnish.
View attachment 273321
View attachment 273322

I was taught to put the risers on first for those reasons along with ice reasons. Dad said treads ware out first, so they need to be exposed for easy replacement. If the tread goes under the riser, water follows and ice expands. Not a common southern issue.Good looking steps. The way you did it is fine but I always install the risers before the treads. This method is easier for me and this method allows you to nail or screw the risers into the back of the treads for stronger tighter stairs.
It looks like he used treated lumber, designed to contact the ground. Are they 6" steps I wonder? Many places do not require a handrail for steps 30" high and under. Safety....over-rated.....I would have added stringer decking leveling feet to keep it off the ground when it rain and pours as that area is susceptible to rot. I would have also undercut the bottom riser to keep it off the ground per line 1.
It will look weird, but for safety I also would have added a railing post and handle on the left side and you can easily attach it to the sides of the stringer.


Some of those chips look large. Is there a bigger opening somewhere to vent heat? Does it need to be vented? If not, could you RTV silicone it?Went out to finish turn a bowl for Mom to give to a lady in her neighborhood club. Plugged it the lathe turned it on and nothing.
Flipped it up on end, removed the control box, opened it up, and see this:
View attachment 273363
It was actually worse, it was full before half of it fell out while opening it. Blew it out, saw no scorch marks, so proceeded. Pulled the wires off the switch and rigged a jumper to test and it ran. Pulled switch, blew it out, cleaned the contacts and good to go. Need to set a reminder to clean out the controller once every 7 years or so to prevent it from happening again.
I was concerned when I saw this about the potential of spontaneous combustion around those electrical connections. ChuckSome of those chips look large. Is there a bigger opening somewhere to vent heat? Does it need to be vented? If not, could you RTV silicone it?
Prolonged contact w/ water can lead to rot. I know this for a fact as I had to remove and replace decking and post because of the contact with water, especially if the water sits and it gets soaked.It looks like he used treated lumber, designed to contact the ground. Are they 6" steps I wonder? Many places do not require a handrail for steps 30" high and under. Safety....over-rated.....
It's got rather large vents, along with the aluminum (?) heat sink on the top and back side. It also sits right underneath the leg on the tail stock side. Not the best design IMO, but it's probably exacerbated by sitting in a bench rather than on a set of legs. To be fair, I don't clean as often as I should. However, when you blow off shavings that build up under the left side there is nothing to stop them from going through the vents.Some of those chips look large. Is there a bigger opening somewhere to vent heat? Does it need to be vented? If not, could you RTV silicone it?


