Very interesting. Thank you.That's true, but I often turn these beaded forms ahead of time so I have one handy when a design pops into mind. The turning time is inconsequential compared to the time burning and coloring so I never really think I start one until the first lines are burned. Just a quirk in the way I think about things.....

You are using an out of date browser. It may not display this or other websites correctly.
You should upgrade or use an alternative browser.
You should upgrade or use an alternative browser.
What did you do in your shop today?
- Thread starter woodtickgreg
- Start date
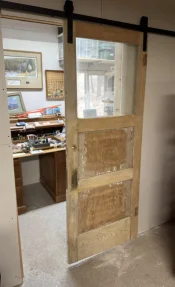
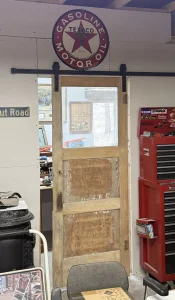
My wife would have wanted the poly applied over the old finish. Says it shows character. Sometimes character can be overdone, methinks.With some heat options in the shop and a ceiling in my fly tying studio, I need a door. Forgot wife and I picked up these old doors, so working on one and I already have the barn door hanging kit. Will worry about finishing later, thinking of just doing polyurethane.
View attachment 282563
View attachment 282564
That is a high quality door judging by the bottom stile there.

The way the paint had chipped on this one nope, didn’t want that type of character. I can picture the idea, just didn’t feel right for this door. Having said that, the belt grinder was too heavy for the thin panels. Will work on those some more to get them looking better.My wife would have wanted the poly applied over the old finish. Says it shows character. Sometimes character can be overdone, methinks.
That is a high quality door judging by the bottom stile there.
I agree with your assessment. Handscraping and Ros are the way to go on those panels. My grandmother used a belt sander on one of those and proved your point is all I will say about the dearly departed.The way the paint had chipped on this one nope, didn’t want that type of character. I can picture the idea, just didn’t feel right for this door. Having said that, the belt grinder was too heavy for the thin panels. Will work on those some more to get them looking better.
Yeah. You can get a carbide scraper for cheap and it will last multiple doors before it has lost it's use.I agree with your assessment. Handscraping and Ros are the way to go on those panels. My grandmother used a belt sander on one of those and proved your point is all I will say about the dearly departed.
I honestly thought this old doo was 36 inches. That’s okay, I will be running a propane heater, itwi require a bit of ventilation. It’s hung and was easy enough to do. Now ready to tackle the one in the master bedroom.
Well stuff happens I guess. You’ll fix it. I believe in you.I honestly thought this old doo was 36 inches. That’s okay, I will be running a propane heater, itwi require a bit of ventilation. It’s hung and was easy enough to do. Now ready to tackle the one in the master bedroom.
View attachment 282569
View attachment 282570

Oops! Been there! Measure once, cut twice I always say. @Tclem taught me that.I honestly thought this old doo was 36 inches. That’s okay, I will be running a propane heater, itwi require a bit of ventilation. It’s hung and was easy enough to do. Now ready to tackle the one in the master bedroom.
View attachment 282569
View attachment 282570

Where do you take all the lead base paint debris? Or do you just put it curbside?With some heat options in the shop and a ceiling in my fly tying studio, I need a door. Forgot wife and I picked up these old doors, so working on one and I already have the barn door hanging kit. Will worry about finishing later, thinking of just doing polyurethane.
View attachment 282563
View attachment 282564

been known to eat itWhere do you take all the lead base paint debris? Or do you just put it curbside?
Gotta say I laughed, as I was tempted to make a similar smart-ass remark.been known to eat it
Easiest fix is to embrace the issue and grab a couple 3 x 1.75 inch pieces of walnut or cherry and a pound of #9 x 4 inch trim screws and edge the door kinda like a picture frame idea without addressing the top and bottom. I did a similar fix on a short door just extended the top and bottom of a pine door with a walnut strip. Everyone thinks it is a custom feature not a "fix"I honestly thought this old doo was 36 inches. That’s okay, I will be running a propane heater, itwi require a bit of ventilation. It’s hung and was easy enough to do. Now ready to tackle the one in the master bedroom.
View attachment 282569
View attachment 282570

I was thinking the same solution as Frank suggests, except I'd use a doweling jig instead of 4" long screws. Since the door rolls in both directions, adding a board to both sides won't look out of place and you don't have to worry about hinges and how it fits in the door frame and all that nonsense.
That’s a cool idea. ThanksEasiest fix is to embrace the issue and grab a couple 3 x 1.75 inch pieces of walnut or cherry and a pound of #9 x 4 inch trim screws and edge the door kinda like a picture frame idea without addressing the top and bottom. I did a similar fix on a short door just extended the top and bottom of a pine door with a walnut strip. Everyone thinks it is a custom feature not a "fix"
i thought first this was a recipe for the lead based paint chipsEasiest fix is to embrace the issue and grab a couple 3 x 1.75 inch pieces of walnut or cherry and a pound of #9 x 4 inch trim screws and edge the door kinda like a picture frame idea without addressing the top and bottom. I did a similar fix on a short door just extended the top and bottom of a pine door with a walnut strip. Everyone thinks it is a custom feature not a "fix"


I actually started this about two weeks ago. It all started with me watching several saw millers slabbing up some Walnut crotches. Their slabs were over 3" thick, and somewhere above the pith, the feather starts to appear. They cut anwhere from 3 -4 more slabs before the feather disappears.
It has always been a question in my mind as to whether you could have someone mill a piece of walnut, get to where the feather starts, rotate the log until it's 90 degrees from the first cut. Start the next cut at about the same amount that was taken before. After that cut is made, rotate the log and do the same, then cut the last cut ending up with a square housing all the feather. Next would be to cut it to fit a lathe, then start turning it. What do you think the surface would start looking like? It's a dream that might just happen this year.
Anyway, I don't have any Walnut crotches yet , so I found a Mulberry, about 8" separating the 2 branches about 4" od each, and the trunk was about 4X6. It was pretty well distributed, so I set it up and started turning.
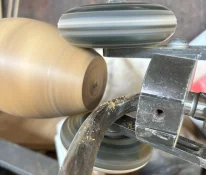
This shows my Nose ring on the live center. I didn't want it to take flight while roughing it.
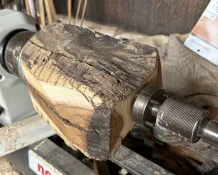
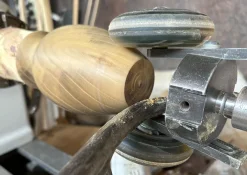
Gotta show the head stock mount. Of course, I'm using my Chuck Plate. Combined with the Nose Ring, you'll never loose any unless you forget to tighten the tail stock.
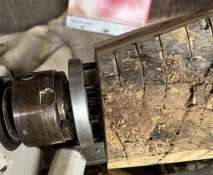
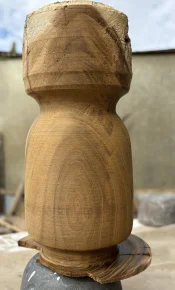
This is side 1. there's not too much to get excited about here.
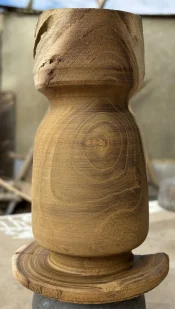
Side 2. Not too much either, but the narrow portion around the neck looks like maybe there is some promise.
I'm done turning and am now sanding it. That about 180 grit. I wend as far as 400.
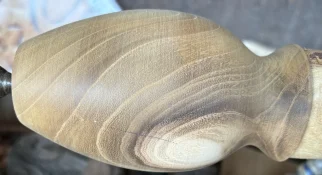
Same as the previous picture except showing a tiny bit of character.
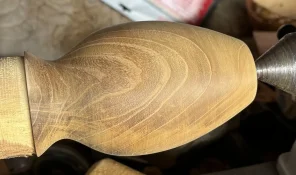
Just removed the tenon. The bottom OD is 1 5/5, 5 1/5 high, and about 3 1/4 round at the widest. The wall thickness varies from 1/4 -5/16".
It's been sanded to 440, steel wooled and Scotch brite polished. Time to clean off the dust and spray it.
Finished pictures next post. ........... Nubs
It has always been a question in my mind as to whether you could have someone mill a piece of walnut, get to where the feather starts, rotate the log until it's 90 degrees from the first cut. Start the next cut at about the same amount that was taken before. After that cut is made, rotate the log and do the same, then cut the last cut ending up with a square housing all the feather. Next would be to cut it to fit a lathe, then start turning it. What do you think the surface would start looking like? It's a dream that might just happen this year.
Anyway, I don't have any Walnut crotches yet , so I found a Mulberry, about 8" separating the 2 branches about 4" od each, and the trunk was about 4X6. It was pretty well distributed, so I set it up and started turning.
This shows my Nose ring on the live center. I didn't want it to take flight while roughing it.
Gotta show the head stock mount. Of course, I'm using my Chuck Plate. Combined with the Nose Ring, you'll never loose any unless you forget to tighten the tail stock.
This is side 1. there's not too much to get excited about here.
Side 2. Not too much either, but the narrow portion around the neck looks like maybe there is some promise.
I'm done turning and am now sanding it. That about 180 grit. I wend as far as 400.
Same as the previous picture except showing a tiny bit of character.
Just removed the tenon. The bottom OD is 1 5/5, 5 1/5 high, and about 3 1/4 round at the widest. The wall thickness varies from 1/4 -5/16".
It's been sanded to 440, steel wooled and Scotch brite polished. Time to clean off the dust and spray it.
Finished pictures next post. ........... Nubs
Well, it's been sprayed, about 10 coats. I was gonna stop at 6, but I noticed there were a bunch of cracks above the sap wood seen in the next picture. I sanded, resprayed and they were still visible. Resanded more area and the cracks vanished. I added another 3 coats to try and hide the 440 grit scratches. I called it quits on spraying this darn thing.
There does look to be some character on both sides, but I'm not impressed. This picture has character around the branch, but
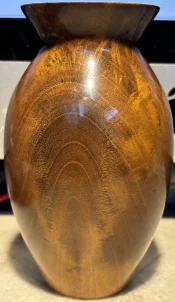
this one only has character on the upper half of the branch.
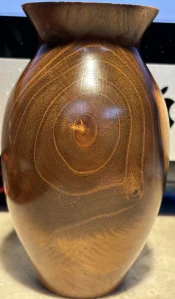
There is a little bit showing on the flare.
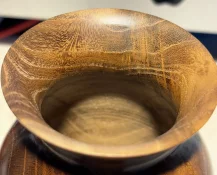
I'm a little disappointed, but is not the wood I wanted to try. It was easy, but it was pretty hard. I've done Mulberry before, but don't remember it being that difficult, especially the inside. Those cracks in the finish are spreading I think, but showing up as strange mark on a supposedly smooth finish. I wait another couple days and take some pictures of that. My hands were clean with the exception of me handling the tank, lacquer, thinner and catalyst and I wiped the pieces between all coats if I did any adjustments to the finish. It's a mystery. .............. Nubs
There does look to be some character on both sides, but I'm not impressed. This picture has character around the branch, but
this one only has character on the upper half of the branch.
There is a little bit showing on the flare.
I'm a little disappointed, but is not the wood I wanted to try. It was easy, but it was pretty hard. I've done Mulberry before, but don't remember it being that difficult, especially the inside. Those cracks in the finish are spreading I think, but showing up as strange mark on a supposedly smooth finish. I wait another couple days and take some pictures of that. My hands were clean with the exception of me handling the tank, lacquer, thinner and catalyst and I wiped the pieces between all coats if I did any adjustments to the finish. It's a mystery. .............. Nubs

May not be spectacular figure, but still cool looking grain and a nice looking piece.
I've done similar to what you are suggesting with walnut, but only with smaller sections, maybe a 6-8" trunk. You do get some nice figure, but with that small a piece, not a lot of feather to begin with. Not cutting away as you suggest, but rather turning the whole trunk/crotch.
I've done similar to what you are suggesting with walnut, but only with smaller sections, maybe a 6-8" trunk. You do get some nice figure, but with that small a piece, not a lot of feather to begin with. Not cutting away as you suggest, but rather turning the whole trunk/crotch.
The crotch trunks were from 24 up to 36" round, maybe larger than that. I'm gonna chek my stash and see if I have anything that large in Walnut crotch. I hope I do so I can try my experiment. Thank for your comment. ........ NubsMay not be spectacular figure, but still cool looking grain and a nice looking piece.
I've done similar to what you are suggesting with walnut, but only with smaller sections, maybe a 6-8" trunk. You do get some nice figure, but with that small a piece, not a lot of feather to begin with. Not cutting away as you suggest, but rather turning the whole trunk/crotch.