
What did you do in your shop today?

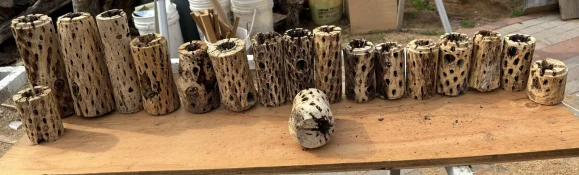
Not today, but yesterday, I set up some Cholla and roughed out 20 pieces. One piece is ly on the ground which I didn't about, and piece #20 is on my jointer with glue drying. IMG_6754.jpeg
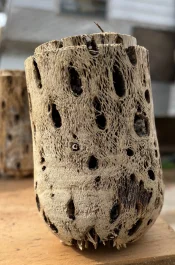
This particular piece almost has a solid bottom. I'll probably fill it with small pieces of Cholla until it's fairly solid.
IMG_6755.jpeg
All pieces shown are Cylindropuntia Fulgida. I have one piece that is Cylindropuntia Versecolor that I'm going to work in about 2 minutes....... Nubs
 
Last edited:
With some heat options in the shop and a ceiling in my fly tying studio, I need a door. Forgot wife and I picked up these old doors, so working on one and I already have the barn door hanging kit. Will worry about finishing later, thinking of just doing polyurethane.

View attachment 282563

View attachment 282564
As somewhat of a safety guy here at work, be sure to wear a good mask. That door is old enough to have lead paint.
 
Here is the Cylindropuntia Versecolor I started on about an hour ago. the pictures do not capture the colors I'm seeing as I hold this piece in my hands. I am surprised as this Cholla has growth rings that first looked a lot like Olive colors and grain. It's too bad it doesn't go all the way around the piece. Anyway, it's shaped and will hog out all of the unnecessary stuff tomorrow.
Top is 2 3/4 od, base is the same, and might be 6" tall. Depends if I try to incorporate the tenon in the shape. If not, 5 5/8" tall.
. IMG_6774.jpeg IMG_6773.jpeg
IMG_6771.webp


.............. Nubs
 
Last edited:
Well, it's been sprayed, about 10 coats. I was gonna stop at 6, but I noticed there were a bunch of cracks above the sap wood seen in the next picture. I sanded, resprayed and they were still visible. Resanded more area and the cracks vanished. I added another 3 coats to try and hide the 440 grit scratches. I called it quits on spraying this darn thing.
There does look to be some character on both sides, but I'm not impressed. This picture has character around the branch, but
View attachment 282875

this one only has character on the upper half of the branch.
View attachment 282876

There is a little bit showing on the flare.
View attachment 282877


I'm a little disappointed, but is not the wood I wanted to try. It was easy, but it was pretty hard. I've done Mulberry before, but don't remember it being that difficult, especially the inside. Those cracks in the finish are spreading I think, but showing up as strange mark on a supposedly smooth finish. I wait another couple days and take some pictures of that. My hands were clean with the exception of me handling the tank, lacquer, thinner and catalyst and I wiped the pieces between all coats if I did any adjustments to the finish. It's a mystery. .............. Nubs
Part of the problem, if I understand what you are after, is your crotch piece is not big enough to display the feather at that diameter. To show feather on a 5 to 6 inch diameter, you will likely need a minimum of 14 inch thickness the narrow way across the crotch. You will need to turn away most of the sapwood before the pattern shows clearly. If you had a 14 inch center and trimmed 3 inches off each side then lay it down and chainsaw 4 inches either side of center, you should be holding the core that you were describing. The feather will show on 2 sides, the other 2 sides will show a cathedral pattern where the 2 branches have grown at an angle away from each other. Depending on the shape and slope of your hollow form, the cathedral pattern will either fade to normal flat sawn appearance or intensify. The feather should be pretty dang awesome when we get to the right tree...
Darn you, now you got me itching to cut one of those out. I could get it in oak tomorrow if I set my mind to it, but Walnut sure is much cooler. Colors show off the figure better in walnut or spalted wood.
 
Here is the Cylindropuntia Versecolor I started on about an hour ago. the pictures do not capture the colors I'm seeing as I hold this piece in my hands. I am surprised as this Cholla has growth rings that first looked a lot like Olive colors and grain. It's too bad it doesn't go all the way around the piece. Anyway, it's shaped and will hog out all of the unnecessary stuff tomorrow.
Top is 2 3/4 od, base is the same, and might be 6" tall. Depends if I try to incorporate the tenon in the shape. If not, 5 5/8" tall.
.View attachment 282905View attachment 282906
View attachment 282909


.............. Nubs
That looks more solid than I would have anticipated! Great piece!
 
Part of the problem, if I understand what you are after, is your crotch piece is not big enough to display the feather at that diameter. To show feather on a 5 to 6 inch diameter, you will likely need a minimum of 14 inch thickness the narrow way across the crotch. You will need to turn away most of the sapwood before the pattern shows clearly. If you had a 14 inch center and trimmed 3 inches off each side then lay it down and chainsaw 4 inches either side of center, you should be holding the core that you were describing. The feather will show on 2 sides, the other 2 sides will show a cathedral pattern where the 2 branches have grown at an angle away from each other. Depending on the shape and slope of your hollow form, the cathedral pattern will either fade to normal flat sawn appearance or intensify. The feather should be pretty dang awesome when we get to the right tree...
Darn you, now you got me itching to cut one of those out. I could get it in oak tomorrow if I set my mind to it, but Walnut sure is much cooler. Colors show off the figure better in walnut or spalted wood.
If it works, I've got two ash crotches and one cherry.
 
Well, it's been sprayed, about 10 coats. I was gonna stop at 6, but I noticed there were a bunch of cracks above the sap wood seen in the next picture. I sanded, resprayed and they were still visible. Resanded more area and the cracks vanished. I added another 3 coats to try and hide the 440 grit scratches. I called it quits on spraying this darn thing.
There does look to be some character on both sides, but I'm not impressed. This picture has character around the branch, but
View attachment 282875

this one only has character on the upper half of the branch.
View attachment 282876

There is a little bit showing on the flare.
View attachment 282877


I'm a little disappointed, but is not the wood I wanted to try. It was easy, but it was pretty hard. I've done Mulberry before, but don't remember it being that difficult, especially the inside. Those cracks in the finish are spreading I think, but showing up as strange mark on a supposedly smooth finish. I wait another couple days and take some pictures of that. My hands were clean with the exception of me handling the tank, lacquer, thinner and catalyst and I wiped the pieces between all coats if I did any adjustments to the finish. It's

Part of the problem, if I understand what you are after, is your crotch piece is not big enough to display the feather at that diameter. To show feather on a 5 to 6 inch diameter, you will likely need a minimum of 14 inch thickness the narrow way across the crotch. You will need to turn away most of the sapwood before the pattern shows clearly. If you had a 14 inch center and trimmed 3 inches off each side then lay it down and chainsaw 4 inches either side of center, you should be holding the core that you were describing. The feather will show on 2 sides, the other 2 sides will show a cathedral pattern where the 2 branches have grown at an angle away from each other. Depending on the shape and slope of your hollow form, the cathedral pattern will either fade to normal flat sawn appearance or intensify. The feather should be pretty dang awesome when we get to the right tree...
Darn you, now you got me itching to cut one of those out. I could get it in oak tomorrow if I set my mind to it, but Walnut sure is much cooler. Colors show off the figure better in walnut or spalted wood.
@Nubsnstubs
I agree with @2feathers Creative Making The feather figure in a piece that small is minimal.

I think it’s “in the chips” when you hollowed it out. Based on my experience a 6” diameter branch with (2) 4” branches on the “Y” is very thin feather figure. Maybe 2”. You need a pretty a substantial branch, Like 12” diameter to build up the thickness you are looking for.

I’m attaching a picture of an approx 10” trunk section of a Mulberry I roughed out about 2 weeks ago. You have to rip them down the middle and enjoy the feather on the bottom of the bowl “most of the time”.

I have taken a spindle blank out of a huge crotch piece and made a vase. I just cut a 4x4 right down the center core of the crotch. I’ll try and find a pic.

IMG_8866.webp
 
@Nubsnstubs
Here are 2 Walnut crotch pieces I cut from the top of the crotch straight down and took a spindle blank out. I don’t particularly care for either form, but I was trying to show feather on multiple sides. Tall one is probably 3” -4” wide and the shorter one is probably closer to5” wide.

IMG_3592.jpeg IMG_3586.jpeg
 
About done with the design on this one. Maybe one more little detail to add - will take another look tomorrow and decide. Otherwise a few hours of burning and it will be done.

PXL_20260106_063143500.webp

PXL_20260106_063233842.webp
 
That one's coming together really nice. Gonna look great with a finish on it. :good2:
 
Warm day for January, so I got after some jobs that got postponed when winter hit after thanksgiving. First is to mix up some more pine tar finish for all the wood handles on shovels, etc. BLO, pine tar and turpentine. Makes the shed smell great for weeks.

PXL_20260106_211326104.webp
 
Warm day for January, so I got after some jobs that got postponed when winter hit after thanksgiving. First is to mix up some more pine tar finish for all the wood handles on shovels, etc. BLO, pine tar and turpentine. Makes the shed smell great for weeks.

View attachment 282967
I’ve not heard of this procedure. Would you please share just what you do, and what it is for. Thanks! Chuck
 
Back
Top