
What did you do in your shop today?

Mother's Day Proto Type 1

I'm going to make our church Mother's Day presents again this year. A suggestion from one of the ladies was a small ring bowl. Just size enough to put their rings in as night on a dresser.

With some scrap Maple, I made this - Not pictured is the bottom- A very small mortise about 1 1/8" and about 1/8" deep. I think I'll be able to mass-produce it. This is 3 3/4" and 1 1/4" My wife thinks I should shoot for 4 1/2".

Any suggestions? I'm thinking of just using some paste wax for a finish... so I can just apply it while it is on the lathe.
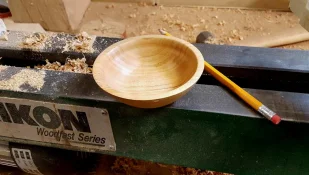
Proto Type 1b.jpg
 
Last edited:
Everybody is going to have a different "ideal" size based on the space they may have available on their dresser. Personally, I think smaller is better, but then I don't wear jewelry. Listen to your wife is my suggestion. Or, don't worry about exact size, but keep them in a range from 3.5" to 4.5" or so.

As to finish, I'd go with an oil finish. Walnut would be easiest and could be applied on the lathe and then set aside to cure. I've never cared for paste wax as a finish as the shine doesn't last and really doesn't do anything for long term protection - not that they would need much. Paste wax give a nice initial appearance, but the shine wears off with time. By using an oil finish, you won't have as much sheen, but they will remain relatively unchanged with time.
 
Well, I took a little time last night and this afternoon to work on some samples. Top left to right: Imbuya, mottled Imbuya, Smokebush burl sunburst, Black and White 1/4 sawn ebony, B & W flatsawn, Birds eye / bear claw Sugar gum with sapwood
Row 2, bottom: 1/4 sawn Imbuya, dark Imbuya, rift cut Apricot, Northern Catalpa burl, N. Catalpa burl sunburst, Tawainese Phoebe

1710024547515.jpeg

I'd like to thank fellow WoodBarter members Byron, Jeff, Jeremy, Rich and Eric in helping me procure the sample blanks.

Second batch, top left to right: CA Sycamore rift cut, CA Sycamore nearly flat cut, Himalayan birch, Himalayan birch 1/4 sawn, Bee-bee Tree 1/4 to rift cut, Pepper tree, Lavelle Cork tree Angel step
Row 2: CA Sycamore 1/4 sawn, Hormingo, Zambian Rosewood, Kirandy, Spalted E. Cottonwood with Angel step, Lavelle Cork tree rift cut with sapwood, Lavelle Cork tree with curl

1710025362661.jpeg

I'd like to thank fellow WoodBarter members Sean and Eric in helping me procure the sample blanks.
 
Last edited:
Continued playing with dry brushing and colors. Tried black - red - white on this piece.

PXL_20240310_060502703.webp

Didn't really like the gradation or the pinkish tone as it got lighter so painted over it with black then green - yellow.

PXL_20240310_062630276.webp

Just an FYI, this is what my " pallette" looks like when done. Start with black and add slight amount of green to it for successive coats until you get to pure green, then start adding yellow to the green until you get to pure yellow for the final coat.

PXL_20240310_062754418.webp

I like the black - green - yellow progression, so now going to start work on the actual piece.
 
Picked up an Oregon chain sharpener late winter, and found an open box deal on their stand for cheap. Put it together, and thought it would be better with an accessory rack. Finally built the rack today, all scrap. Got plenty of pegs around, so the wheels and spare/dull chains will all have a home in one spot. Top will be drilled for hex keys, etc. Cobbled together, but functional.
Chain Sharpener.webp
 
Continued playing with dry brushing and colors. Tried black - red - white on this piece.

View attachment 254389

Didn't really like the gradation or the pinkish tone as it got lighter so painted over it with black then green - yellow.

View attachment 254390

Just an FYI, this is what my " pallette" looks like when done. Start with black and add slight amount of green to it for successive coats until you get to pure green, then start adding yellow to the green until you get to pure yellow for the final coat.

View attachment 254391

I like the black - green - yellow progression, so now going to start work on the actual piece.
Cool Tim!
 
Helped my BIL to complete a coat rack for family member in their first home of their own. Barn wood tough as nails with the smell of lighter knot. 36” lg, 8” high. Used satin lacquer and knocked down a bit.The spikes are some I cut and tapped for him years ago.

IMG_4067.jpeg
 
Last edited:
There is a small leak under the garage door and when the storm comes the wrong way, I get water, So today I squeegee it out today... probably have to do it again tomorrow. UGH!
 
Made a few little pieces and continued playing with texture and paint.

New test piece. Used the point of a cone bit to make these divots.

PXL_20240318_051624828.webp

Next to the larger piece I worked on a few days ago.

PXL_20240318_051835237.webp
 
Have you used that sealer Paul? That may really help with the seep i get under my 16' door. Concrete contractor (in 1996) encouraged a center-floor drain, and i always end up with a puddle in a low spot around the drain. Downside--as the floor warms up in the spring, i get condensation which i sweep out the garage door now--not to mention snow melting from car--so the floor seal would make that tougher.
 
Have you used that sealer Paul? That may really help with the seep i get under my 16' door. Concrete contractor (in 1996) encouraged a center-floor drain, and i always end up with a puddle in a low spot around the drain. Downside--as the floor warms up in the spring, i get condensation which i sweep out the garage door now--not to mention snow melting from car--so the floor seal would make that tougher.
No, I haven't used one; never needed to. I was just aware of them and thought I'd post a link to one on Amazon to be helpful to Jon. There are a LOT of them, with somewhat varying styles. You don't have to put adhesive under them, you could just lay them down and then take them up any time you need to sweep. My problem would more likely be that I'd keep tripping over them :smile:

Also, some of them have a pretty gradual curve on both sides so sweeping stuff over them might not be much of a problem.
 
You know how hard it is when you rent to get your landlord to fix something? It is even harder when it is the Parsonage.
But this would be a temporary fix that is totally and easily removable and it's hardly expensive.
 
No, I haven't used one; never needed to. I was just aware of them and thought I'd post a link to one on Amazon to be helpful to Jon. There are a LOT of them, with somewhat varying styles. You don't have to put adhesive under them, you could just lay them down and then take them up any time you need to sweep. My problem would more likely be that I'd keep tripping over them :smile:

Also, some of them have a pretty gradual curve on both sides so sweeping stuff over them might not be much of a problem.
That's worth a try...i could even fasten one end if i needed to--only get the leaking on one stall of the 16' door.
 
You know how hard it is when you rent to get your landlord to fix something? It is even harder when it is the Parsonage.
Parsonage called at 10:30 am, flooded basement. I was sick. Saw missed call at 6:30pm. Wife and I had basement pumped out and temporary replacement sump pump in place by 8pm. The waiting is the hardest part. Or is it the wading....
 
Back
Top