Work bench build - picture heavy.

  • Thread Starter Thread Starter
  • #82
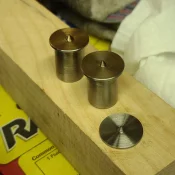
Dowel center transfers are done. Stainless steel.
20231109_170129.webp
Ill be using this milescraft drill guide to drill the holes for the dowels.
20231109_172022.webp
This will be my setup for drilling the holes.
20231109_172110.webp
So it's a good thing other things have kept me out of the shop for a couple weeks. The wood is moving after the glue up.
20231109_172155.webp
It has opened up about an 1/8" on the ends. A run through the jointer will close it back up. I fully expect the only time it will be closed is the day i make it. After that seasonal changes in the shop humidity will cause it to move. Another reason why the top will stay 3 seperate pieces.
20231109_172207.webp
 
  • Thread Starter Thread Starter
  • #83
Short day at work, only 8.5 hours today so I came home and went right down to the shop. I ran all the insides of the sections across the jointer to true them up again. That was a workout, lol.
Then I did some layout to mark for the holes to be drilled. I settled on 5 holes, they space roughly 16" apart.
Drilling point marked and center punched.
20231114_175219.webp
Set the dewalt up on the drill guide.
20231114_175242.webp
Outfeed table comes in handy.
20231114_175253.webp
The drill guide worked great! And the holes are nice and smooth. Kinda surprising with a spade bit.
20231114_175520.webp
With all the holes drilled and blown out with compressed air I set the center transfers in place.
20231114_180839.webp
Here you can see how they sit in the holes.
20231114_180925.webp
Put a couple of clamps on to squeeze the sections together to make the transfers leave their mark.
20231114_181452.webp
Separated the sections.
20231114_181624.webp 20231114_181633.webp
And this is the mark left by the transfers.
20231114_181736.webp
 
  • Thread Starter Thread Starter
  • #84
I drilled the mating holes and blew everything out with compressed air.
Then I cut the 3/4" oak dowels to length and chamfered the ends, 5 3/4" for the 6" holes. This leaves a little room for expansion.
I cut 1 extra. Dowels are never round I find. So they will not go in the holes. They need to be sanded a bit.
20231114_184019.jpg
Off to the lathe for sanding the dowels, used 80 grit cloth backed paper. Didn't take long at all.
20231114_184917.jpg
I test fit all the dowels for a loose fit so I can remove them if I ever have to move the bench top. This thing is going to be super heavy when done. Here the dowels are inserted and I'm ready to close the gap and test the fit.
20231114_185834.jpg
Pretty good match, very slight ridge in a couple places that will be removed when I final sand the top.
20231114_190102.jpg
So these two sections are done as far as fitting goes. Now to do the last section. The dowel idea is working out great.
 
  • Thread Starter Thread Starter
  • #85
Here's today's progress on the bench top.
All the holes are drilled and the dowels all sanded and inserted.
20231115_181919.jpg
And here it is closed up.
20231115_182524.jpg
Did some layout to cut to length.
20231115_184119.jpg 20231115_184136.jpg
Ill be using my Makita 16" beam saw to cut through the 3 1/2" thick top.
20231115_185512.jpg
I clamped a straight edge on the top to use as a guide.
20231115_185524.jpg
Worked like a charm.
20231115_185951.jpg
Pretty clean cut that will clean up easily with a sander.
20231115_185959.jpg
Both sides are cut to length. Top is 5'6" in length. 36" wide. 3 1/2" thick.
20231115_191058.jpg
Heres my old bench. Ash board on the bench will be used for the base.
20231115_194129.jpg
 
Last edited:
  • Thread Starter Thread Starter
  • #86
I won't get much out of this board.
20231115_194135.webp
It has a couple pretty good cracks on one end and ant damage on the other.
20231115_194146.webp
 
Greg, I have a question I'm sure you have considered. Since you are making the top modular is there any concern that it may develop a warp? You had a gap develop in days which required you to joint the walnut again. Before getting to far down the road do you think counter top bolts might be a good idea? It would keep it locked together and still provide the ability to disassemble later.

DSC_0280_1_Cropped_1060x1060.webp
 
Greg, I have a question I'm sure you have considered. Since you are making the top modular is there any concern that it may develop a warp? You had a gap develop in days which required you to joint the walnut again. Before getting to far down the road do you think counter top bolts might be a good idea? It would keep it locked together and still provide the ability to disassemble later.

View attachment 249695
I was going to suggest all-thread but I'm sure that was considered already. Your idea would be easier.
 
  • Thread Starter Thread Starter
  • #90
Yeah those would work. I'm trying to keep the metal fastners to a minimum. The top will be like a table with breadboard ends, the only time the gap will be closed is the day I make it. After that seasonal changes will allow the top to expand and contract and I do expect the gaps to open back up, that's ok, it's not going to hurt anything or hinder it's workability. Think about it like this, a split top roubo has a gap.
 
Last edited:
  • Thread Starter Thread Starter
  • #91
One thing to keep in mind is that wood is always alive, it moves constantly. There is no way you are going to stop the movement of a 3 foot wide table this thick, it's gonna move. So embrace it, allow for it, accept it. If you don't it will tear itself apart, something is going to give somewhere. If not the top then in the base.
 
One thing to keep in mind is that wood is always alive, it moves constantly. There is no way you are going to stop the movement of a 3 foot wide table this thick, it's gonna move. So embrace it, allow for it, accept it. If you don't it will tear itself apart, something is going to give somewhere. If not the top then in the base.
My bench , I think is 24". Has a gap in one board for about a foot. First bench, about same size, no gaps, old growth Doug fir.
Mine is mortise and tenon,loose, with a screw in large hole with washer. Wood pegs hide the screws.. made that way so it can be taken apart.
 
And to add. My first bench was red oak and fir top. No allowance for movement. It was before I was aware of such things or I don't need no stinkin rules. Wood was old and long time dry. Bench has probably been down to 10 degrees and up to 90+
 
One thing to keep in mind is that wood is always alive, it moves constantly. There is no way you are going to stop the movement of a 3 foot wide table this thick, it's gonna move. So embrace it, allow for it, accept it. If you don't it will tear itself apart, something is going to give somewhere. If not the top then in the base.
Sounds good, I'm going to make one soon and my questions are for self educational purposes. I'm not thinking modular for mine so looking at it differently. Great build brother
 
  • Thread Starter Thread Starter
  • #97
Got some shop time today and I started processing some wood for the 6x6 legs. Some of it was drops from the long boards of the top.
Some 2x6 ash.
20231119_155835.jpg
Ripping the wane off some walnut to use as filler to get the thickness I want.
20231119_161208.jpg
Sawdust on the floor of my happy place.
20231119_165511.jpg
This should be enough stock for the 4 legs.
20231119_165522.jpg
Walnut filler wood.
20231119_165540.jpg
Most of this walnut has a lot of sapwood in it so this is a good way to use it. I find the sapwood to be quite hard as well so it's very usable for this project.
Next more jointing, planing, and gluing.
 
Last edited:
  • Thread Starter Thread Starter
  • #98
Got all the stock for the legs cut to length and jointed on 2 sides.
20231122_190107.webp
Ash stock.
20231122_192553.webp
Matched up all the walnut for like color and max thickness.
20231122_203402.webp
Got 1 in the clamps. Then I'll joint 2 sides again and run them through the planer.
20231122_203414.webp
Dumped the dust collector again. Scrap box is getting out of controll again.
20231122_203440.webp
It's really too bad all the ash is gone around here now, I really like working with it.
 
  • Thread Starter Thread Starter
  • #99
Well it's Thanksgiving day and the turkey is in the oven so off to the shop I went. When I was taking the first section of walnut for the legs out of the clamps I noticed that on of my clamps is broken, kind odd for a bessy clamp. It still seems to work ok. I must have dropped it on the foot and broken it. 20231123_112521.webp
Ran the first section of walnut through the jointer on 2 sides.
20231123_112650.webp
Next one is in the clamps. 2 to go for the walnut.
20231123_112656.webp
I started to think I'll be doing some sanding soon so I got the new dewalt quit vac installed under my outfeed table. I took the wheels off of it so it sits flat and wont move. Mounted the tool triggered switch too. I do need to get a longer and m ore flexible hose for it. I'll probably go with a rockler kit, I like those.
20231123_115421.webp
 
I’m thinking about the rockler kit as well. I am loving having my shop vac under the workbench and the remote switch
 
Back
Top