Finished this one this morning. Tried a new technique and learned something about milo on this one. The box itself is made from koa thins I got from Rob (
@rob3232 ). The lid is made from inlaying a mesquite thin I got from Jerry (
@Nubsnstubs ) into a rainbow poplar thin. Then I framed that in milo I got from Chris (
@Kalai ). The finish is a mix of satin wipe-on poly and just plain old paste wax.
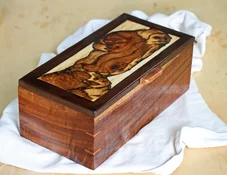
The new technique I tried involved inlaying the mesquite thin into the poplar. I posted a picture earlier when I started this process (
https://woodbarter.com/threads/what-did-you-do-in-your-shop-today.9770/page-615 ). I laid the mesquite on the poplar and traced around it with a sharp pencil. Then used an Exacto knife to carve a knife kerf along those pencil lines. Then I used my Dremel with a 1/16" spiral bit to trace that line, free hand. I set the depth to about 75% the thickness of the mesquite thin (around 0.125"). I used the same bit to widen that groove, especially around tight corners. That gave me a little leeway when I changed to a larger bit to carve out the inside. I used a 0.25" spiral bit in my trim router to remove all the inside poplar. Once I had the mesquite fit as best I could I epoxied it in place. First I applied some shellac on the poplar around the edge so the epoxy wouldn't soak in. I ran a bead of epoxy around the edge and spread a coat around the bottom and glued the mesquite in. After gluing the mesquite in, the epoxy around the edges of the inlay had flowed deeper into the inlay so I had to mix a little more epoxy and carefully dribble it into the low spots using a toothpick. Once that all dried, I used my belt sander to flatten it all out. I am happy with how that all worked out.
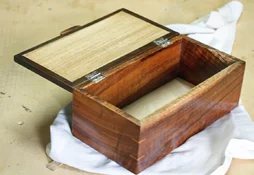
I built the box from the koa I got from Rob, the pieces determined the size of the box. Nothing fancy here, just beautiful wood.
Then I fit the lid to the box. I decided to use hinges. I also decided the lid needed a frame to look finished. I didn't have any koa long enough to frame the lid so I decided to use milo I got from Chris. Koa and milo both being from Hawaii. Anyway.... I cut the poplar / mesquite panel to size and framed it with a 0.75" milo strip. I initially tried to use wipe-on poly and quickly discovered that is wasn't setting up properly on the milo. I traded a couple messages with Chris and he confirmed that the problem is milo is oily wood that "doesn't like finishes". Since I'd already started with the wipe-on and it was fine on the mesquite and poplar, I tried a couple things. I tried to wipe down the milo with alcohol and then apply wipe-on. I also tried to apply a couple coats of shellac and then go to wipe-on. Neither worked very well. So ultimately I decided to just sand it all down to 600, maybe 800, can't remember now, and just paste wax it. It came out fine. But when I do make something from the rest of the milo board I got from Chris I'll not even try to finish it. It sands really smooth anyway so probably don't need a finish.
Thanks to Rob, Jerry and Chris for the beautiful wood.



